I'd like to wish everyone a festive Yule, a merry Christmas, a happy Hanukkah, a nice time with family, friends, warm food and cold drink, or even just a pleasant time at the end of a long, busy year (whatever your inclination might be).
For my own part, I'd like to thank those of you who have been following along with my ramblings and leaving comments on my updates! I hope this site has been helpful (ideally even informative, if I can swing that now and again) and I'm looking forwards here to a less eventful new year here and the opportunity to keep up with a hobby I love/loathe with ideally the opportunity to share more in the way of painting, modeling, sculpting and, time permitting, possibly even a tutorial or three.
I know I'd asked before what sorts of things people would like to see on here (sculpting/Green Stuff conversion, blending, and more to do with painting duly noted and not forgotten), but I figger I'll ask again: if there's anything at all related to working with fine scale miniatures or models that anyone would like to see posted in whatever amount of detail, by all means let me know! I'm keeping up with this because I enjoy sharing my work and in the hope that other folks are getting something out of it, too.
Cheers,
Bryan "Tinweasel" Wride

12/25/2009
Forge World Renegade Psyker [Update 12/24/2009]
I've been looking through some recent White Dwarf issues for inspiration to find a blue-grey color scheme that would complement the orange-yellow undertones of this guy's skin and bone, and lo and behold, I even found a recipe of sorts to sort of base things off of that I can tweak to match my Rogue Psyker's coloration more precisely.
My current progress (I'm trying to balance the image colors and brightness with this guy, 'cause he's all over the map, but I think this is fairly representative):


The colors on his front side in the "head view" pic are in semi-shadow in my light box when taking the close up picture, so bear that in mind. I also took a back view pic, since it shows off the color of the fatigues a bit better (he's leaning forwards, so I've got a lot of exaggerated shading on his legs and belt area from the front. I also was playing around with color on his backpack - if I could get feedback on how it looks so far (still unfinished, of course.)
So what do you guys think? I'd appreciate as much critique as anyone can dish out, since I think I'm a little rusty in the painting department and even more importantly, I'm using this as sort of a test figure for the planned color scheme of the rest of my Renegades and Heretics force - the main colors for my take on The Shriven will be the olive-brown drab fatigues and the "surgical green" that their CBRNe protective gear will be colored. (I already know he's a little glossy - that's on purpose, but it will be sorted out in the end.)
12/21/2009
Hobby Tip - Shaking Violently Being the Next Best Thing to Strangling

Anyone who's ever painted (miniatures or otherwise) has probably experienced the frustration of trying to mix a color that has separated. Certain paints are especially famous for this (yes, GW Foundation paints and P3 metallics, I'm looking squarely at you), but every color has a tendency to settle over time.
Without boring anyone to tears, hopefully, I'm going to explain a bit about why it happens and then offer a few suggestions on how to, if not prevent paint separation outright, then at least make mixing a little bit easier. Paint, for simplification's sake, is generally made up of three different elements: binder, carrier and pigment. The carrier is the primary liquid in most acrylic paints, and is responsible for the overall "flow" of your paint when wet - with most acrylics, the carrier is deionized water, whereas with solvent-based acrylics (such as Tamiya Acrylics) it's a general-purpose thinner (a variation of rubbing alcohol, perhaps) that serves essentially the same purpose. The remaining elements are the "solids" of the paint that are in suspension in the carrier; pigment being the coloration, and the binder being what "fixes" the pigment in place once dry and after the carrier and whatever other liquid elements in the paint have evaporated away. As you might guess, the pigment and binders are usually heavier than the carrier medium and over time tend to separate out, if only due to gravity and particle size. Another partial reason for "settling" might be due to evaporation of the carrier in paint pots that don't seal appropriately - that is, without enough carrier liquid to keep the other ingredients "afloat" in suspension, all the more solid elements of the paint will start to clump together and sink as separated-out "sediment."
With all that out of the way, here's a few ideas as to how to limit the amount of settling in your paints:
- Keep your pots stored upside down. Not only does this make the colors themselves more visible in the rack with just about every bottle design I've seen so far, but it causes the paint itself inside the jar to act as a "barrier" of sorts to limit the amount of air able to pass into the paint pot. Less air equals less evaporation of the carrier liquid inside the pot, and thus "thinner" (and easier to mix) paint. Any separation of paint elements will have the pigments and binders settling towards the lid of the pot, as well, which generally makes for easier re-mixing if you shake all your paints periodically to maintain "freshness."
- After every use (or thereabouts) add a little bit of liquid back into your paint pot - in most acrylic paints, this would be deionized water. For the sake of limiting impurities in your paints, you want to use water as physically pure as possible, especially if you live/paint in an area where there is hard water. Deionized would have the fewest impurities but be the most expensive, then on to distilled water, then purified water, and finally to tap water. The reason for adding in liquid? To replace whatever amount of carrier has evaporated or been otherwise lost, which, while not technically remixing your paint for you, essentially allows it to maintain a closer-to-new proportion of carrier (or a close enough substitute) in relation to the other paint elements and thereby making the paint less thick overall and easier to reconstitute.
- Last and maybe best, use an agitator of some sort inside your paint pot. Ideally you want something evenly shaped and small enough to move around freely inside the pot when shaken, made of an inert material so as to not chemically interact with the paint in any way, but still heavy enough to actually shift settled contents and stir things together again without having to break a wrist with the effort. I've seen mention on several forums of folks using various things as in-pot agitators, primarily leftover trimmed-down sprue but also items such as white metal clippings, BB's, or even stainless steel ball bearings. Personally, I've tried most of these and found them less than satisfying: the sprue wasn't heavy enough, the white metal awkwardly shaped and reacting (slightly) with the contents of the pot, BB's outright rusting from the core once their inert nickel plating wore down enough, and ball bearings being expensive unless bought in bulk - also a little hard to find. My solution? A trip to the local arts and crafts chain store (Michael's, in my case) to buy glass beads - I've found 6mm to be a good and fairly inexpensive size. If you go this route, I'd suggest that instead of buying loose glass beads from the beading/jewelery-making section where they are a little pricey for the amount you get, I simply bought a few on-sale faux pearl glass bead necklaces - twice the amount for about half the cost. (Thus far I've had the luck on several trips to pick up mine on sale - 65-count necklaces of 6mm round and durable glass beads for $1.50 US!) They're even reusable once you use up all the paint in a pot, responding just as well to paint stripping as your average white metal figure. I use glass beads as agitators for paints from Games Workshop (both the newer short style pot as well as the old canister-type), Vallejo, P3, and Tamiya, and also to keep my several baby food jars of different self-mixed thinners from thickening up.
12/20/2009
Nothing Lost, Nothing Gained
By Sethero:Competition deadline come and gone, and all of us in the house not feeling well this weekend. Mostly my son, who seems to have a stomach ache today or something going on that was prompting him to cry non-stop most of the morning. He's only had an hour and a half nap today, was crying went he finally fell asleep and is crying again now that he's woke up.
All finished entries must be submitted via PM to Sethero by Sunday, December 20th at 1900hrs GMT.
I made a little progress early this morning before everyone else woke up, but looks like life wasn't on my side for this one. Only about half done, assuming we're talking straight painting without anything fancy like pigment powders or a first stab at oils - I'd contemplated trying them with this guy, but I think he's looking weathered enough already.
Ah well, my first miniature in progress without having painted anything in about a year and I think he's coming along nicely... he's grossed out my wife, the nurse, who used to work in the Orthopedic Surgery unit at the hospital. (I must be doing something right, I think!)
Forge World Renegade Psyker WIP [Update 12/19/2009]

I was able to put in a decent amount of time today painting while my wife and daughter were out with her parents and my son was taking a good, solid nap due to not feeling well (of course, getting him to sleep took a while in itself.) Following this, it was off to a holiday get-together with my wife's parents and that side of the family. I had thought I'd not be able to paint any more and finish it before the closing deadline of the competition, but I suddenly realized a few hours ago that it was the 19th and not the 20th as I had thought. Maybe there's still hope...
Someone had asked elsewhere for a closeup of his face. Well, here it is - warts and all - now that everything's filled in and the details are actually visible. I'm somewhat stuck as to what color to paint his outer vest/jacket, and the eye lenses didn't turn out quite as vibrant as I had hoped. All the same, though, it's nice to be making progress on an excellent sculpt - been a pleasure to paint so far.
12/14/2009
Forge World Renegade Psyker WIP [Update 12/13/2009]
I've had a few hours here and there over the past few days to work a bit more on the Renegade Psyker - I have a somewhat "firm" deadline of sorts, since it's a figure that I'd like to enter into an informal painting competition (we're up to Mk. VII already!) currently running over at the Relicnews Painting & Modeling Forum and the final deadline for finished submissions is on the 20th.

I'm feeling like I'm more or less done with the skin tones, barring maybe a highlight touch-up here or there - definitely open to suggestion, though, as it's been a while since I last painted any flesh tones. I basically sat down and played with a bunch of different colors worked in, trying to accentuate things towards the face and arms with warmer colors and have details "recede" somewhat further down the chest and stomach with cooler colors worked in. All the little details inset into his flesh still need to be painted, as does his exposed skull - the "exploding concrete and dust" figure base is simply a basecoat and a wash or two of color at this point and needs some highlighting, if nothing else.
It all seems halfways decent to me, but then again, I was just happy to be painting. I'd definitely appreciate any comments or suggestions from other painters, since I don't really have anyone (other than a few people at the GW shop) who are physically available to "honestly and critically" review my work - it's always been that way, though. (My wife's not a big fan of the hobby, especially any figures that are inclined towards the "Nurgle" end of the scale...)
12/06/2009
Forge World Renegade Psyker WIP [Update 12/6/2009]
Well, this would mark the first time I've painted in just about a year - I kinda packed it in in December of '08 to get things ready for the birth of our son, who was due (and born) in February of '09. I suppose this next pic is rather a significant event, from that standpoint:

The base's basecoat was actually the other night, but everything else was painted in a few hours this morning, including tidying up my work space in the basement. I guess right now could be considered by most to match what essentially amounts to a base color, no highlighting, with the skin tones and exposed bone going to be shaded in from here. (That's not actually how I painted him thus far, but that's neither here nor there... unless anyone really wants details.)
I wouldn't mind any feedback since, again, it's been a little while since I've picked up a brush. (I've done quite a lot of assembly and conversion over the past year, and even was working on a conversion 'n' painting commission piece before the customer disappeared - nothing's ever quite made it to the painting stage, though. This guy is for an informal painting competition, and I think I'll maybe be able to finish by the deadline, barring anything cropping up.
12/01/2009
Blood Flows Red on the Highway
Well, this marks a momentous occasion: my first-ever Warhammer 40K vehicle is starting to resemble something vaguely like a Rhino after being broken down, mixed in with some other parts, and cobbled back together. (In truth, this is also the first "plastic vehicle model" I've ever built where I had a clue as to what I was doing - the first was a shoddily-assembled and even worse-painted model of the large ship from Disney's "The Black Hole" when I was maybe 8 years old). This Rhino is to be the transport for my Undivided Chaos Lord and his crazed Berzerker retinue as they race across the battlefield to close with the enemy - I'm wanting it decorated up a bit, but not so much that it screams "Something important in here, please shoot me!" especially given that there should be at least one other vehicle on the field, if not more:

The final product is going to (ideally) look like a Mk.I that has over time "evolved" and/or "converted" into somewhat of a quasi Mk. II Rhino with some general stuff missing, out of place, or mutated. I got the Chaos Space Marine Battleforce Box when the latest Chaos Codex came out and the parts for this were in it - now, several years later, I'm having fun "kit-bashing."
I have somewhat of a dilemma, though: other than Mk. I-reminiscent panels on the sides and open spaces on the top, I'd like to put some sort of decorative pattern or something. I had considered two bands of multiple inset skulls, one each running up the front angle over the tracks, past the exhaust pipes, and then down the back angle - there's several problems with this, one being that the pintle-mount cupola occupies half that top space; another is what to do at, say, the halfway mark, where in order for the skulls not to look awkward on the trip back down the rear angle over the tracks, I'd have to do a 180° rotation. Next up would be some sort of hammered metal banding pattern - same thing in that half of one would need to be thinned on the top, or not include one of the bands entirely; last but not least, I could forgo all that, do all the paneling similar to a Mk. I, and have a replica of sorts of my Warband's insignia patterned around the three circular shapes and then creatively in the vaguely open area - something like this:

(except smaller)
So far as the overall look - the new Vindicator revisions had just came out around the time of the latest Chaos Space Marines Codex (or thereabouts) when I got my Rhino w/ the CSM Battleforce and I liked the chunky-style busy-looking top of the Vindi much better than the plain ol' Rhino top. So here it is quite a few years later and I decided to make my own chunky, Vindicator-esque Rhino like I had decided on way back then - after quite a lot of cutting, gluing, and trimming, things are starting to come together but I'm expecting to put a lot more detail on it.
Some extra spiky detailing is going to be added in when I sculpt some growths/horns around the exhaust pipes/engine columns to protect them, and some, um, mutated texture/spines here and there around the body of the thing. Don't know what color I'll paint the more organic areas, but from an experiment with the Games Day figure of two years ago in starting an Ultramarine scheme, I know an excellent way of having the paint flake away from the "different" spots. I was also thinking barbed wire strung around the perimeter of the roof to prevent people from climbing up on top - a la the tanker truck from The Road Warrior. Dunno, though.
I don't necessarily want to peg this Rhino as my Chaos Lord and Berserker retinue's transport so it turns into an automatic fire magnet, so I don't want to make it too ostentatious. The filigree would be a good idea if I had a lot of time, but since this is theoretically my "Snow theme" competition entry, I'd like to finish the modeling and get on to the color "soonish." For filigree, ([I]maybe[/I]) painted on effects would be doable time-wise, but even using fine powder and thinned glue to make raised pattern lines, that'd take forever to apply.
I have to take another look at the skull panels from one of the newer Imperial Administratum building sets I bought - a lot of good stuff for ruins there, outside of things to add to this Rhino. I don't even know if I'd be able to saw it evenly into straight sections unless by pyrogravure and marked everything out ahead, and then undercut any overhanging bone outlines over the borders to have it look proper.
I'm probably leaning towards a hammered metal look (ball peen hammer divots, say), but it depends how things come together. Right now I have the ammo cans cut for the forward default twin bolter so it will sit lower but need to figure out how to merge them into the guns so as to not look forced. I'm having the default twin bolter listed as standard to a Chaos Rhino mounted to the cupola next to the driver's port w/ a 360° traverse, and the pintle-mounted one separate on the roof at the back.
I've decided that my vehicles are going to be crewed by The Shriven, so I can get some practice in modeling and painting them as magnetized add-ons prior to going whole hog with the full army list some time in the future.

The final product is going to (ideally) look like a Mk.I that has over time "evolved" and/or "converted" into somewhat of a quasi Mk. II Rhino with some general stuff missing, out of place, or mutated. I got the Chaos Space Marine Battleforce Box when the latest Chaos Codex came out and the parts for this were in it - now, several years later, I'm having fun "kit-bashing."
I have somewhat of a dilemma, though: other than Mk. I-reminiscent panels on the sides and open spaces on the top, I'd like to put some sort of decorative pattern or something. I had considered two bands of multiple inset skulls, one each running up the front angle over the tracks, past the exhaust pipes, and then down the back angle - there's several problems with this, one being that the pintle-mount cupola occupies half that top space; another is what to do at, say, the halfway mark, where in order for the skulls not to look awkward on the trip back down the rear angle over the tracks, I'd have to do a 180° rotation. Next up would be some sort of hammered metal banding pattern - same thing in that half of one would need to be thinned on the top, or not include one of the bands entirely; last but not least, I could forgo all that, do all the paneling similar to a Mk. I, and have a replica of sorts of my Warband's insignia patterned around the three circular shapes and then creatively in the vaguely open area - something like this:
(except smaller)
So far as the overall look - the new Vindicator revisions had just came out around the time of the latest Chaos Space Marines Codex (or thereabouts) when I got my Rhino w/ the CSM Battleforce and I liked the chunky-style busy-looking top of the Vindi much better than the plain ol' Rhino top. So here it is quite a few years later and I decided to make my own chunky, Vindicator-esque Rhino like I had decided on way back then - after quite a lot of cutting, gluing, and trimming, things are starting to come together but I'm expecting to put a lot more detail on it.
Some extra spiky detailing is going to be added in when I sculpt some growths/horns around the exhaust pipes/engine columns to protect them, and some, um, mutated texture/spines here and there around the body of the thing. Don't know what color I'll paint the more organic areas, but from an experiment with the Games Day figure of two years ago in starting an Ultramarine scheme, I know an excellent way of having the paint flake away from the "different" spots. I was also thinking barbed wire strung around the perimeter of the roof to prevent people from climbing up on top - a la the tanker truck from The Road Warrior. Dunno, though.
I don't necessarily want to peg this Rhino as my Chaos Lord and Berserker retinue's transport so it turns into an automatic fire magnet, so I don't want to make it too ostentatious. The filigree would be a good idea if I had a lot of time, but since this is theoretically my "Snow theme" competition entry, I'd like to finish the modeling and get on to the color "soonish." For filigree, ([I]maybe[/I]) painted on effects would be doable time-wise, but even using fine powder and thinned glue to make raised pattern lines, that'd take forever to apply.
I have to take another look at the skull panels from one of the newer Imperial Administratum building sets I bought - a lot of good stuff for ruins there, outside of things to add to this Rhino. I don't even know if I'd be able to saw it evenly into straight sections unless by pyrogravure and marked everything out ahead, and then undercut any overhanging bone outlines over the borders to have it look proper.
I'm probably leaning towards a hammered metal look (ball peen hammer divots, say), but it depends how things come together. Right now I have the ammo cans cut for the forward default twin bolter so it will sit lower but need to figure out how to merge them into the guns so as to not look forced. I'm having the default twin bolter listed as standard to a Chaos Rhino mounted to the cupola next to the driver's port w/ a 360° traverse, and the pintle-mounted one separate on the roof at the back.
I've decided that my vehicles are going to be crewed by The Shriven, so I can get some practice in modeling and painting them as magnetized add-ons prior to going whole hog with the full army list some time in the future.
11/25/2009
#hobbytiptuesday - Windex
Nothing but a simple, straightforward tip here - it's late, I'm tired, and I've not made any entries in a while since I've been working behind-the-scenes on converting a Rhino for my Disciples of the Four army's Chaos Lord and his Berzerker retinue: specifically, a Mk. II Rhino reworked to look like an upgraded Mk. I Rhino with added "bling." (I'm getting near the point where it's publicly presentable, I think, if not completely finished. Watch this space for updates "soonish!")
Today's tip is essentially this: if you use a palette of any sort, whether it be a cheap white ceramic tile or an 8 well "daisy"-style plastic watercolor one, I've found that spraying it down with ol' classic blue Windex and letting it sit for a little while (say, 15 minutes or so) is great for making cleanup a lot quicker and easier. After squirting down the palette with Windex and letting it soak, the paint generally sloughs right off, especially when ran under warm or hot water.
I don't know if it's the ammonia or the fact that Windex is also designed as a surfactant to make cleaning glass (and countertops!) easier, but I find it works great on palettes. On a related note, I find it also works excellently for sloughing dried paint off of the 1mL medication dispensing syringes I use for mixing and dispensing my paints and thinners - I seem to be in the minority, though, when it comes to using syringes or similar tools for precise measurement when I'm painting.
Note: unlike Simple Green, which I would recommend to anyone for stripping paint from white metal or plastic figures and models with a minimum of effort and no damage to the figures at all, I wouldn't say the same about Windex. While the palettes and graduated syringes I use are plastic, they are "industrial" grade plastic and not molded polystyrene like most of my current figures - although I've not tested it for stripping paint, I have the sneaking suspicion that Windex might be a bit harsh on polystyrene, much like Pine Sol.
11/12/2009
The Disciples of the Four and The Shriven (It's All Dan Abnett's Fault)
Here's something a little different that's not specifically about painting and modeling! Although I've taken a few stabs at trying to crank out an army for 40K in the past, most of which are now relegated to work-in-progress status and many of those linked to in the Gallery of my painting website, I haven't really had any fully realized army lists or troop rosters in mind to work towards - more often just vague half-formed plans. With the goal of keeping myself on track (as well as possibly getting feedback on the validity/combat-worthiness of my forces), I've been busy the past few weeks in spare moments trying to narrow down selections for two completely different army lists for forces I'd like to field in the hopefully near future - one is fairly straightforward from the current Games Workshop Chaos Space Marines Codex and the other has been planned out more from a modeling, conversion, and back story standpoint over the past several years and just lately been pigeonholed into one of the army lists from Forge World's three Siege of Vraks Imperial Armour books. The more convoluted army list of the two is now a Nurgle-biased force using the Renegades and Heretics list out of Imperial Armour Vol. VII, and is serving as my starting point for representing a force of The Shriven as taken from Dan Abnett's First and Only novel in the Gaunt's Ghosts series - for anyone who's already read in past entries about my unwholesome fascination with them as described in the book, I apologize in advance.
Bear in mind that I hardly have any tabletop 40K play experience under my belt as I've consistently been more of a painter and converter than a gamer since getting back into the hobby about 4 years ago, but I'm looking to make a serious attempt at planning, assembling and painting up a few small armies (500 points or so each) with several goals in mind: 1) I'd like to actually play 40K for once with a fully painted and game-legal army of my own, 2) I want to complete a starting force of Chaos Space Marines in a loose, non-Legion-specific Warband of my own design for the sake of getting something playable "soonish" while still allowing for some conversion and variety in painting, and 3) I'd like to finally be able to put a force on the table as allies of my CSM Warband so as to represent remnants of The Shriven from First and Only - an army composed of the former workers, administrators, disciplinarians, and leftover general populace of the Forge World of Fortis Binary who were corrupted by Chaos, went rogue, and overtook the planet itself.
My first army list has been easier to wrap my head around, as I'm more familiar with the Chaos Space Marine Codex, their troop types, and the overall concept of how the Chaos Marines theoretically handle themselves on the tabletop. This first list represents a smallish beginning force of troops from my self-designed Warband, The Disciples of the Four, that I've been kicking around ideas for in my head ever since Games Workshop released the latest CSM Codex:
=HQ=
Undivided Chaos Lord
- Daemon Weapon
- Combi-melta
140 pts.
=Troops=
5 Khorne Berzerkers (w/ Chaos Lord attached to these guys in game-play)
- Skull Champion
-- Power Fist
Rhino w/ pintle-mount twin bolter
185 pts.
8 Chaos Marines
- Icon of Chaos Glory
- Meltagun
Rhino
175 pts.
Total: 500 pts.
In terms of a back story, The Disciples of the Four are an extra-zealous splinter group from the post-Heresy Word Bearers Legion, some time after the Legion's retreat to the Eye of Terror. Essentially, the originators of The Disciples split away from the Word Bearers Legion due to a difference in ideology: they felt their former comrades were somewhat lacking in "enthusiasm" - outside of converting whole populaces to worship of the Chaos Powers, building unholy monuments that stretch up into the stratosphere, and dogmatically enforcing their religious will on the conquered, they felt that the Word Bearers Legion's somewhat "distanced" spiritual approach didn't go nearly far enough. The Disciples of the Four want to demonstrate the might and the glory of the Gods of Chaos to the rest of the galaxy physically as well as from a "spiritual" standpoint. My Warband essentially will be marked with rampant mutation and corruption of the body and soul (from a "sane" 40K perspective) as a sign of their devotion to the Fell Powers, and the higher one progresses in the overall hierarchy within The Disciples, the more marked and favored they will be by the 4 Chaos Gods (read: rife with physical perversion and deviation from the semblance of their former appearance).
I'm keeping with an Undivided belief approach in the Warband's adoration of the Chaos Powers (ideally for the most variety in painting, conversion and gameplay), and from a "fluff" standpoint, so long as any potential new members or allies likewise show complete devotion to the Ruinous Powers (both spiritual and corporeal), then The Disciples of the Four would be accepting of whoever (or whatever) wishes to join up with them in their efforts. I more or less adopted this "theme" for the sake of not getting stagnant or bored painting-wise, meaning I'll be able to incorporate Games Workshop's canonical Chaos Marine Legions' color schemes and styles of appearance that I've always liked directly into my force as well as (suitably corrupted) Loyalist Marine Chapter paint schemes and insignia; so long as I maintain certain specific elements from figure to figure such as iconography or particular armor panels in set colors, I'm thinking things won't look too motley.
My second army list is a first stab at getting some models on the tabletop so as to represent a playable force of The Shriven - I have no experience whatsoever playing Imperial Guard or even against IG, so this is more an attempt to combine the ideas I want to get across with something that will hopefully be effective in-game. Compared to my planned Chaos Marine force, I'm expecting more or less every figure of my Shriven army to be converted from original base models/parts in some way - in other words I'm planning to get my Disciples of the Four troops painted up to a reasonable standard using whatever shortcuts and repetitive batch painting I can tolerate, so as to be able to actually play a game with my own figures, while The Shriven troops will be a bit more involved in creation and can be worked on in the background. So far as a back story goes in terms of their alliance with my Warband, they're intended to be leftovers of The Shriven forces in First and Only after the involvement by Gaunt's Ghosts on the Forge World of Fortis Binary. In the book (without ruining a great read) they are allied with the Iron Warriors and have a leaning towards long range bombardment, trench fighting, self-mutilation (former work-related protective gear sewn directly into their flesh, for example) and the use of, um, poisonous chemicals and daemonic rituals. Here's my planned army list for The Shriven as a separate small force to complement my initial Chaos Space Marine troops:
=HQ=
Renegade Company Command Platoon
Company Command Squad (more or less comparable to the Troop Platoon Command Squad from the newest GW Imperial Guard Codex)
1 Champion, 4 Renegades
(Champion has laspistol/CC weapon, 2 have lasguns, 2 have autoguns)
- Vox-caster
- Chaos banner
Mortar Squad (part of Platoon)
3 Heavy Weapons teams
- Lasgun & mortar each team
- Chemical shells (poisoning of bombardment targets on a 2+, and Marine-killing AP)
125 pts.
Apostate Preacher of Nurgle (comparable to the Ministorum Priest from the latest IG Codex)
- Bolt Pistol
- Eviscerator
67 pts.
=Elites=
5 Plague Marines (same as in the GW Chaos Space Marine Codex)
- Plasma Gun
130 pts.
=Troops=
Mutant Rabble (more or less comparable to a squad of IG Conscripts, and will have the Preacher attached in game-play)
20 Mutants
- 2 Flamers
92 pts.
Mutant Rabble
20 Mutants
- Flamer
86 pts.
Total: 500 pts.
Given the unfolding of the story in First and Only, this force represents The Shriven "in exile" finding a welcome home as allies amongst The Disciples of the Four, as well as a following of mutants and degenerates trailing in their wake as The Shriven recouped their numbers and sought refuge on a number of worlds following an abrupt separation from their previous "protectors." I'm blaming the current lack of tanks and other fun means of mass slaughter on my difficulty in cramming heavy armor and warm bodies into the same 500 point army list, but I could also say that in their departure from Fortis Binary they were forced to leave a majority of their heavy guns behind but still have a leaning towards trench warfare tactics, heavy fire support. and long-range bombardment as learned from their time with the Iron Warriors.
Feedback on either the army lists or my "fluff" for them would be greatly appreciated, as I'm pretty much a newbie when it comes to army building and actual gaming in 40K - I haven't even played anything in 5th Edition, for example, outside of a single brief run with 500 points' worth of unpainted and borrowed Orks when the Assault on Black Reach set first came out. For anyone interested, I've had a running work-in-progress thread over on the RelicNews Painting & Modeling Forum with both my work on The Shriven and (moreso) the Disciples of the Four for quite a while now. (Barring a few in-progress projects in what free time I have, my planned focus in the near future will ideally be on getting the troops for both these army lists assembled, playable and painted!)
As an aside, it's nice to see I'm not the only one who has similar opinions about modeling, painting, army building and (eventually) playing using Forge World models and rules as a main focus of an army. Ron over at From the Warp made a post about this regarding his Deathwing Space Marine army: From the Warp: Using Forge World stuff
11/09/2009
Hobby Tip - Cyanoacrylate Gluing
This Hobby Tip entry is specifically regarding cyanoacrylate (or CA) glue, one of the more important tools in assembling figures and vehicles. CA glue is unique in that it requires no heat or pressure to bond - it reacts with moisture in its surroundings in order to polymerize (solidify) and will join together anything it is in contact with as a byproduct of its polymerization process. Cyanoacrylate glue has a number of advantages: it sets itself even in an airless environment, it is able to join together different material types since its setting process is more or less "self-sufficient," and the glue itself creates a reasonably strong bond if spread on properly prepared (slightly roughed-up) join surfaces. As a result of using moisture as the main catalyst in its chemical reaction, cyanoacrylate glue is brittle when fully dried as compared to other glues. Another failing is that due to its brittleness, CA glue bonds themselves can "shatter" much easier compared to those of glues that maintain a certain amount of flexibility, like two-part epoxies.
I've found through trial and error (generally a lot of error) that it is most often a waste to buy a large size bottle of the stuff. Despite various methods to try and keep the stuff from clogging or generally building up to the point where the bottle becomes useless, it invariably seems to happen. I've tried using wood nails/push pins in the top to seal the bottle (inert metal vs. directly stuck cap), wiping off the bottle and slapping the lid on tight as quick as possible (limiting amount of air), transferring the stuff into a smaller precision-drip bottle (despite a metal drip tube this time, it still clogged and wouldn't clean out despite all kinds of tricks), and even experimenting with all different consistencies of CA glue (super thin vs. medium viscosity vs. gel) to try and find one that would "last" longer - I think you get the idea. My advice would be to buy the smallest bottle you can (generally the cheapest, anyhow) and that way you'll have less go to waste. I no longer buy larger repackaged bottles from hobby stores, or even specialty hobby brands like Zap-A-Gap, since they all come in larger containers and are all essentially the same thing - pure cyanoacrylate glue.
In terms of usage, the gel variety (Krazy Glue Craft Gel, "Gap Filling Formula" Zap-A-Gap) has a longer set time (30-60 seconds) and is good if you need to position a part before the glue hardens it in place - another fringe benefit for assembling models or figures is that the gel variety also fills minor gaps due to the thicker consistency. Super thin CA glue is great for narrow spaces and has a quick set time (5-10 seconds, usually) - it makes the best use of precision applicators and allows capillary action to "draw" itself into narrow crevices due to the surface tension of the liquid CA glue (in other words, if applied to a narrow crack between two close-fitting held-together parts, it will creep in between the parts and join them in a very short time frame. Medium viscosity CA glue behaves, well, somewhere in the middle.
A lot of people use CA bond time accelerators or "zip kickers" - now while I've never personally bought them, I've likewise never had reason to. The idea behind a CA accelerator is that it essentially serves as a catalyst for the glue's "chemical reaction" - in other words, it increases the amount of moisture in contact with the glue so that it sets quicker. As I mentioned at the start, the key feature of CA glue is that it responds extremely well to moisture of any kind - unsurprisingly enough, even a drop or two of plain water will cause your CA glue to "kick off" immediately when compared to allowing CA glue to draw moisture from the to-be-glued parts and ambient humidity. Even breathing on setting CA glue has much the same effect (with the down side of potential inhalation of glue fumes), while using a hair dryer on parts glued with CA adds funneled air moisture via the directed blower as well as a quicker evaporation rate. You can likewise add a great number of materials to CA glue besides water that have a high "moisture" content and a fast evaporation rate in order to speed up the glue's chemical reaction: acetone, mineral spirits, rubbing alcohol, Tenax 7-R, thin viscosity plastic (polystyrene) cement, and even Green Stuff (AKA Kneadatite) - you'll find that the CA glue sets up much quicker, almost instantly in some cases. The greater the added moisture coupled with a quicker evaporation, the faster the setting time. (Again, I've never bought a "name brand" CA glue bond time accelerator - but I've used plenty "off-brand" kinds!) A few notes on this subject: a lot of chemicals are almost as toxic on inhalation as the glue fumes itself, so be careful, and using some sort of "zip kicker" versus allowing it to "naturally" set results in a weaker join - a forced reaction means less opportunity to spread or establish stronger polymer bonds.
One thing about CA glue to always keep in mind, is that even though it make have set visibly and bonded parts together physically it is by no means "dry" (although technically this is true about most substances that start out "wet," like paint or even spray primer.) It continues to give off fumes until completely evaporated and these fumes are lighter than air. If you have CA glue inside a sealed container (like a glued-on enclosed canopy or glue-fastened vehicle cockpit, for example), fumes from the drying CA glue will interact with ambient humidity inside the container and you will end up with a hazy coating everywhere that the fumes have spread - great for "tinted glass" effects, but not so good for a clear plastic window. Like it says on the bottle labels, always use CA glue in an open, well-ventilated space: I'd suggest that when allowing CA-glued parts to dry, you should lay them or prop them up so that the fumes have somewhere to vent away other than inside your model.
In a roundabout way, this brings me back to the problem of preventing clogged glue bottles. The reason they clog or get their lids glued on solidly is the "reacts with moisture" part - after you put the glue bottle cap on, the glue solidifies as it reacts with ambient moisture drawn into the mouth of the glue bottle as well as any moisture on the outside of the bottle opening or inside the cap itself. You're essentially putting a self-sealing cork on your glue bottle if there's any glue in the opening whatsoever, and it will happily adhere the moisture-laden bottle cap to the moisture-laden bottle mouth if you let it - I speak from experience here.
Here are several methods to minimize your CA glue bottles "clogging" themselves and becoming unusable as a result:
- Make sure to wipe any excess glue off the opening of the bottle, in order to minimize the amount of chemical bonding after you put the cap on.
- Use bottles with a smaller opening, or better yet, smaller bottles outright - the smaller the opening and the smaller the amount of glue left behind to react, the easier it will be to break the seal the next time around.
- Accept that the glue will eventually seal its bottle shut, buy bottles with long "spouts," and simply snip off the blocked end whenever it happens.
- Coat the open end of your glue bottle before putting the lid on with something that A) does not carry moisture and B) will help to protect the glue inside from additional moisture - smearing a little bit of petroleum jelly (Vaseline) on the mouth of your glue bottle will keep it usable much longer and help to prevent clogs.
11/03/2009
* KABOOOM* Forge World Renegade Psyker WIP [Update 11/2/2009]
I'm turning my attention back to my Forge World Renegade Psyker as an entry in a friendly painting competition over on the RelicNews Painting & Modeling Forum that's going to be starting up on Oct 15th, and essentially my next step now would be getting under way with painting. He's standing on a trimmed-down Secret Weapon Miniatures "Urban Ruins" resin pre-cast mounted atop a Games Workshop slottabase, which is primarily cracked and pitted concrete in appearance but with a little extra surface grit that I added in parts. This particular base seemed a perfect fit to my vision of the figure's overall appearance, since by offsetting the resin pre-cast piece on top of the slottabase and pinning the Psyker to the slightly raised back portion of the resin pre-cast base allowed me to "play up" the fractured concrete at the Psyker's feet. I further converted the overall figure basing to ideally show him in the process of using a "psychic power," as he's thrown back his gas mask and is clutching his head in apparent anguish - kinda hard to tell, though, since the sculpt of the figure is such that his "face" is stripped down to the bare skull with augmetic eyes and a breathing system.
At face value, it doesn't make any sense to me that a Renegade Psyker would be sent out to fight an Imperial reclamation force as a living weapon but is having a hard time preventing his own head from exploding. It seemed to me that a better visual effect overall would be to give the Psyker an external demonstration of him actively using a "psychic power."
Since the "Urban Ruins" resin pre-cast was a perfect layout allowing me to have him standing on pitted concrete with increasing damage in an outward direction in front and away from him, I decided to add an effect of what hopefully looks like chunks of shattered concrete exploding outwards in front of him (and a buckled and torn part of a Rhino hatch in the mix, just for fun with color and texture):


Unfortunately, my client for the Thousand Sons Chaos Lord commission I've been working on in my "spare time" the past few months apparently "disappeared off the face of the Earth" and I've had no luck in attempts to make contact. I'm taking a break in work on that piece - likely to be auctioned off when finished - in order to paint up the Renegade Psyker for the competition at the Painting & Modeling Forum. I put painting the Psyker on hold a while back in order to work on the Thousand Sons Lord commission - the Psyker suffered some slight damage to the previously-finished basing in the down time (probably our cats and getting jostled around since I need to reorganize my painting area) and I just patched him back up today.
I've no idea how the Psyker will turn out appearance-wise except for a few vague color ideas: ideally I'll be trying an airbrush that I got for my birthday in August (using paint for the first time) at some point with him, even if it's just blocking out areas of plain color; he's theoretically going to be a test of a workable color scheme for a Renegades & Heretics force aligned with multiple Chaos Powers (I had a definite color scheme in mind that I was set to use back in 2007 when I first concocted having a Renegade force under the Lost and the Damned rules, but those were more generic troops than the FW Siege of Vraks army list I'm using now); and lastly, and maybe most importantly - I haven't painted anything at all since December 2008! (It's been quite the year.)
Comments/suggestions appreciated, as always!
10/30/2009
Getting back to business!
Note: this is not an apology, it is a combination public service announcement and self-motivational tool.
Since our daughter started 1st Grade in the beginning of September, she has been sick several times and has shared that "wealth" with the rest of the family - I've no doubt we've had our own stuff and passed some on to her, but c'est la vie. Her 7-month-old brother has caught more or less everything that she has had. At one point in the past several months, the both of them had dual ear infections at the same time. My wife (in addition to being sick w/ colds and respiratory infections several times) found out that she had an abdominal hernia, likely dating back to when we had our son in February and due to a respiratory infection for several months around the time she delivered him by C-section, had complications due to her racking cough including tearing her incision - is it any wonder her abdominal muscles didn't quite heal properly (hence the hernia)? She had surgery about 2 1/2 weeks back now, is recovering nicely, and has all her innards stuffed back in their appropriate locations - morbid bastard that I am, I was having visions of Father Nurgle's Plaguebearers with intestines dangling out (thankfully didn't come true in her case) when describing her abdominal hernia to people.
Myself, I've had several colds and respiratory infections along with everyone else - hey, why not - and am in the process of slowly getting over what feels like an ear infection on one side and has had most of the symptoms of an ear infection, but technically "isn't" at least according to two different ENT doctors. On the neat-o side of things, I got to have a CAT scan of my head to see what's going on internally - I've never had anything like that done before, barring an X-ray of a dislocated and broken "pinkie" toe a year or so ago, but that's not quite the same thing (and besides, I kinda figgered my toe was dislocated and broken, having straightened it back in place from being bent sideways). I'm still waiting on the scan results from earlier this week, and aside from a treatable cause of my "unusual ear pain," I'm hoping they also show the hamster inside my skull still hard at work busily spinning his wheel.
All this is not really why I'm making an entry here - no, the reason I'm making an entry is to publicly advertise my intention (now that things have hopefully started settling down a bit life-wise) to get back on track with more regular updates and such here to make this painting/modeling site worth reading. To that end, here's a few works-in-progress that ideally will be showing here in future updates:
- The Thousand Sons Chaos Lord of Tzeentch I made an entry about several months ago is nearing completion of the conversion work, but the commissioning client seems to have vanished! Not naming names, he was working at the Games Workshop Hobby Center I generally go to, but is no longer there - I never received my usual down-payment of the final fee (never asked, in truth) because I was able to get ahold of him fairly easily to go over ideas and make sure we were on the same page so far as the conversion and painting work to be done. Well, I put work on the figure on hold and sent the client an email to find out his intentions - my only other means of contacting him. At this point there's been no response by the requested "deadline" per my email to the client and I have no other reasonable way of getting ahold of him (I think hiring a private investigator would be a bit much ). All he's out financially is the base figure and a few conversion pieces, whereas I've sunk enough time and effort into this figure at this point that I'm going to finish this Thousand Sons Chaos Lord how I envisioned him - and then ideally he will be going up for sale or possible eBay auction.
- The Forge World Renegade Psyker I have prepped, re-based and primed will finally be getting painted - ideally in a "test" color scheme for a Renegades and Heretics force allied with my Chaos Warband (The Disciples of the Four). I don't believe I've actually mentioned this yet, but the sole reason for my "going over to the side of Chaos" was Dan Abnett's descriptions of The Shriven - an army composed of workers and military support personnel of a Forge World "gone bad" - in his Gaunt's Ghosts series novel, "First and Only."
I picked up the first Gaunt's Ghosts Omnibus in 2007 at the Black Library section at my first-ever Games Workshop Games Day while I stood in line to talk to Mr. Abnett, who was the guest author in Chicago that year. I'll repeat here more or less what I told him when I finally got up to the front of the line where he was chatting and signing: "I'm not going to say I'm your biggest fan, because it would be a bold-faced lie. I grabbed this book more for something to read through while I waited in line to talk to you and I've never read anything else you've written before. l will say this, though: in just going through the first few chapters here, I have to say you've got a hell of a great writing style and I've found myself completely drawn in and wanting to read more. Your descriptions are excellent and I can picture everything in my head, and the characterization and dialogue are very well-written. I'm really looking forwards to reading more by you." Well, ten or so of Dan's books on my bookshelf in and a metric crap-ton of unassembled GW Chaos miniatures in the basement later, and the sentiment still stands. I started working on a force of The Shriven shortly after getting back from Games Day, had a slight change of direction following the release of the Chaos Space Marines Codex and the "fading out" of support for The Lost and the Damned, and then got completely sidetracked with other "new and shiny" stuff since then.
Things have come full circle - the three Siege of Vraks books from Forge World have re-ignited my motivation to have a combined Renegade and Chaos Marine force, and all the ideas kicking around since July of '07 are gnawing their way out of my head in new and more simplified ways. Oh, and if anyone happens to talk to Mr. Abnett - myself and a few unwholesome-looking individuals in body armor with green rubberized industrial protective equipment sewn into their flesh would like to have a word with him and bandy some ideas about. - Progress on a 500+ point force of Bad Moons Orks in a "speed painted" scheme, ideally with a step-by-step painting piece or two. I blame the Assault on Black Reach set and some generous bitz-donating souls for these guys.
- Progress on a 500+ point force of converted Necrons tainted by millenia of slumber on a Tomb World in the general vicinity near where the Eye of Terror eventually opened up. They've spent their thousands upon thousands of years of dormancy basking in ambient output from one of the largest breaches by The Warp into real space. As a result, while they aren't servants of Chaos since they essentially have no mortal souls to be corrupted, their physical forms for the most part just "aren't quite right" due to the transmuting effects of Warp energy on material objects.
After a "failed first attempt" at painting a Tau army to tabletop standards (I only ever finished a squad's worth - but they did get published on the Games Workshop US website as Honorable Mentions from the 2007 Chicago Golden Demons, so that's consolation) and abandonment of a plain ol' Ultramarines starter force from the Battle for Macragge set (blame Dan Abnett, as mentioned above), I set my sights on painting up some Necrons just for the sake of playing the game (hey, Necrons are easy to paint, right?) I even took shortcuts to speed things along (using spray paint as a base coat color, washes for shading, and simple edge highlights), but then my imagination kicked in after the first 3-4 Warriors and they started not to look so... regimented any more. - A number of single-figure display-quality figures that right now are sitting lonely in boxes and blister packs near my painting desk in our basement.
- Heck, maybe even some of the several hundred old school Grenadier and Ral Partha figures that have been stowed away in drawers and boxes since I took a break from (or got sidetracked from) miniature painting when I first went away to college almost 17 years ago now.
10/10/2009
Weathering Reference Photos
Last Friday on the way home from work at a new position in downtown Detroit, I figured I'd take my time driving and snap some photos of examples of environmental weathering, paint chipping, collapsed buildings, fire-damaged structures, and some unfortunate examples of "urban decay." I've had a number of jobs around Detroit over the years and have seen a lot of sights similar to the images further down - while I can't say it's not somewhat saddening, I also think these images make for good reference pictures for modeling different weathering/environmental effects. I added a few more pictures to the lot en route to other destinations this week, but essentially they are all in relative time/place order if one were to follow a slightly wandering path.
Just for information's sake, I don't generally pick up a camera to go and shoot images of "urban decay" as a matter of course. Our cell phone plan allowed us to upgrade to Blackberry phones, and this initially began as me testing out the surprisingly good built-in camera after taking a detour past a major backup on the I-75 expressway. Another reason I went through areas I've been through many times before taking reference pictures of this kind of stuff is that I plan on replicating similar environmental effects as a basing theme of sorts for any figures I finish on several small 40K "armies" currently in progress.
While there's a lot of nice parts of the city, by and large they are along the main roads and mostly centered around buildings/areas of significance. Sad, really, as there's a lot of cultural significance to many parts of Detroit. In contrast to "built up" areas, there's a great many midtown Detroit neighborhoods that have reverted back to a quasi-rural state, mostly from population relocation/abandonment. About a half mile from one of the "built up" areas of the city, for example, you might find yourself in an area of boarded-up buildings, razed plots of overgrown land, vacant properties used as dumping grounds, and the occasional long-term resident with no "neighbors" visible in any direction - that's essentially the case in the progression of photos here. I took most of these pictures along a trip north on Mack Ave from Woodward in midtown, west along Brush St to near Interstate 94, detoured slightly off the service drive of I-94 near Mt. Elliot, and then through one of the neighborhoods off northbound Gratiot about a mile or two south of 8 Mile Rd - essentially the rough boundary of northern Wayne County.
(Click on the thumbnails for 1024x768 res pics - 56K users beware!)

Corrugated metal, weathered wood and cinder block, likely gang tags, and (hopefully not visible) a family of feral cats amongst the trees/undergrowth

Closeup of weathered cinder block and rusted/heat damaged sheet metal vent

Rusted metal, weathered stacked plywood, overgrown concrete and damaged fencing

Burnt out timber and roofing, chipping painted wood

Overgrown burnt out building/vehicle w/ several overgrown gravel mounds in foreground

Collapsed building due to fire damage w/ collateral fire damage to adjacent brick

Burnt down structure being overgrown - surprised the heck out of me, but in stopping there briefly I flushed out a huge pheasant from the undergrowth nearest the former building

Naturally decaying brick facade due to exposure w/ staining/exposure on adjacent structure

Collapsing brick wall, chipping/peeling paint

Distance view of derelict factory-type structure


Images of effects of weathering/paint chipping/rusting/fire on various materials

Large patterned gold surface in daylight (I've been impressed with the appearance of the roof for a while, but never had a camera)

(Same as above, but from a different light/camera angle)
I drove by some shady/depressing stuff for some of these pics - a few crack houses, a likely prostitute who noticed me parked and started towards the car before I drove on, the "bread van" making the rounds at one of the 24-hour warming centers for the city's homeless/indigent, a seagull exploding in a cloud of feathers in the middle of the street after being hit dead-on by a car and an outright not-so-subtle drug deal going down on one of the residential streets that (coincidentally?) had one of the better examples of a burned out building when I turned the corner at the end of the same block. Probably the only cheerful thing out of the whole lot would be the "donut 'n' coffee" shop, so I saved that for the end - it's been there for ages (and so is presumably good - dunno, I've never stopped in) but the golden metallic-paneled overhangs are a recent addition (past year or two) and look positively amazing on a nice day with sun.
If by some chance the owners of some of these "reference materials" would prefer me not to have a particular picture posted, lemme know and I will certainly take it down.
Just for information's sake, I don't generally pick up a camera to go and shoot images of "urban decay" as a matter of course. Our cell phone plan allowed us to upgrade to Blackberry phones, and this initially began as me testing out the surprisingly good built-in camera after taking a detour past a major backup on the I-75 expressway. Another reason I went through areas I've been through many times before taking reference pictures of this kind of stuff is that I plan on replicating similar environmental effects as a basing theme of sorts for any figures I finish on several small 40K "armies" currently in progress.
While there's a lot of nice parts of the city, by and large they are along the main roads and mostly centered around buildings/areas of significance. Sad, really, as there's a lot of cultural significance to many parts of Detroit. In contrast to "built up" areas, there's a great many midtown Detroit neighborhoods that have reverted back to a quasi-rural state, mostly from population relocation/abandonment. About a half mile from one of the "built up" areas of the city, for example, you might find yourself in an area of boarded-up buildings, razed plots of overgrown land, vacant properties used as dumping grounds, and the occasional long-term resident with no "neighbors" visible in any direction - that's essentially the case in the progression of photos here. I took most of these pictures along a trip north on Mack Ave from Woodward in midtown, west along Brush St to near Interstate 94, detoured slightly off the service drive of I-94 near Mt. Elliot, and then through one of the neighborhoods off northbound Gratiot about a mile or two south of 8 Mile Rd - essentially the rough boundary of northern Wayne County.
(Click on the thumbnails for 1024x768 res pics - 56K users beware!)

Corrugated metal, weathered wood and cinder block, likely gang tags, and (hopefully not visible) a family of feral cats amongst the trees/undergrowth

Closeup of weathered cinder block and rusted/heat damaged sheet metal vent
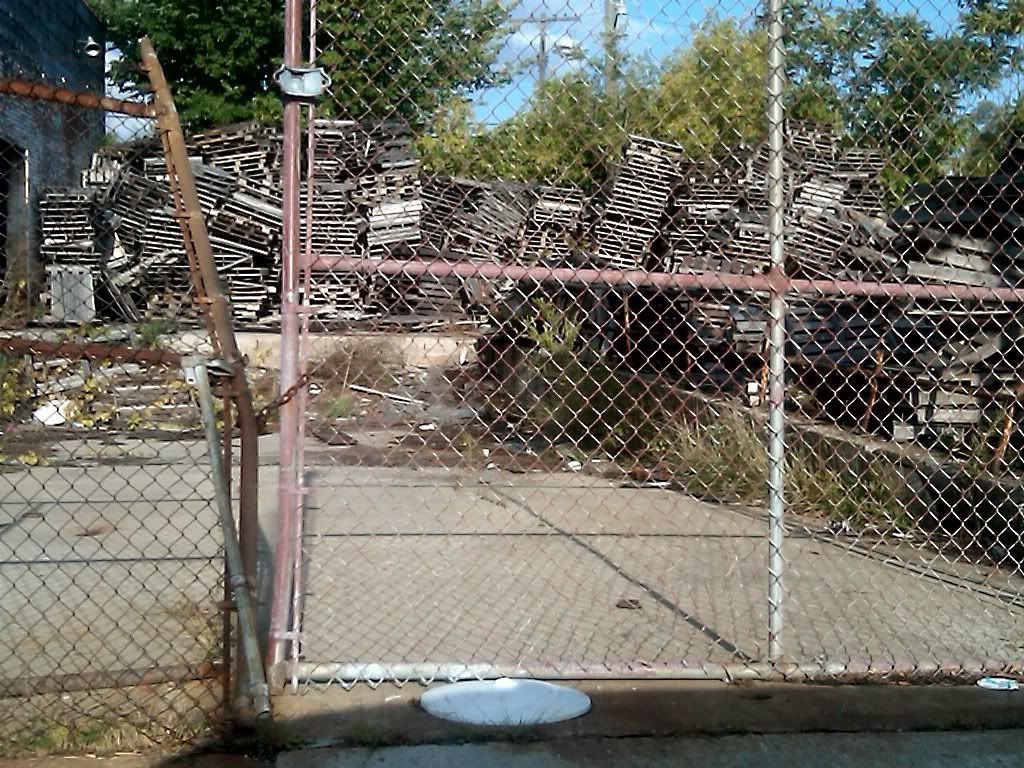
Rusted metal, weathered stacked plywood, overgrown concrete and damaged fencing

Burnt out timber and roofing, chipping painted wood

Overgrown burnt out building/vehicle w/ several overgrown gravel mounds in foreground

Collapsed building due to fire damage w/ collateral fire damage to adjacent brick

Burnt down structure being overgrown - surprised the heck out of me, but in stopping there briefly I flushed out a huge pheasant from the undergrowth nearest the former building

Naturally decaying brick facade due to exposure w/ staining/exposure on adjacent structure

Collapsing brick wall, chipping/peeling paint

Distance view of derelict factory-type structure
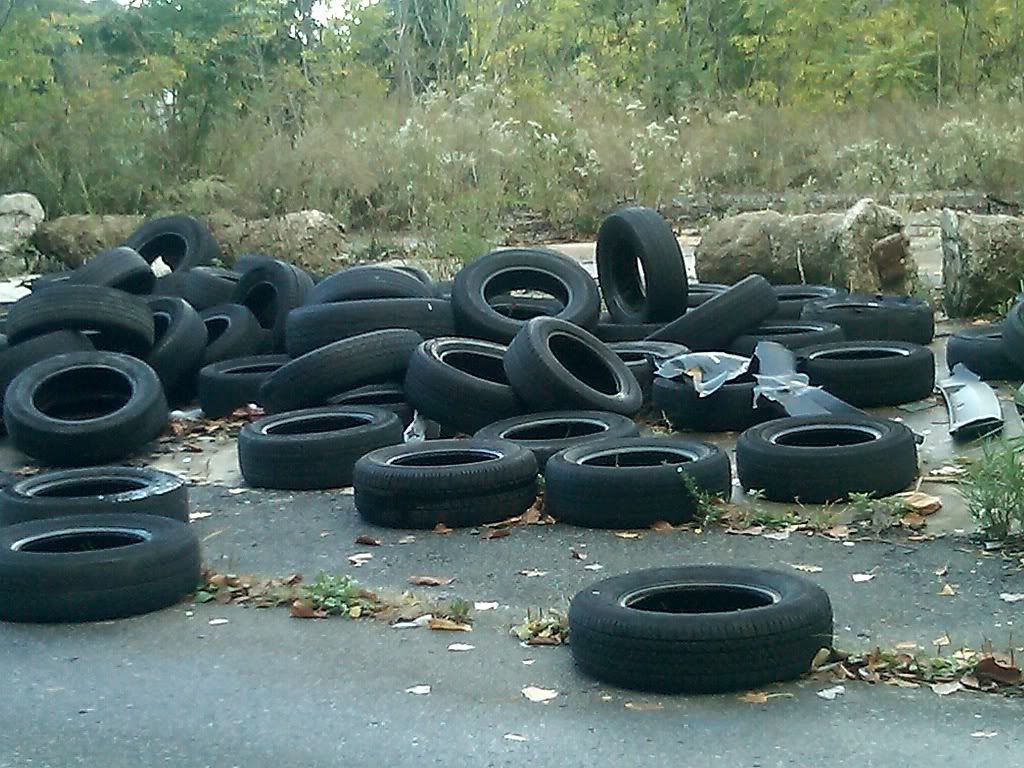

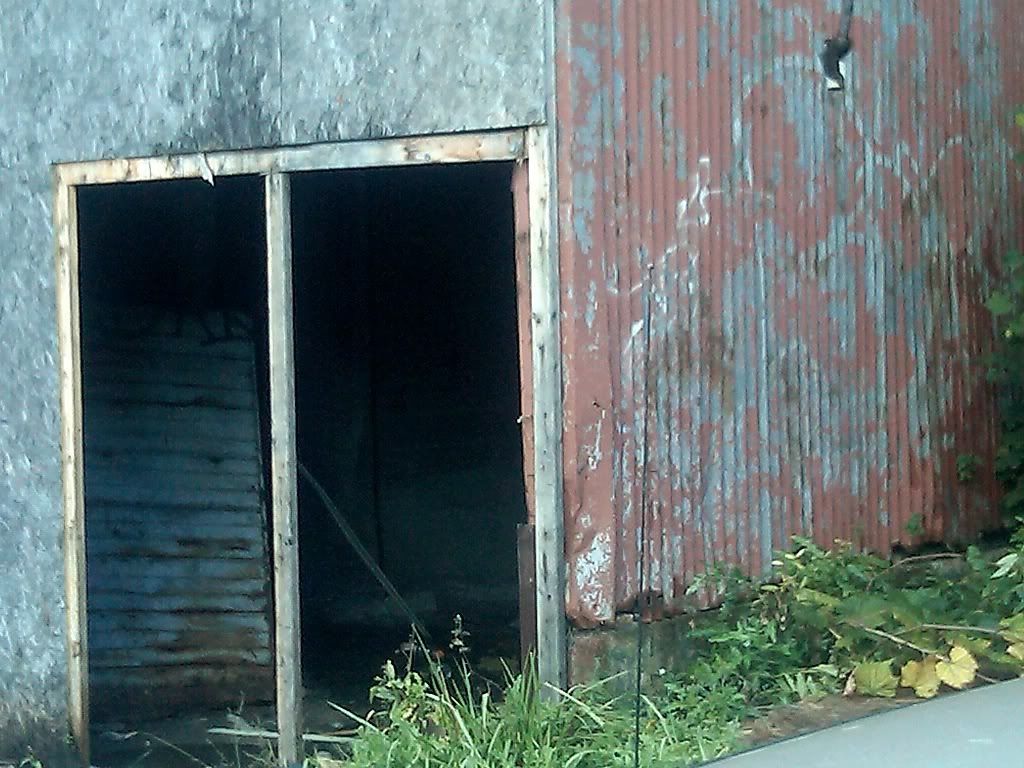


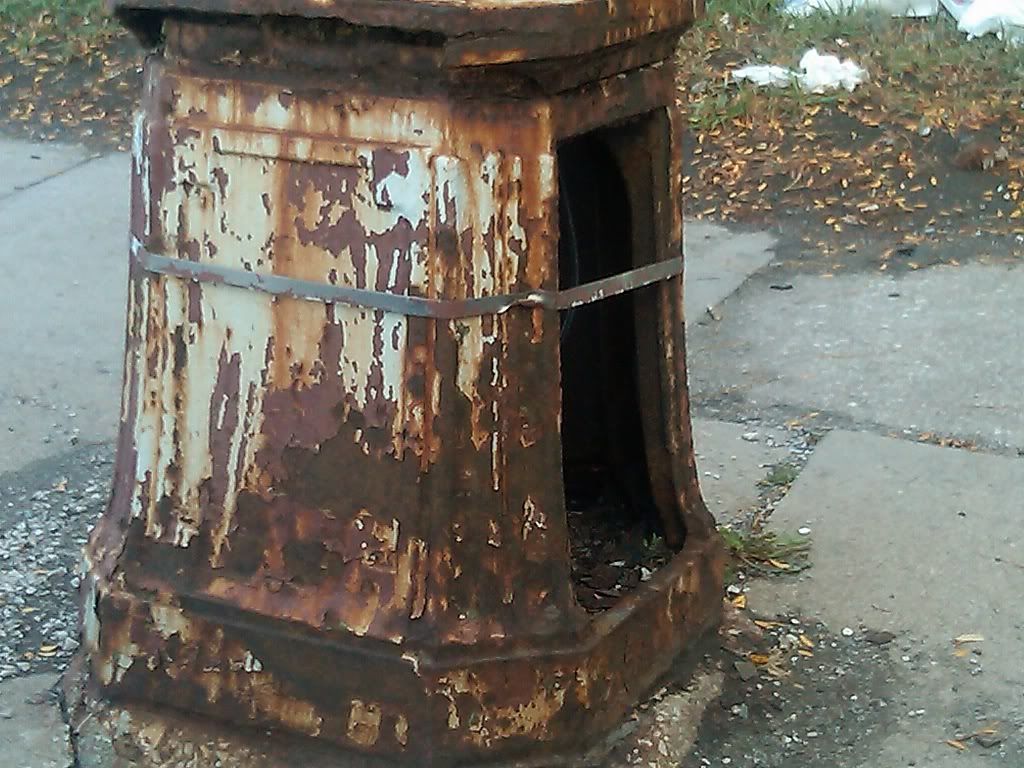
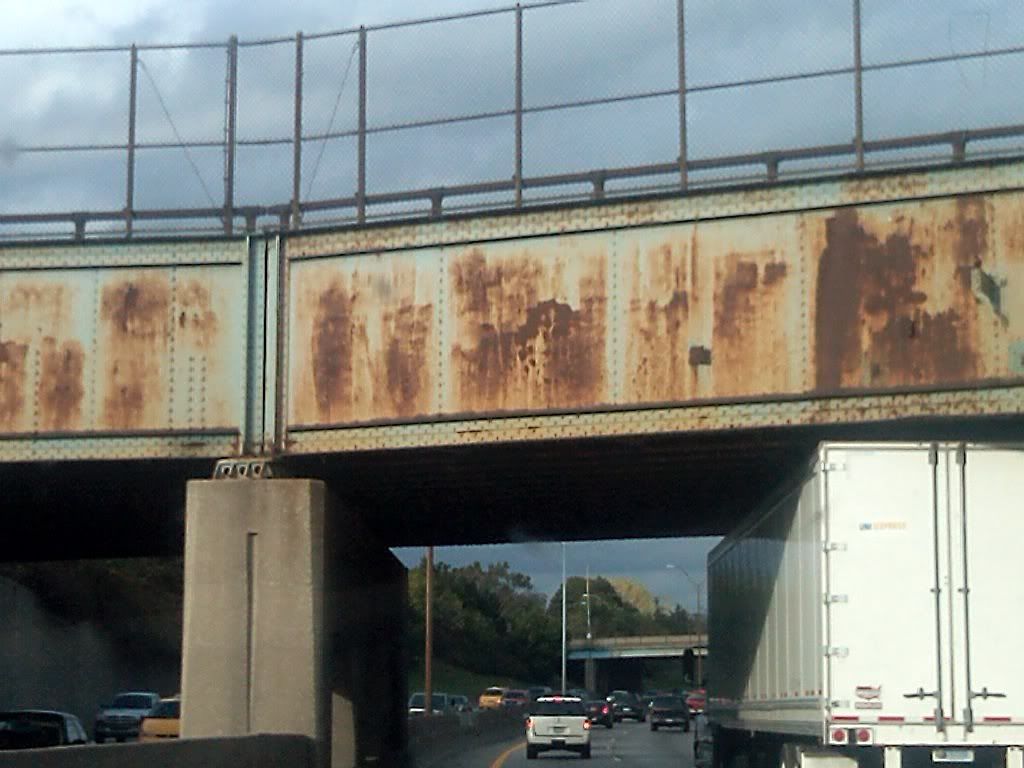
Images of effects of weathering/paint chipping/rusting/fire on various materials

Large patterned gold surface in daylight (I've been impressed with the appearance of the roof for a while, but never had a camera)

(Same as above, but from a different light/camera angle)
I drove by some shady/depressing stuff for some of these pics - a few crack houses, a likely prostitute who noticed me parked and started towards the car before I drove on, the "bread van" making the rounds at one of the 24-hour warming centers for the city's homeless/indigent, a seagull exploding in a cloud of feathers in the middle of the street after being hit dead-on by a car and an outright not-so-subtle drug deal going down on one of the residential streets that (coincidentally?) had one of the better examples of a burned out building when I turned the corner at the end of the same block. Probably the only cheerful thing out of the whole lot would be the "donut 'n' coffee" shop, so I saved that for the end - it's been there for ages (and so is presumably good - dunno, I've never stopped in) but the golden metallic-paneled overhangs are a recent addition (past year or two) and look positively amazing on a nice day with sun.
If by some chance the owners of some of these "reference materials" would prefer me not to have a particular picture posted, lemme know and I will certainly take it down.
10/08/2009
An update... literally and figuratively!
It's been a little while since my last legitimate update here, and I don't want anyone to think I've forgotten the place. I started a new job Monday of last week, and even though it's "just" a contract behavioral health intake/assessment position where I'm there through a placement agency, it's the first time I've worked since early February of '09. It's kinda nice being able to say I'm gainfully employed again, even though I still need to ideally finalize some things: like the timing of an expected paycheck in the (hopefully) near future versus much-needed income from my (thankfully) extended unemployment benefits; what my actual official duties are at this placement position, as they seem to change to greater or lesser extents from day to day; even niggling "little" details like how long this position is expected to last - I was told at least a month, but don't have a definite schedule yet past the end of this work week. The job itself seems decent enough, and at a respectable agency despite things being very hectic and there being a fairly big adjustment to working a schedule again instead of being a stay-at-home dad. My wife also had surgery today to repair an internal tear in her abdominal muscle apparently dating back to some difficulties with the birth of our son in February. Um, I've had a busy past few weeks!
All that being said, there is somewhat of a definite update to the site - I've gone through and revised all my previously posted Hobby Tips with the main focus of the tip appended to the title so as to make it a little easier to search for a specific topic, if anyone were so inclined. Maybe more significantly, I've dropped the "Tuesday" part from the whole Hobby Tip thing. I had originally intended to post them as a regularly scheduled feature, but the "Tuesday" thing was completely arbitrary; I didn't want to "steal any thunder" from the guys over at The Painting Corps (not that I think I would, but still...) They've got a great site and their regular Friday hobby feature is a much-looked-forward-to part of my blog reading - they never fail to be informative and a lot better written than my own. As a result, I picked any other day besides Friday and Tuesday drew the short straw; the problem with writing up content specifically for Tuesday being that I either had something to post but then had to postpone it to Tuesday, or, as has been the case of late, I'd be so busy throughout the week that a regular Hobby Tip entry either got put up past my self-imposed "deadline" or, worse yet, not at all. With that in mind, and with a lot of things going on in my life right now outside of miniature painting and modeling, ideally I'll be able to post things worth reading or looking at (I can think of four or five finished figures for which I haven't posted any static pages linked to my website Gallery, for example) as well as fairly frequent Hobby Tips, small and large, that ought to hopefully keep people other than myself entertained by seeing.
Is there any specific content that someone might want to see me cover, out of curiosity?
9/26/2009
Hobby Tip - Making Rounded Rivets, Pt. 2
Now for the actual process of making rounded rivets. The initial introduction and materials summary can be found in Part 1.
Let me put out a disclaimer of sorts to start with here before delving into the actual step-by-step. I know there's likely a ton of other methods out there for making rivets and there's nothing especially earth-shattering about my own method. Three other techniques I'm familiar with are: using small dots of PVA glue to build up a "rivet" shape, gluing small plastic bead-shaped "spacers" from a water purifier filter into place in shallow drilled divots, and simply using round styrene rod thinly cut into measured "rivet-height" lengths and glued where needed.
I think this method gives a reasonably realistic-looking end result and I've found it to be a bit more durable than glued-on rivets, where I've frequently had my rivet work scrape off or easily get knocked off - especially when working with metal figures where the plastic-to-metal bond isn't so strong. I've also found the "rivet setting" part of this writeup to be equally useful for other things like small studded spikes or even horns on figures. The downside to my rivet-making method, and I'll lay it out plain now, is that the "setting" part is slightly more time consuming than some of the other approaches mentioned above - on the other hand, if you make a whole lot of rivet "blanks" in batches during down time (like when watching a movie you've already seen a hundred times), then that's the bulk of the work done and the rest is just placement.
I would suggest to anyone trying this method of making rounded rivets that they take all safety precautions necessary - there, that's my public service announcement duties covered for the month. No, really, I personally check over all my equipment and tools before I start any work to make sure that nothing is damaged or compromised, that everything is firmly tightened and nothing is out of place and that my eyes are shielded from possible flying debris. As a general rule, I always try to use my Dremel immediately over (if not slightly within) a small, portable wastebasket so as to minimize the odds of something being flung loose as well as to collect as much waste, dust, and stray particles as possible.

At this point you cut a short length off of the styrene rod in addition to the rivet - I'd suggest about a millimeter or so, but it all really depends on how much depth you have in the area you're wanting to place your rounded rivets.
The next part is relatively straightforward: for the sake of consistent spacing and level appearance, you'll likely want to take a ruler and a soft lead pencil with a good point and go along and mark where you're going to place your rounded rivets - you'll know before you start the next step of drilling if things look good appearance-wise, and you can always adjust your planned placement at this point since everything is simply markings on the figure. I prefer to use mechanical pencils with 2B grade lead for as they make clear marks even on metal figures, erase fairly easily afterward and are soft enough that they don't gouge sheet styrene if you're doing layers of custom conversion.
Now you take your drill bit that matches as closely as possible to the diameter of the round styrene rod you've used to make your rivets, and sink placement holes to at least the depth of your length of rounded rivet (remember I suggested cutting them off the rod in 1mm segments or thereabouts). You might want to drill slightly deeper than the length of your rivet cut-offs, since you can always put a little extra glue in the hole and simply hold the rivet in place to the correct depth until the glue sets up a bit.
Once you've got your holes drilled for placing your rounded rivet lengths, you'll want to use tweezers or something similar with a narrow-but-firm grip to hold the length of rivet near the top, apply a small amount of cyanoacrylate glue (CA glue, Krazy Glue, Zap-A-Gap, etc.) around the lower end of the rivet length and, placing the end into the hole you've pre-drilled, hold it at the height you want the final rivet to stick out (or course, this assumes that you may have been a little off on the depth of the hole - if you're able to drill precisely right or have the foresight to test fit and/or shorten the length of the rivet "insert" before gluing and slotting it home. I would suggest CA glue over polystyrene (plastic) cement, since an excess of plastic glue on the slotted end of the rivet when mounted in/on a plastic figure could creep up and deform the rounded rivet shape at the visible end that you've spent your time making. CA glue also allows a bit of leeway in terms of adjusting the fit of your rivet before it sets, tends to fill any gaps better if your holes weren't able to be the same diameter as the styrene rod you used, and can be wiped away without melting/distorting the final appearance of your rounded rivet if you did happen to use a little too much glue at the base before slotting it home.
Here's an example of rounded rivets made following the guidelines above set into a sheet styrene "plate" over the skull of a converted figure:

As you can see in this close-up picture of some finished ones I've left some of the rivets imperfectly shaped and in a few places not put anything into the holes I've drilled for them, all with the idea of getting across battle damage, or perhaps "wear and tear" on the figure.
Here's more of the same with finished pictures of the rounded rivets in several places across a full figure, the same as seen in the top-down head picture above:

Let me put out a disclaimer of sorts to start with here before delving into the actual step-by-step. I know there's likely a ton of other methods out there for making rivets and there's nothing especially earth-shattering about my own method. Three other techniques I'm familiar with are: using small dots of PVA glue to build up a "rivet" shape, gluing small plastic bead-shaped "spacers" from a water purifier filter into place in shallow drilled divots, and simply using round styrene rod thinly cut into measured "rivet-height" lengths and glued where needed.
I think this method gives a reasonably realistic-looking end result and I've found it to be a bit more durable than glued-on rivets, where I've frequently had my rivet work scrape off or easily get knocked off - especially when working with metal figures where the plastic-to-metal bond isn't so strong. I've also found the "rivet setting" part of this writeup to be equally useful for other things like small studded spikes or even horns on figures. The downside to my rivet-making method, and I'll lay it out plain now, is that the "setting" part is slightly more time consuming than some of the other approaches mentioned above - on the other hand, if you make a whole lot of rivet "blanks" in batches during down time (like when watching a movie you've already seen a hundred times), then that's the bulk of the work done and the rest is just placement.
I would suggest to anyone trying this method of making rounded rivets that they take all safety precautions necessary - there, that's my public service announcement duties covered for the month. No, really, I personally check over all my equipment and tools before I start any work to make sure that nothing is damaged or compromised, that everything is firmly tightened and nothing is out of place and that my eyes are shielded from possible flying debris. As a general rule, I always try to use my Dremel immediately over (if not slightly within) a small, portable wastebasket so as to minimize the odds of something being flung loose as well as to collect as much waste, dust, and stray particles as possible.
- To get started, take a length of the 0.4mm diameter round styrene rod and set your Dremel on the lowest speed setting with a medium sanding disc firmly in place. You want to hold the length of styrene rod perhaps 1/4" up the rod from the end to be shaped and be sure that you always shape the end of the styrene against the portion of the medium sanding disc spinning away from you. (I'm left handed, so for me that's the bottom.) You might want hold the styrene rod with hobby pliers, forceps, or even tweezers - anything so long as you can maintain a firm grip on it. Myself, I'm comfortable pinching the rod between my fingertips with the remaining length pointed outwards away from me while shaping it, but I also have very steady hands and maintain a constant focus on my work to avoid injury. (At the lowest speed setting, my particular Dremel can be used for polishing, light finish woodwork, or even shaping and buffing fingernails in a slightly different hobby; I wouldn't use my hands to hold material at any higher RPM settings, however.)
- Even at the lowest speed setting, the medium sanding disc is capable of melting the styrene rod through friction - we actually want to take advantage of this as it makes the shaping process easier. With very light taps of the end of the round rod against the portion of the disc spinning away from you, twisting the rod slightly at every tap to expose a new face to the sanding disc, holding it at about a 60° and you'll start to see friction melt the styrene in the shape of a rough "bullet" point. I should note that at a low speed setting and with about 1/4" of the styrene rod exposed, you'll find that the end "jumps" constantly away from the disc while shaping - this isn't necessarily a bad thing as it limits the amount of time and friction that the styrene is exposed to in contact with the sanding disc, but it does take some getting used to.
- Gradually you want to move the very end of the now-semi-pointed styrene rod to more of a 45° angle in relation to the disc, and maintain the process of touching the very end against the spinning disc with very light taps while making sure to twist the rod slightly at every tap to expose new surfaces to the disc. You'll quickly note that it begins to assume more of a rounded aspect at the end.
- At this point, you'll likely be able to finish off the rounding process with extremely light taps of the very end of the now-shaped styrene rod end against the sanding disc, again making sure to continue twisting the rod with every contact - if done lightly and carefully enough throughout the whole process, you should essentially have a smooth, natural rounding to the end of the styrene rod with a minimum of wasted material. If the shape is slightly off that's not necessarily a bad thing, as the appearance when eventually mounted on the figure can help to contribute to any "battle damage."

At this point you cut a short length off of the styrene rod in addition to the rivet - I'd suggest about a millimeter or so, but it all really depends on how much depth you have in the area you're wanting to place your rounded rivets.
The next part is relatively straightforward: for the sake of consistent spacing and level appearance, you'll likely want to take a ruler and a soft lead pencil with a good point and go along and mark where you're going to place your rounded rivets - you'll know before you start the next step of drilling if things look good appearance-wise, and you can always adjust your planned placement at this point since everything is simply markings on the figure. I prefer to use mechanical pencils with 2B grade lead for as they make clear marks even on metal figures, erase fairly easily afterward and are soft enough that they don't gouge sheet styrene if you're doing layers of custom conversion.
Now you take your drill bit that matches as closely as possible to the diameter of the round styrene rod you've used to make your rivets, and sink placement holes to at least the depth of your length of rounded rivet (remember I suggested cutting them off the rod in 1mm segments or thereabouts). You might want to drill slightly deeper than the length of your rivet cut-offs, since you can always put a little extra glue in the hole and simply hold the rivet in place to the correct depth until the glue sets up a bit.
Once you've got your holes drilled for placing your rounded rivet lengths, you'll want to use tweezers or something similar with a narrow-but-firm grip to hold the length of rivet near the top, apply a small amount of cyanoacrylate glue (CA glue, Krazy Glue, Zap-A-Gap, etc.) around the lower end of the rivet length and, placing the end into the hole you've pre-drilled, hold it at the height you want the final rivet to stick out (or course, this assumes that you may have been a little off on the depth of the hole - if you're able to drill precisely right or have the foresight to test fit and/or shorten the length of the rivet "insert" before gluing and slotting it home. I would suggest CA glue over polystyrene (plastic) cement, since an excess of plastic glue on the slotted end of the rivet when mounted in/on a plastic figure could creep up and deform the rounded rivet shape at the visible end that you've spent your time making. CA glue also allows a bit of leeway in terms of adjusting the fit of your rivet before it sets, tends to fill any gaps better if your holes weren't able to be the same diameter as the styrene rod you used, and can be wiped away without melting/distorting the final appearance of your rounded rivet if you did happen to use a little too much glue at the base before slotting it home.
Here's an example of rounded rivets made following the guidelines above set into a sheet styrene "plate" over the skull of a converted figure:

As you can see in this close-up picture of some finished ones I've left some of the rivets imperfectly shaped and in a few places not put anything into the holes I've drilled for them, all with the idea of getting across battle damage, or perhaps "wear and tear" on the figure.
Here's more of the same with finished pictures of the rounded rivets in several places across a full figure, the same as seen in the top-down head picture above:

9/23/2009
Hobby Tip - Making Rounded Rivets, Pt. 1
(Hey, what can I say - our whole family has been simultaneously sick and the 'Net seems to have eaten my first attempt at posting this, so here we go again.)
Somewhat building upon last week's Hobby Tip, this one is geared specifically towards making rounded rivets in 28mm (or roughly 1/35th scale) as a part of converting your figures/models. The reason I say "converting" specifically is that it's a little involved and slightly time intensive to get set up, but once you're rolling along you can make any number of rivets for use at a later time - and the rivet "setting" can be done at any point if you have an appropriate-sized drill bit and pin vise (or improvise, as I'll get to).
To start with, here's a picture of the materials you might likely need:

Out of all the items in the picture, the most important material would be styrene rod of a very small diameter: here we have .015"/0.4mm diameter in a package of 10 - it might not seem a lot of round styrene rod, but given the output product it tends to last quite a while (of course, that also assumes you're not covering an entire Games Workshop Baneblade conversion with these - if you were, I'd probably recommend a larger diameter of styrene and a less involved method and/or the services of a good, professional psychiatrist). By personal preference in making rounded rivets, I'd recommend Plastruct styrene products as they seem a little more accurate/precise in their measurements and also seem to be generally available in smaller diameter sizing, but conversely are also slightly more expensive (or so it seems locally) than other generally available manufacturers, such as Evergreen Scale Models. Just for comparison's sake, I included a length of the 0.4mm round styrene rod next to a length of 0.5mm rod: there is a difference appearance-wise and scale-wise on the final figure, but you can reasonably use this rounded rivet method with any diameter of styrene rod - I'm thinking that for "chunkier" sizes, though, you'd have to be a bit more thorough in your rounding off, whereas the smaller diameters will look good even if slightly uneven.
In the image above we also have two grades of sandpaper - medium-fine grit (120) and 800 grit wet/dry - both of which you might try, although I'd lean more towards the medium-fine 120 grit myself if I'd be doing this manually. I've shown my variable-speed Dremel with a medium grit sanding disc mounted - this is actually the means by which I'd recommend you round off your rivets and the method I'm going to focus the Hobby Tip writeup on, but this is straightforwards enough that you could likely settle on a sandpaper shaping method without too much trouble (and I'd recommend rounding down the styrene with a fingertip pressing the very end of the rod lightly onto the paper, from past experience).
There's several pin vises in the image - one of which is home made. The one without the rotating "hand rest" was the first one I bought (from Sears, I believe, although not a Craftsman product but a "generic" brand) and is perfectly fine and very inexpensive - it also came with an assortment of different bits. The other, slightly fancier one, was picked up at a train/model hobby store and was slightly more expensive (but still under $12) and did not come with bits but came with several "chuck" inserts of varying hole diameters. The reason I mention this is that ideally, for very tiny rivets using the method I'll be laying out, you need to drill shallow holes of matching diameter; the plain pin vise doesn't tighten enough to grip the size drill bit needed, whereas using a very small size drill bit in the slightly fancier one was a relative piece of cake. The third "pin vise" in the picture is actually a length of wooden dowel (end rounded with sandpaper for comfort) with the appropriate-sized bit glued into (via two-part epoxy and a thorough soaking of CA+ glue) a matching diameter hole to just below the beginning of the "threads" on the tiny drill bit itself - not the most elegant of handles, but it gets the job done and is easily portable.
Now we get to the drill bit: a size #74 high speed twist drill bit made by Precision Twist Drill Co. (one of a bag of like 20 or so matching-sized bits) and the same diameter as the small "standard" rivet size as represented by Games Workshop on a large number of their 40K figures - also the perfect size to make holes to inset the previously-mentioned .015"/0.4mm diameter round styrene rod.
Now for the process! (In my next entry, of course...)
9/16/2009
Hobby Tip - Using Guide Templates
Pardon the personal info, I suppose, if you're strictly just following along for hobby-related stuff - you can skip past the block of my rambling here to the next section.
Just for the sake of noting it; this has been one of those weeks. Our 5-year-old daughter came down with an unrelenting hacking cough/cold/ear infection/103° fever combo which jumped off on Saturday and has continued on its merry way since then, with the exception of the fever breaking, thus allowing her to enjoy the remainder of her second week of school ever starting today. I feel bad for her being sick, but at the same time her personality and behavior took a complete turn-about from her usual pleasant self and roughly about that time dad apparently joined the Infernal Hierarchy so far as she was concerned, and every suggestion, request, or glance from me was met with immense disdain if not full-blown tantrum - and guess who the stay-at-home parent is? Today our 7-month-old son seemed completely off, hardly ate, and alternated between screaming and looking extremely tired/fitfully sleeping all day - he's also generally a pleasant baby and mostly predictable other than teeth, but he's also apparently got a helluva set of lungs. The long and the short of this all being: not a lot of sleep and not much done related to miniature painting or modeling all week. On the positive side: my wife and I saw the movie 9 at the theater and it was an excellent film, I got a call from an agency offering placement in a contingent position (which is nice, since I've been unemployed since February) although I still need to meet with them, and my unemployment benefits were to run out next week - but I apparently qualify for an extension, so while income isn't as good as it could be in our household, at least we'll continue to maintain the status quo as I try to find something manageable. (There are aspects of being an unplanned stay-at-home-parent which are nice, but I gotta confess I'd much rather have regular, stable employment and a bit more predictability - I've been employed more or less continuously since I was 14, and it's been a helluva adjustment, not the least of which being that our son was born the week after I lost my job.)
I'm essentially still working on the conversion portion of a commissioned Chaos Lord for a Games Workshop 40K Thousand Sons army, and while I've been making progress in fits and starts and keep plugging along, I don't feel I've made enough in any one particular area to post pictures of "finished" sections. I'm essentially building a brand new head with a Thousand Sons-styled "headdress" for him, however, and figured out a useful trick in terms of trimming sheet styrene of a set thickness to a specific even width - the part of the head I'm working on is the outer trim of the headdress containing the ribbed panelling, which means I'm nearing the finish line on one of the trickiest aspects thus far.
If you happen to find yourself needing lengths of sheet styrene to a specific width (and where it's impractical/unavailable to buy pre-cut sheet styrene), today's tip might come in handy. Hopefully anyone who's worked with sheet styrene (AKA plasticard) is familiar with scoring the stuff with a hobby knife or something similar to get a clean break of the styrene to a desired shape - well, I've been doing that for the most part but I'm finding myself needing to trim down a vaguely even 3mm wide length of 1mm thick styrene into an even 2mm wide strip (or thereabouts). The length of styrene is just a little too narrow to get an outright even break along a deeply scored line, and in trying to separate the excess off with needle-nosed hobby pliers, it more or less tore along the scored line - but with rather rough edges along the sections where the styrene was not pre-scored. Ideally I want it the correct width before I glue it in place on the figure, so I only have to worry about cutting the various lengths I need.
That's where I hit on the idea of simply drawing out on a piece of paper the correct width and shape length of styrene I need smoothed out and to the correct measurements - a guide template or "cutting guide" of sorts, like I would use if this were a larger piece of wood I were shaping with a router or band saw, only one that I can set the strip of styrene onto on my cutting mat. This is the tricky part, since as I said, it's more or less already the correct width along the length of the strip - well beyond the point of drawing the areas that need to be trimmed off onto the piece itself and then cutting along the outline, since most of the unwanted excess is gone and I'm now just trying to tidy things up to a specific width.
A hopefully self-explanatory picture:

What simply needs to be done past the point in the picture is to shave or cut the styrene length back to where I can see the pencil lead again, which should be fairly easy since I have a visual reference of my 2mm target width to aim towards. There's a number of advantages to this: it's on a cutting mat where I can get leverage; I don't have to hold the narrow length with needle-nosed pliers or a vise and using some other method to shape the styrene length where the edges won't be as "crisp"; and I don't have to "eyeball" the correct width at all since it's right there in front of me (unlike if I used a Dremel-mounted sanding disc, needle files, or sandpaper outright).
Questions? Comments? I'm thinking this technique ought to be applicable to tidying up custom-cut shapes as well that for one reason or another can't be cut out precisely (such as an outline drawn on the styrene itself) - an awkward-shaped addition of extremely thin sheet styrene to the face place of the Chaos Lord's helmet comes to mind, for example.
9/08/2009
#hobbytiptuesday - Making Sharpened Teeth
Note: for simplicity's sake, I'm simply going to use reference "teeth" throughout this Hobby Tip writeup, but the technique is applicable for just about anything on a figure that one would want as a length of pointed object: sharp teeth, spines, spikes, claws, studs, spurs, and all the way up to tusks and the like with thicker lengths of styrene. I've been using this method for a while and found it useful in shaping a wide variety of add-on details with my miniatures.
I would imagine a lot of people sculpt pointed teeth, spikes, etc. from the same material with which they are doing customization or additional sculpting onto a figure. Personally, I prefer to make sharp teeth and similar details out of length of styrene rod, which I can buy in a variety of pre-sized diameters and grind to shape. I find it gives me a bit more freedom to sculpt details on a figure, drill in holes for the "sharp bits" afterward, and then (if necessary) sculpt gums or additional flesh around the solid styrene. I also find that by making teeth out of a firmer material beforehand, it allows me to make adjustments directly to the teeth as the project goes along, if need be, before putting them in their "final" position. Personal opinion again, but I figger that added details sculpted around the teeth respond more dynamically to having them there as an existing hard physical object what I than I feel I'd get if I were trying to do them as a part of the overall process with a medium like Green Stuff or Milliput - to each their own, though.
Here are the materials I generally use in making teeth to add to figures:

Lengths of styrene rod, available in many hobby stores or through suppliers of Evergreen and Plastruct products; sandpaper - I use a 120 "medium" grit here, although that's a matter of personal preference from trial and error; Tenax 7-R Plastic Welder - couldn't recommend this stuff more highly for a variety of uses with plastic miniatures and bitz; a sharp hobby knife of some type; and alternatively, a Dremel or other high speed rotary tool with medium or coarse sanding discs - it goes a bit faster in terms of shaping a point, but is a bit sloppier due to melting of the styrene in the process (I'll focus on strictly sandpaper here in this Hobby Tip, but you can get the same results with careful quick taps of your styrene rod on a sanding disc at a low speed).

Holding the styrene rod at roughly a 45° angle to the sandpaper, you want to shape a quick point first with application of pressure slightly behind the end of the rod and short, quick drags of the rod backwards on the paper. I find that you get better results if you work near the outer edge of a piece of sandpaper on a flat surface, twisting the rod as you go with your other fingers to keep a different surface of the styrene against the paper with every burst of friction - eventually, if you keep twisting it evenly, you end up with a centered point.

Once you have your initial centered point, you move your grip slightly so as to make light, quick drags of the styrene rod backwards along more of the flat surface behind the shaped point. Again twisting as you go, you'll find that the surface of the sharpened shape begins to lengthen with repeated dragging across the paper with application of pressure further behind the initial point - in other words, you can vary the length and curve of the tooth's "pointiness" by adjusting how you grind down the remaining styrene rod behind your initial 45° angle. This particular example tooth in the picture ended up being about 3mm in length with a gradual curve to the top as I used a thicker styrene rod and drew out the "point" by sanding against the "flat" of the styrene rod.
A few steps not shown, but hopefully self-explanatory:
After shaping the tooth to whatever curve and length desired, I generally give the tooth still attached to the end of the styrene rod a quick dip into the jar of Tenax 7-R - what the stuff normally does is liquefy plastic it comes in contact with, so you can brush it on in small doses and let capillary action and a little pressure "glue" plastic parts together seamlessly. In my case, with just a quick dip of the piece I've sanded to shape, it "firms" the whole dipped tooth up to a hard, smooth length of styrene so fine points at the end of long gradual tapers are less likely to get broken off. (Barring having a jar of Tenax 7-R handy, a similar effect could be achieved from an extra- extra-fast dip in straight acetone - acetone, however, is more likely to ruin the shape of your sanded tooth if it is left suspended in the liquid too long, and it takes a little longer for the styrene to solidify completely again as compared to using Tenax.)
All that remains is cutting your sanded tooth off the end of your length of styrene rod. Generally I make teeth two at a time - one on each end of the rod following the same process - and then trim them both off the length of styrene, for the sake of saving some time and effort. I would also recommend leaving a little extra length of un-shaped styrene at the base of your teeth to allow for sinking an inset hole for them on your figure, or drilling in a pin in the base for purposes of mounting a home-made tusk or something a little thicker.
Here we have an assortment of finished sanded teeth ready for use:

Through experience, I've found that teeth and spikes and the like made this way prove a bit more durable if you leave a slight length behind your curved point and you mount them on your figure glued into a shallow hole from a suitably-sized fine drill bit. You can then go and shape the gums or flesh around the base of the tooth - or in the case of spiked armor, leave it as-is if you have the length of sharpened styrene rod in a hole of matching diameter.
As always, I'd appreciate any comments or feedback and if anything is a little unclear wording-wise, I'd be more than happy to explain any part of the process in a bit more detail. (Any excuse to make another entry here, you know...)
9/02/2009
Venting a Bit...
Well, I have to say I'm a little... not exactly sure what word to use: discouraged? disappointed? jealous? Unlike a lot of folks in the blogging community and on the Forum I generally frequent, apparently, I won't be opening my copy of Space Hulk that I ordered and paid for, despite it having been shipped and received yesterday.
I placed my order at the Games Workshop Hobby Center that I usually frequent, as I like the staff and the store and figgered I'd let my wallet do the talking in terms of doing my part to keep a place I like in business. Ordering through the Games Workshop website and then paying by credit card at the register, the staff asked if I wanted it shipped to my home address or to pick it up at the store.
Well, given my thinking about spending money on this "surprise release" after I'd already expected to receive/ordered several hundred dollars' worth of miniature-related stuff for my birthday, and not quite being sure how to broach that with my wife, etc. - I just said to have my Space Hulk box shipped to the GW store. I've been following the order online since I placed it, and like a lot folks, saw it was dispatched already - shipped via FedEx, as a matter of fact - and according to tracking it was shipped the 28th of August and set to be delivered yesterday. Well, I'm thinking, "Great! We're going away on vacation to visit my parents-in-law for the Labor Day holiday weekend here and I'll get to relax and check out the game and maybe even play it with my daughter if it's not incredibly complicated."
I got an email confirmation from FedEx that it had been delivered. Well, I got off the phone with the store after reading all the posts in a Space Hulk thread in the Tabletop General Discussion section of my usually-visited Forum, verifying that it had arrived. The GW store staff confirmed that it had arrived and was in the store, but basically said that I couldn't pick it up until the 5th. I mentioned the FedEx tracking notification and that we were going out of town and that I knew of quite a few persons that had ordered the box elsewhere and had apparently received the set - the staffer said he would call the manager to see if I could come in to pick it up. Well, calling back to follow up, I was told that essentially he confirmed that they aren't allowed to release any of the Space Hulk sets until the 5th, that they were sorry I had been notified of the shipment, and commiserated that if I had ordered it someplace else I, too, would probably be opening a Space Hulk box myself - and that all these other companies that have actually let paid-for merchandise shipped ahead of time to the customers that bought it aren't supposed to be releasing their Space Hulk sets until the 5th either. (I'm also wondering if things would be different if I'd set a home delivery location?)
To compound the sudden discouragement:
When I was last in the GW Hobby Center about a week ago, the new White Dwarf issue (yeah, the Space Hulk one) had arrived for subscribers and staff were calling everyone letting them know their issues were in. I've had an at-home 2-year subscription with about 7 issues left and there was no joy in the mailbox yesterday yet again.
I pre-ordered the 3-book Siege of Vraks set early as a birthday present to myself, of sorts - the last book in the series was released the day after my birthday - and the set came via UPS yesterday. I didn't even have to go through the effort of opening up the box - it was already opened for me, well, probably unintentionally and by a large, angry machine... but still! And the special Siege of Vraks slip case included for all 3 volumes has one corner mangled, all pit-bull chewed-on like. And not that it's an amazingly big thing but it was one of the hopeful aspects of me pre-ordering it early... no signature by the author, either. The Model Masterclass book I ordered from Forge World arrived with one corner similarly crushed, folded, and spindled, and while the staff in the UK was nice about shipping a replacement after I eventually was able to contact them, in the process I found that I apparently can't make international calls on our home phone or my cell phone without buying a pre-paid calling card or paying by the minute with a credit card - when the heck did that sort of thing change? Most of my extended family lives in the UK and we used to call back and forth all the time growing up. I'll have to go buy a calling card again to get in touch with Forge World customer service.
I guess I'm just venting a bit with all my recent "highly anticipated" items from Games Workshop/Forge World getting "shot down" in some way or other.
I get the concept of a September 5th release date and all, it just feels like I'm being "penalized" (in a manner of speaking) for ordering it through my local GW store, especially since I was notified my copy of the game was delivered already via FedEx and we're going to be away visiting relatives through Monday - a vacation it seemed like I'd be able to bring the new game along for and get family involved in playing during 4 days of relaxation.
I also understand the problems with shipping large packages overseas re: my Forge World stuff. I guess I had hoped this time the rilly expensive book set would arrive unscathed - it was disappointing to see the UPS guy walking up the driveway to drop a large box off behind the house and I'd been looking forwards to the books and when I bring the cardboard box inside, the end is hanging open and the contents were damaged. Thankfully not the books, though! (And a small box of bits I ordered when calling back about the Model Masterclass book arrived safe and sound, too.)
Subscribe to:
Posts (Atom)
LinkWithin
