Apparently there was some problem with the HTML coding in my painting website which caused everyone viewing it with MS Internet Explorer to see the news blog on the main page in only a 2-inch band or so. I trimmed out a few things and it seems to be working properly now. On that happy note, here's a figure I prepped and glued together last night who has a personal inquiry:
Showing posts with label preparation. Show all posts
5/06/2010
5/01/2010
Former Heresy-Era Rhino
It's still a work-in-progress, but I'm far enough along that I figgered I'd post pictures. I've been working on it for a long while in fits and starts, but it's at a point where my plans for the thing are finally starting to pan out (or so I think!) Ideally, I'd like to get some feedback on the overall appearance, battle damage, and hammered metal alternate paneling on the right vehicle side.
I didn't want to go with strictly a Mark I Rhino conversion, because I do like the Mark II style doors and design. I wanted it to look like it's been around a long, long while - like 10,000 years in and out of the Eye of Terror on various campaigns with my Disciples of the Four warband. I'm keeping with the design theme that this has seen long use and has "mutated" over time in service to all of the Chaos Gods - as such, it's not specific to any one Chaos Power, and I'm going to use it as the command Rhino for my warband. I'm going to use the same color scheme as for the majority of my troops - a dark, fleshy red with dark purple accents and semi-quartering (although maybe not on the Rhino, painting schemes being what they are). In any case, the insignia of my warband is going to be prominently displayed on the front panel of the vehicle and likely on the top (so it can be seen "from the air" by any Shriven-related support vehicles).
Many thanks to DeSnifter over at Warseer for his Rhino conversion templates, which prompted the initial turning of gears in my thinking! One big change is that I wanted a bit more "depth" for the side venting panels, so I've used fine gauge chicken wire inset over a thin styrene backing - well, that, and I've liked the design style of the Vindicator ever since it came out, so I wanted more of a reinforced armor front facing for my command Rhino.
I didn't want to go with strictly a Mark I Rhino conversion, because I do like the Mark II style doors and design. I wanted it to look like it's been around a long, long while - like 10,000 years in and out of the Eye of Terror on various campaigns with my Disciples of the Four warband. I'm keeping with the design theme that this has seen long use and has "mutated" over time in service to all of the Chaos Gods - as such, it's not specific to any one Chaos Power, and I'm going to use it as the command Rhino for my warband. I'm going to use the same color scheme as for the majority of my troops - a dark, fleshy red with dark purple accents and semi-quartering (although maybe not on the Rhino, painting schemes being what they are). In any case, the insignia of my warband is going to be prominently displayed on the front panel of the vehicle and likely on the top (so it can be seen "from the air" by any Shriven-related support vehicles).
Many thanks to DeSnifter over at Warseer for his Rhino conversion templates, which prompted the initial turning of gears in my thinking! One big change is that I wanted a bit more "depth" for the side venting panels, so I've used fine gauge chicken wire inset over a thin styrene backing - well, that, and I've liked the design style of the Vindicator ever since it came out, so I wanted more of a reinforced armor front facing for my command Rhino.
4/23/2010
Hobby Tip: On My Word, Unleash Nurgle!
It's somewhat sloppy and disgusting work (isn't that the Nurgle way of it?), but here's a few ways to get your plastic or metal figures looking like they've given over to Papa Nurgle in no time. (For those not familiar, Nurgle in Warhammer 40K is the Chaos god of disease, decay, pestilence, entropy, and fearlessness of death.)
Supplies for adding disgusting texture to your figures:
Here's the step-by-step on applying a disgusting texture to your figure:
Adding a look of disease and decay to your figures:
Supplies for adding disgusting texture to your figures:
- You'll need some type of PVA glue. I'm partial to Elmer's Wood Glue as it's a bit "stiffer" in consistency than regular White Glue and comes in larger containers by comparison especially if you buy it at a DIY or building surplus store - then again, you can probably find cheap (as in inexpensive) glue, like Elmer's or another good brand name, at some of the higher end dollar stores (Dollar General, Dollar Tree, etc.) especially if they have a school supply section.
- You'll probably want some sort of thickener, which ought to serve the added bonus of giving your infected areas some gross texture as well. Anything along the lines of talcum powder, baby powder, or extra-fine grit will do - ideally you want something inert and non-food based (although I've always used cornmeal as a basing material, and I've never had any figure bases turn, um, Nurgly). The thicker the "grain" of your material, the more textured the final result will be - in the example pictures, I used a mixture of fine grit, cornmeal, and baby powder.
- Last but not least, you'll want to pick up an assortment of smaller-sized beads. If you get coupons in your weekend paper (JoAnn's) or subscribe online (Michael's, Hobby Lobby) you can probably get 40% off a decent-sized container of seed beads - the kind with tiny holes in them so as to resemble pustules on a figure. In the example pictures, I used a mixture of the larger dessicant beads from a few packets of silica gel (the sort you find in new boxed home items or clothing pockets when bought at the store) as well as the tiny plastic ionized beads from the inside of a water purifying pitcher filter (they are a pain to separate out from the activated charcoal, but well worth it!)
Here's the step-by-step on applying a disgusting texture to your figure:
- Sort out your beads first, making sure you have the sizes and appearances you want - maybe even divvying 'em up in groupings according to where you'll be placing them. (It's not rocket science, granted, but I'm all about having stuff at hand and ready to go when you need it as opposed to sorting through piles of beads while your glue slowly dries unused on the figure.)
- Mix some powdery thickener into your PVA glue and apply it in a smallish amount where you want your pustules to sprout, preferably not with a good paintbrush unless you want to accidentally make Father Nurgle extra proud.
- Stick your beads where you want 'em, making sure they're aligned (sprouting?) just the way you want the final product (crop?) to look.
- Slather on more of your glue and thickener mixture around or even on your groupings of pustules, trying to be sloppy but careful - there's an oxymoron for you, but I'm thinking you can picture what I mean. You probably want to steer clear of the tops of your pustules-to-be, unless you want the areas near the top of the sores to be grainy textured - I'd think smooth would be the way to go (like pus-distended skin stretched sickeningly taut by the diseased innar... er, yeah).
Adding a look of disease and decay to your figures:
- Gather an assortment of fine drill bits, the smaller the better. (In the example pictures, I used drill bits from 1/78" all the way up to 1/8" in size.
- Make sure you have a sturdy base to mount your drill bits for use - a good pin vise should have a chuck for extra-small bits or be otherwise adjustable to hold even smaller-sized ones. If your pin vise is not nearly as adjustable for tiny drill bits (my first one wasn't, for example), you can take a short cut-off length of dowel and make a relatively deep hole in it a little larger in diameter than a drill bit you want to mount (I used a pair of locking pliers to grip one of my smaller drill bits initially - it was hard work, but I finally got a nice deep hole to set my 1/78" bit into with room to spare for glue.) Once your preferred drill bit will fit in the dowel, try roughing up the non-spiraling end of it with a file or sandpaper to ensure a good grip for glue. Slather the roughed-up end of the bit with glue and set it in the hole you drilled - I'd recommend epoxy glue since CA glue (AKA "Super Glue") is overly brittle, but even something like rubber cement would work in a pinch.
- Drill holes in various sizes across the areas you want to look especially diseased on your figure. It's probably best not to clump larger holes together, but a larger one surrounded by an assortment of smaller-sized ones generally looks good. Make sure not to repeat any particular pattern over the surface of your figure, since this is ideally supposed to be random.
- Tidy up any burrs on the edges of your drill holes with a quick, light drag from a scalpel or hobby knife (unless you want the holes to look somewhat inflamed as well).
4/16/2010
Decisions, decisions...
Do I prefer an airbrush or a paintbrush now? Do I paint the segmented protrusion coming out of the Plaguebearer's mouth so as to make it resemble a giant, pasty-looking maggot, or paint it up as a dripping, putrefactingly rotten tongue? Anyone have any suggestions?
I've been trying out some new stuff here over the past few days - one of these figures was airbrushed with some additional shading touch-ups via a brush which were then gone over with an empty airbrush to drive the thinned paint into the depressions, and the other used the same colors but was strictly hand-painted via paintbrushes.
I must say I am certainly loving this airbrush, now that I've finally put it to use - it works especially well with washes. Even using windshield wiper fluid to cut my paints, the extra bluish tone from the wiper fluid adds a little extra something outside of the beige paints themselves. I applied a basecoat, two shading colors, and a highlight in about an hour! Whee! (I do have clear airbrush thinner, but I think I might stick with this wiper fluid for a while...)
I'm also pleased that my prep work on the Commission Giveaway Contest winner's Speculo Killer turned out so smooth. The figure is so delicate in appearance and what angles she has are so awkward - I wasn't sure I got everything or that things were smooth enough. After giving the figure a guide wash tonight on the "unpainted" parts, it looks like I covered both aspects well. Yay, me!
4/07/2010
Reporting In, Sir!
If anyone's noticed the relative scarcity of updates lately, there's been a few reasons for it. One is family stuff - trips out of town, wife starting a new job, our 1-year-old with pneumonia; the other(s) are that I've been trying to focus on the commission work I'm doing. I'm ready to start painting the Speculo Killer from the Infinity range, and was hoping to do so after getting back from a trip with two days that the kids would both be at day care - well, our son's pneumonia's scratched that "free time" idea for the most part, but at least now's the easy part in that I much prefer putting brush to figure. I generally dislike prepping figures since it takes me a long time being somewhat obsessive about mold lines and flush fittings and all that fun stuff.
I also received another commission shortly after running the Commission Giveaway Contest, and while assembling and tidying up and gluing that is still underway, I will say this - it's not a GW Trygon or Mawloc, and it's not a Valkyrie, although it's up there in scale and will be mounted on a similar blank. It's something big and evil, and it's going to be going on this base:
I cut it out of sheet plastic stock with an electric bandsaw, trimmed to shape with a heavy rasp, and then smoothed things out with a progression of sandpaper from 60 grit up to 800. It's fun to break out the big toys once in awhile, and thankfully our son's a relatively sound sleeper!
I also received another commission shortly after running the Commission Giveaway Contest, and while assembling and tidying up and gluing that is still underway, I will say this - it's not a GW Trygon or Mawloc, and it's not a Valkyrie, although it's up there in scale and will be mounted on a similar blank. It's something big and evil, and it's going to be going on this base:
I cut it out of sheet plastic stock with an electric bandsaw, trimmed to shape with a heavy rasp, and then smoothed things out with a progression of sandpaper from 60 grit up to 800. It's fun to break out the big toys once in awhile, and thankfully our son's a relatively sound sleeper!
2/13/2010
Hobby Tip - Cyanoacrylate Gluing, pt. 2
As sort of a follow-up to my last Hobby Tip regarding Cyanoacrylate Gluing and some ongoing frustration regarding fingers sticking to everything while trying to glue paper to sheet styrene as part of an ongoing Rhino conversion, I figgered I may as well share this tip:
To prevent your fingers from sticking to CA-glued objects, you can either coat them with a thin layer of Vaseline (per my last Hobby Tip regarding CA gluing) or try using an oil- and moisturizer-rich hand lotion just before you apply the glue. Tried this today after much frustration, using some heavy-duty Eucerin lotion that we have in the house and I'm pleased to say that it works wonderfully! Michigan winter and the lovely triple-threat combination of below-freezing temperatures, extremely dry air and high wind is rough on the skin, so we have a ready supply of lotion handy, all I needed to add was some paper, styrene, and Zap-A-Gap for a trial run:
One important afterthought: as part of ongoing prep work, make sure that you wash and gently scrub with dishwashing soap (or another degreaser/surfactant) and a toothbrush anything that you've stuck together with hand lotion as a barrier on your fingers, prior to doing any additional work on it, as any residual hand lotion on your work will act as a moisture-proof barrier to everything else, too!
To prevent your fingers from sticking to CA-glued objects, you can either coat them with a thin layer of Vaseline (per my last Hobby Tip regarding CA gluing) or try using an oil- and moisturizer-rich hand lotion just before you apply the glue. Tried this today after much frustration, using some heavy-duty Eucerin lotion that we have in the house and I'm pleased to say that it works wonderfully! Michigan winter and the lovely triple-threat combination of below-freezing temperatures, extremely dry air and high wind is rough on the skin, so we have a ready supply of lotion handy, all I needed to add was some paper, styrene, and Zap-A-Gap for a trial run:
One important afterthought: as part of ongoing prep work, make sure that you wash and gently scrub with dishwashing soap (or another degreaser/surfactant) and a toothbrush anything that you've stuck together with hand lotion as a barrier on your fingers, prior to doing any additional work on it, as any residual hand lotion on your work will act as a moisture-proof barrier to everything else, too!
11/09/2009
Hobby Tip - Cyanoacrylate Gluing
This Hobby Tip entry is specifically regarding cyanoacrylate (or CA) glue, one of the more important tools in assembling figures and vehicles. CA glue is unique in that it requires no heat or pressure to bond - it reacts with moisture in its surroundings in order to polymerize (solidify) and will join together anything it is in contact with as a byproduct of its polymerization process. Cyanoacrylate glue has a number of advantages: it sets itself even in an airless environment, it is able to join together different material types since its setting process is more or less "self-sufficient," and the glue itself creates a reasonably strong bond if spread on properly prepared (slightly roughed-up) join surfaces. As a result of using moisture as the main catalyst in its chemical reaction, cyanoacrylate glue is brittle when fully dried as compared to other glues. Another failing is that due to its brittleness, CA glue bonds themselves can "shatter" much easier compared to those of glues that maintain a certain amount of flexibility, like two-part epoxies.
I've found through trial and error (generally a lot of error) that it is most often a waste to buy a large size bottle of the stuff. Despite various methods to try and keep the stuff from clogging or generally building up to the point where the bottle becomes useless, it invariably seems to happen. I've tried using wood nails/push pins in the top to seal the bottle (inert metal vs. directly stuck cap), wiping off the bottle and slapping the lid on tight as quick as possible (limiting amount of air), transferring the stuff into a smaller precision-drip bottle (despite a metal drip tube this time, it still clogged and wouldn't clean out despite all kinds of tricks), and even experimenting with all different consistencies of CA glue (super thin vs. medium viscosity vs. gel) to try and find one that would "last" longer - I think you get the idea. My advice would be to buy the smallest bottle you can (generally the cheapest, anyhow) and that way you'll have less go to waste. I no longer buy larger repackaged bottles from hobby stores, or even specialty hobby brands like Zap-A-Gap, since they all come in larger containers and are all essentially the same thing - pure cyanoacrylate glue.
In terms of usage, the gel variety (Krazy Glue Craft Gel, "Gap Filling Formula" Zap-A-Gap) has a longer set time (30-60 seconds) and is good if you need to position a part before the glue hardens it in place - another fringe benefit for assembling models or figures is that the gel variety also fills minor gaps due to the thicker consistency. Super thin CA glue is great for narrow spaces and has a quick set time (5-10 seconds, usually) - it makes the best use of precision applicators and allows capillary action to "draw" itself into narrow crevices due to the surface tension of the liquid CA glue (in other words, if applied to a narrow crack between two close-fitting held-together parts, it will creep in between the parts and join them in a very short time frame. Medium viscosity CA glue behaves, well, somewhere in the middle.
A lot of people use CA bond time accelerators or "zip kickers" - now while I've never personally bought them, I've likewise never had reason to. The idea behind a CA accelerator is that it essentially serves as a catalyst for the glue's "chemical reaction" - in other words, it increases the amount of moisture in contact with the glue so that it sets quicker. As I mentioned at the start, the key feature of CA glue is that it responds extremely well to moisture of any kind - unsurprisingly enough, even a drop or two of plain water will cause your CA glue to "kick off" immediately when compared to allowing CA glue to draw moisture from the to-be-glued parts and ambient humidity. Even breathing on setting CA glue has much the same effect (with the down side of potential inhalation of glue fumes), while using a hair dryer on parts glued with CA adds funneled air moisture via the directed blower as well as a quicker evaporation rate. You can likewise add a great number of materials to CA glue besides water that have a high "moisture" content and a fast evaporation rate in order to speed up the glue's chemical reaction: acetone, mineral spirits, rubbing alcohol, Tenax 7-R, thin viscosity plastic (polystyrene) cement, and even Green Stuff (AKA Kneadatite) - you'll find that the CA glue sets up much quicker, almost instantly in some cases. The greater the added moisture coupled with a quicker evaporation, the faster the setting time. (Again, I've never bought a "name brand" CA glue bond time accelerator - but I've used plenty "off-brand" kinds!) A few notes on this subject: a lot of chemicals are almost as toxic on inhalation as the glue fumes itself, so be careful, and using some sort of "zip kicker" versus allowing it to "naturally" set results in a weaker join - a forced reaction means less opportunity to spread or establish stronger polymer bonds.
One thing about CA glue to always keep in mind, is that even though it make have set visibly and bonded parts together physically it is by no means "dry" (although technically this is true about most substances that start out "wet," like paint or even spray primer.) It continues to give off fumes until completely evaporated and these fumes are lighter than air. If you have CA glue inside a sealed container (like a glued-on enclosed canopy or glue-fastened vehicle cockpit, for example), fumes from the drying CA glue will interact with ambient humidity inside the container and you will end up with a hazy coating everywhere that the fumes have spread - great for "tinted glass" effects, but not so good for a clear plastic window. Like it says on the bottle labels, always use CA glue in an open, well-ventilated space: I'd suggest that when allowing CA-glued parts to dry, you should lay them or prop them up so that the fumes have somewhere to vent away other than inside your model.
In a roundabout way, this brings me back to the problem of preventing clogged glue bottles. The reason they clog or get their lids glued on solidly is the "reacts with moisture" part - after you put the glue bottle cap on, the glue solidifies as it reacts with ambient moisture drawn into the mouth of the glue bottle as well as any moisture on the outside of the bottle opening or inside the cap itself. You're essentially putting a self-sealing cork on your glue bottle if there's any glue in the opening whatsoever, and it will happily adhere the moisture-laden bottle cap to the moisture-laden bottle mouth if you let it - I speak from experience here.
Here are several methods to minimize your CA glue bottles "clogging" themselves and becoming unusable as a result:
I've found through trial and error (generally a lot of error) that it is most often a waste to buy a large size bottle of the stuff. Despite various methods to try and keep the stuff from clogging or generally building up to the point where the bottle becomes useless, it invariably seems to happen. I've tried using wood nails/push pins in the top to seal the bottle (inert metal vs. directly stuck cap), wiping off the bottle and slapping the lid on tight as quick as possible (limiting amount of air), transferring the stuff into a smaller precision-drip bottle (despite a metal drip tube this time, it still clogged and wouldn't clean out despite all kinds of tricks), and even experimenting with all different consistencies of CA glue (super thin vs. medium viscosity vs. gel) to try and find one that would "last" longer - I think you get the idea. My advice would be to buy the smallest bottle you can (generally the cheapest, anyhow) and that way you'll have less go to waste. I no longer buy larger repackaged bottles from hobby stores, or even specialty hobby brands like Zap-A-Gap, since they all come in larger containers and are all essentially the same thing - pure cyanoacrylate glue.
In terms of usage, the gel variety (Krazy Glue Craft Gel, "Gap Filling Formula" Zap-A-Gap) has a longer set time (30-60 seconds) and is good if you need to position a part before the glue hardens it in place - another fringe benefit for assembling models or figures is that the gel variety also fills minor gaps due to the thicker consistency. Super thin CA glue is great for narrow spaces and has a quick set time (5-10 seconds, usually) - it makes the best use of precision applicators and allows capillary action to "draw" itself into narrow crevices due to the surface tension of the liquid CA glue (in other words, if applied to a narrow crack between two close-fitting held-together parts, it will creep in between the parts and join them in a very short time frame. Medium viscosity CA glue behaves, well, somewhere in the middle.
A lot of people use CA bond time accelerators or "zip kickers" - now while I've never personally bought them, I've likewise never had reason to. The idea behind a CA accelerator is that it essentially serves as a catalyst for the glue's "chemical reaction" - in other words, it increases the amount of moisture in contact with the glue so that it sets quicker. As I mentioned at the start, the key feature of CA glue is that it responds extremely well to moisture of any kind - unsurprisingly enough, even a drop or two of plain water will cause your CA glue to "kick off" immediately when compared to allowing CA glue to draw moisture from the to-be-glued parts and ambient humidity. Even breathing on setting CA glue has much the same effect (with the down side of potential inhalation of glue fumes), while using a hair dryer on parts glued with CA adds funneled air moisture via the directed blower as well as a quicker evaporation rate. You can likewise add a great number of materials to CA glue besides water that have a high "moisture" content and a fast evaporation rate in order to speed up the glue's chemical reaction: acetone, mineral spirits, rubbing alcohol, Tenax 7-R, thin viscosity plastic (polystyrene) cement, and even Green Stuff (AKA Kneadatite) - you'll find that the CA glue sets up much quicker, almost instantly in some cases. The greater the added moisture coupled with a quicker evaporation, the faster the setting time. (Again, I've never bought a "name brand" CA glue bond time accelerator - but I've used plenty "off-brand" kinds!) A few notes on this subject: a lot of chemicals are almost as toxic on inhalation as the glue fumes itself, so be careful, and using some sort of "zip kicker" versus allowing it to "naturally" set results in a weaker join - a forced reaction means less opportunity to spread or establish stronger polymer bonds.
One thing about CA glue to always keep in mind, is that even though it make have set visibly and bonded parts together physically it is by no means "dry" (although technically this is true about most substances that start out "wet," like paint or even spray primer.) It continues to give off fumes until completely evaporated and these fumes are lighter than air. If you have CA glue inside a sealed container (like a glued-on enclosed canopy or glue-fastened vehicle cockpit, for example), fumes from the drying CA glue will interact with ambient humidity inside the container and you will end up with a hazy coating everywhere that the fumes have spread - great for "tinted glass" effects, but not so good for a clear plastic window. Like it says on the bottle labels, always use CA glue in an open, well-ventilated space: I'd suggest that when allowing CA-glued parts to dry, you should lay them or prop them up so that the fumes have somewhere to vent away other than inside your model.
In a roundabout way, this brings me back to the problem of preventing clogged glue bottles. The reason they clog or get their lids glued on solidly is the "reacts with moisture" part - after you put the glue bottle cap on, the glue solidifies as it reacts with ambient moisture drawn into the mouth of the glue bottle as well as any moisture on the outside of the bottle opening or inside the cap itself. You're essentially putting a self-sealing cork on your glue bottle if there's any glue in the opening whatsoever, and it will happily adhere the moisture-laden bottle cap to the moisture-laden bottle mouth if you let it - I speak from experience here.
Here are several methods to minimize your CA glue bottles "clogging" themselves and becoming unusable as a result:
- Make sure to wipe any excess glue off the opening of the bottle, in order to minimize the amount of chemical bonding after you put the cap on.
- Use bottles with a smaller opening, or better yet, smaller bottles outright - the smaller the opening and the smaller the amount of glue left behind to react, the easier it will be to break the seal the next time around.
- Accept that the glue will eventually seal its bottle shut, buy bottles with long "spouts," and simply snip off the blocked end whenever it happens.
- Coat the open end of your glue bottle before putting the lid on with something that A) does not carry moisture and B) will help to protect the glue inside from additional moisture - smearing a little bit of petroleum jelly (Vaseline) on the mouth of your glue bottle will keep it usable much longer and help to prevent clogs.
11/03/2009
* KABOOOM* Forge World Renegade Psyker WIP [Update 11/2/2009]
I'm turning my attention back to my Forge World Renegade Psyker as an entry in a friendly painting competition over on the RelicNews Painting & Modeling Forum that's going to be starting up on Oct 15th, and essentially my next step now would be getting under way with painting. He's standing on a trimmed-down Secret Weapon Miniatures "Urban Ruins" resin pre-cast mounted atop a Games Workshop slottabase, which is primarily cracked and pitted concrete in appearance but with a little extra surface grit that I added in parts. This particular base seemed a perfect fit to my vision of the figure's overall appearance, since by offsetting the resin pre-cast piece on top of the slottabase and pinning the Psyker to the slightly raised back portion of the resin pre-cast base allowed me to "play up" the fractured concrete at the Psyker's feet. I further converted the overall figure basing to ideally show him in the process of using a "psychic power," as he's thrown back his gas mask and is clutching his head in apparent anguish - kinda hard to tell, though, since the sculpt of the figure is such that his "face" is stripped down to the bare skull with augmetic eyes and a breathing system.
At face value, it doesn't make any sense to me that a Renegade Psyker would be sent out to fight an Imperial reclamation force as a living weapon but is having a hard time preventing his own head from exploding. It seemed to me that a better visual effect overall would be to give the Psyker an external demonstration of him actively using a "psychic power."
Since the "Urban Ruins" resin pre-cast was a perfect layout allowing me to have him standing on pitted concrete with increasing damage in an outward direction in front and away from him, I decided to add an effect of what hopefully looks like chunks of shattered concrete exploding outwards in front of him (and a buckled and torn part of a Rhino hatch in the mix, just for fun with color and texture):

Unfortunately, my client for the Thousand Sons Chaos Lord commission I've been working on in my "spare time" the past few months apparently "disappeared off the face of the Earth" and I've had no luck in attempts to make contact. I'm taking a break in work on that piece - likely to be auctioned off when finished - in order to paint up the Renegade Psyker for the competition at the Painting & Modeling Forum. I put painting the Psyker on hold a while back in order to work on the Thousand Sons Lord commission - the Psyker suffered some slight damage to the previously-finished basing in the down time (probably our cats and getting jostled around since I need to reorganize my painting area) and I just patched him back up today.
I've no idea how the Psyker will turn out appearance-wise except for a few vague color ideas: ideally I'll be trying an airbrush that I got for my birthday in August (using paint for the first time) at some point with him, even if it's just blocking out areas of plain color; he's theoretically going to be a test of a workable color scheme for a Renegades & Heretics force aligned with multiple Chaos Powers (I had a definite color scheme in mind that I was set to use back in 2007 when I first concocted having a Renegade force under the Lost and the Damned rules, but those were more generic troops than the FW Siege of Vraks army list I'm using now); and lastly, and maybe most importantly - I haven't painted anything at all since December 2008! (It's been quite the year.)
Comments/suggestions appreciated, as always!
At face value, it doesn't make any sense to me that a Renegade Psyker would be sent out to fight an Imperial reclamation force as a living weapon but is having a hard time preventing his own head from exploding. It seemed to me that a better visual effect overall would be to give the Psyker an external demonstration of him actively using a "psychic power."
Since the "Urban Ruins" resin pre-cast was a perfect layout allowing me to have him standing on pitted concrete with increasing damage in an outward direction in front and away from him, I decided to add an effect of what hopefully looks like chunks of shattered concrete exploding outwards in front of him (and a buckled and torn part of a Rhino hatch in the mix, just for fun with color and texture):
Unfortunately, my client for the Thousand Sons Chaos Lord commission I've been working on in my "spare time" the past few months apparently "disappeared off the face of the Earth" and I've had no luck in attempts to make contact. I'm taking a break in work on that piece - likely to be auctioned off when finished - in order to paint up the Renegade Psyker for the competition at the Painting & Modeling Forum. I put painting the Psyker on hold a while back in order to work on the Thousand Sons Lord commission - the Psyker suffered some slight damage to the previously-finished basing in the down time (probably our cats and getting jostled around since I need to reorganize my painting area) and I just patched him back up today.
I've no idea how the Psyker will turn out appearance-wise except for a few vague color ideas: ideally I'll be trying an airbrush that I got for my birthday in August (using paint for the first time) at some point with him, even if it's just blocking out areas of plain color; he's theoretically going to be a test of a workable color scheme for a Renegades & Heretics force aligned with multiple Chaos Powers (I had a definite color scheme in mind that I was set to use back in 2007 when I first concocted having a Renegade force under the Lost and the Damned rules, but those were more generic troops than the FW Siege of Vraks army list I'm using now); and lastly, and maybe most importantly - I haven't painted anything at all since December 2008! (It's been quite the year.)
Comments/suggestions appreciated, as always!
9/26/2009
Hobby Tip - Making Rounded Rivets, Pt. 2
Now for the actual process of making rounded rivets. The initial introduction and materials summary can be found in Part 1.
Let me put out a disclaimer of sorts to start with here before delving into the actual step-by-step. I know there's likely a ton of other methods out there for making rivets and there's nothing especially earth-shattering about my own method. Three other techniques I'm familiar with are: using small dots of PVA glue to build up a "rivet" shape, gluing small plastic bead-shaped "spacers" from a water purifier filter into place in shallow drilled divots, and simply using round styrene rod thinly cut into measured "rivet-height" lengths and glued where needed.
I think this method gives a reasonably realistic-looking end result and I've found it to be a bit more durable than glued-on rivets, where I've frequently had my rivet work scrape off or easily get knocked off - especially when working with metal figures where the plastic-to-metal bond isn't so strong. I've also found the "rivet setting" part of this writeup to be equally useful for other things like small studded spikes or even horns on figures. The downside to my rivet-making method, and I'll lay it out plain now, is that the "setting" part is slightly more time consuming than some of the other approaches mentioned above - on the other hand, if you make a whole lot of rivet "blanks" in batches during down time (like when watching a movie you've already seen a hundred times), then that's the bulk of the work done and the rest is just placement.
I would suggest to anyone trying this method of making rounded rivets that they take all safety precautions necessary - there, that's my public service announcement duties covered for the month. No, really, I personally check over all my equipment and tools before I start any work to make sure that nothing is damaged or compromised, that everything is firmly tightened and nothing is out of place and that my eyes are shielded from possible flying debris. As a general rule, I always try to use my Dremel immediately over (if not slightly within) a small, portable wastebasket so as to minimize the odds of something being flung loose as well as to collect as much waste, dust, and stray particles as possible.

At this point you cut a short length off of the styrene rod in addition to the rivet - I'd suggest about a millimeter or so, but it all really depends on how much depth you have in the area you're wanting to place your rounded rivets.
The next part is relatively straightforward: for the sake of consistent spacing and level appearance, you'll likely want to take a ruler and a soft lead pencil with a good point and go along and mark where you're going to place your rounded rivets - you'll know before you start the next step of drilling if things look good appearance-wise, and you can always adjust your planned placement at this point since everything is simply markings on the figure. I prefer to use mechanical pencils with 2B grade lead for as they make clear marks even on metal figures, erase fairly easily afterward and are soft enough that they don't gouge sheet styrene if you're doing layers of custom conversion.
Now you take your drill bit that matches as closely as possible to the diameter of the round styrene rod you've used to make your rivets, and sink placement holes to at least the depth of your length of rounded rivet (remember I suggested cutting them off the rod in 1mm segments or thereabouts). You might want to drill slightly deeper than the length of your rivet cut-offs, since you can always put a little extra glue in the hole and simply hold the rivet in place to the correct depth until the glue sets up a bit.
Once you've got your holes drilled for placing your rounded rivet lengths, you'll want to use tweezers or something similar with a narrow-but-firm grip to hold the length of rivet near the top, apply a small amount of cyanoacrylate glue (CA glue, Krazy Glue, Zap-A-Gap, etc.) around the lower end of the rivet length and, placing the end into the hole you've pre-drilled, hold it at the height you want the final rivet to stick out (or course, this assumes that you may have been a little off on the depth of the hole - if you're able to drill precisely right or have the foresight to test fit and/or shorten the length of the rivet "insert" before gluing and slotting it home. I would suggest CA glue over polystyrene (plastic) cement, since an excess of plastic glue on the slotted end of the rivet when mounted in/on a plastic figure could creep up and deform the rounded rivet shape at the visible end that you've spent your time making. CA glue also allows a bit of leeway in terms of adjusting the fit of your rivet before it sets, tends to fill any gaps better if your holes weren't able to be the same diameter as the styrene rod you used, and can be wiped away without melting/distorting the final appearance of your rounded rivet if you did happen to use a little too much glue at the base before slotting it home.
Here's an example of rounded rivets made following the guidelines above set into a sheet styrene "plate" over the skull of a converted figure:

As you can see in this close-up picture of some finished ones I've left some of the rivets imperfectly shaped and in a few places not put anything into the holes I've drilled for them, all with the idea of getting across battle damage, or perhaps "wear and tear" on the figure.
Here's more of the same with finished pictures of the rounded rivets in several places across a full figure, the same as seen in the top-down head picture above:
Let me put out a disclaimer of sorts to start with here before delving into the actual step-by-step. I know there's likely a ton of other methods out there for making rivets and there's nothing especially earth-shattering about my own method. Three other techniques I'm familiar with are: using small dots of PVA glue to build up a "rivet" shape, gluing small plastic bead-shaped "spacers" from a water purifier filter into place in shallow drilled divots, and simply using round styrene rod thinly cut into measured "rivet-height" lengths and glued where needed.
I think this method gives a reasonably realistic-looking end result and I've found it to be a bit more durable than glued-on rivets, where I've frequently had my rivet work scrape off or easily get knocked off - especially when working with metal figures where the plastic-to-metal bond isn't so strong. I've also found the "rivet setting" part of this writeup to be equally useful for other things like small studded spikes or even horns on figures. The downside to my rivet-making method, and I'll lay it out plain now, is that the "setting" part is slightly more time consuming than some of the other approaches mentioned above - on the other hand, if you make a whole lot of rivet "blanks" in batches during down time (like when watching a movie you've already seen a hundred times), then that's the bulk of the work done and the rest is just placement.
I would suggest to anyone trying this method of making rounded rivets that they take all safety precautions necessary - there, that's my public service announcement duties covered for the month. No, really, I personally check over all my equipment and tools before I start any work to make sure that nothing is damaged or compromised, that everything is firmly tightened and nothing is out of place and that my eyes are shielded from possible flying debris. As a general rule, I always try to use my Dremel immediately over (if not slightly within) a small, portable wastebasket so as to minimize the odds of something being flung loose as well as to collect as much waste, dust, and stray particles as possible.
- To get started, take a length of the 0.4mm diameter round styrene rod and set your Dremel on the lowest speed setting with a medium sanding disc firmly in place. You want to hold the length of styrene rod perhaps 1/4" up the rod from the end to be shaped and be sure that you always shape the end of the styrene against the portion of the medium sanding disc spinning away from you. (I'm left handed, so for me that's the bottom.) You might want hold the styrene rod with hobby pliers, forceps, or even tweezers - anything so long as you can maintain a firm grip on it. Myself, I'm comfortable pinching the rod between my fingertips with the remaining length pointed outwards away from me while shaping it, but I also have very steady hands and maintain a constant focus on my work to avoid injury. (At the lowest speed setting, my particular Dremel can be used for polishing, light finish woodwork, or even shaping and buffing fingernails in a slightly different hobby; I wouldn't use my hands to hold material at any higher RPM settings, however.)
- Even at the lowest speed setting, the medium sanding disc is capable of melting the styrene rod through friction - we actually want to take advantage of this as it makes the shaping process easier. With very light taps of the end of the round rod against the portion of the disc spinning away from you, twisting the rod slightly at every tap to expose a new face to the sanding disc, holding it at about a 60° and you'll start to see friction melt the styrene in the shape of a rough "bullet" point. I should note that at a low speed setting and with about 1/4" of the styrene rod exposed, you'll find that the end "jumps" constantly away from the disc while shaping - this isn't necessarily a bad thing as it limits the amount of time and friction that the styrene is exposed to in contact with the sanding disc, but it does take some getting used to.
- Gradually you want to move the very end of the now-semi-pointed styrene rod to more of a 45° angle in relation to the disc, and maintain the process of touching the very end against the spinning disc with very light taps while making sure to twist the rod slightly at every tap to expose new surfaces to the disc. You'll quickly note that it begins to assume more of a rounded aspect at the end.
- At this point, you'll likely be able to finish off the rounding process with extremely light taps of the very end of the now-shaped styrene rod end against the sanding disc, again making sure to continue twisting the rod with every contact - if done lightly and carefully enough throughout the whole process, you should essentially have a smooth, natural rounding to the end of the styrene rod with a minimum of wasted material. If the shape is slightly off that's not necessarily a bad thing, as the appearance when eventually mounted on the figure can help to contribute to any "battle damage."
At this point you cut a short length off of the styrene rod in addition to the rivet - I'd suggest about a millimeter or so, but it all really depends on how much depth you have in the area you're wanting to place your rounded rivets.
The next part is relatively straightforward: for the sake of consistent spacing and level appearance, you'll likely want to take a ruler and a soft lead pencil with a good point and go along and mark where you're going to place your rounded rivets - you'll know before you start the next step of drilling if things look good appearance-wise, and you can always adjust your planned placement at this point since everything is simply markings on the figure. I prefer to use mechanical pencils with 2B grade lead for as they make clear marks even on metal figures, erase fairly easily afterward and are soft enough that they don't gouge sheet styrene if you're doing layers of custom conversion.
Now you take your drill bit that matches as closely as possible to the diameter of the round styrene rod you've used to make your rivets, and sink placement holes to at least the depth of your length of rounded rivet (remember I suggested cutting them off the rod in 1mm segments or thereabouts). You might want to drill slightly deeper than the length of your rivet cut-offs, since you can always put a little extra glue in the hole and simply hold the rivet in place to the correct depth until the glue sets up a bit.
Once you've got your holes drilled for placing your rounded rivet lengths, you'll want to use tweezers or something similar with a narrow-but-firm grip to hold the length of rivet near the top, apply a small amount of cyanoacrylate glue (CA glue, Krazy Glue, Zap-A-Gap, etc.) around the lower end of the rivet length and, placing the end into the hole you've pre-drilled, hold it at the height you want the final rivet to stick out (or course, this assumes that you may have been a little off on the depth of the hole - if you're able to drill precisely right or have the foresight to test fit and/or shorten the length of the rivet "insert" before gluing and slotting it home. I would suggest CA glue over polystyrene (plastic) cement, since an excess of plastic glue on the slotted end of the rivet when mounted in/on a plastic figure could creep up and deform the rounded rivet shape at the visible end that you've spent your time making. CA glue also allows a bit of leeway in terms of adjusting the fit of your rivet before it sets, tends to fill any gaps better if your holes weren't able to be the same diameter as the styrene rod you used, and can be wiped away without melting/distorting the final appearance of your rounded rivet if you did happen to use a little too much glue at the base before slotting it home.
Here's an example of rounded rivets made following the guidelines above set into a sheet styrene "plate" over the skull of a converted figure:
As you can see in this close-up picture of some finished ones I've left some of the rivets imperfectly shaped and in a few places not put anything into the holes I've drilled for them, all with the idea of getting across battle damage, or perhaps "wear and tear" on the figure.
Here's more of the same with finished pictures of the rounded rivets in several places across a full figure, the same as seen in the top-down head picture above:
9/23/2009
Hobby Tip - Making Rounded Rivets, Pt. 1
(Hey, what can I say - our whole family has been simultaneously sick and the 'Net seems to have eaten my first attempt at posting this, so here we go again.)
Somewhat building upon last week's Hobby Tip, this one is geared specifically towards making rounded rivets in 28mm (or roughly 1/35th scale) as a part of converting your figures/models. The reason I say "converting" specifically is that it's a little involved and slightly time intensive to get set up, but once you're rolling along you can make any number of rivets for use at a later time - and the rivet "setting" can be done at any point if you have an appropriate-sized drill bit and pin vise (or improvise, as I'll get to).
To start with, here's a picture of the materials you might likely need:

Out of all the items in the picture, the most important material would be styrene rod of a very small diameter: here we have .015"/0.4mm diameter in a package of 10 - it might not seem a lot of round styrene rod, but given the output product it tends to last quite a while (of course, that also assumes you're not covering an entire Games Workshop Baneblade conversion with these - if you were, I'd probably recommend a larger diameter of styrene and a less involved method and/or the services of a good, professional psychiatrist). By personal preference in making rounded rivets, I'd recommend Plastruct styrene products as they seem a little more accurate/precise in their measurements and also seem to be generally available in smaller diameter sizing, but conversely are also slightly more expensive (or so it seems locally) than other generally available manufacturers, such as Evergreen Scale Models. Just for comparison's sake, I included a length of the 0.4mm round styrene rod next to a length of 0.5mm rod: there is a difference appearance-wise and scale-wise on the final figure, but you can reasonably use this rounded rivet method with any diameter of styrene rod - I'm thinking that for "chunkier" sizes, though, you'd have to be a bit more thorough in your rounding off, whereas the smaller diameters will look good even if slightly uneven.
In the image above we also have two grades of sandpaper - medium-fine grit (120) and 800 grit wet/dry - both of which you might try, although I'd lean more towards the medium-fine 120 grit myself if I'd be doing this manually. I've shown my variable-speed Dremel with a medium grit sanding disc mounted - this is actually the means by which I'd recommend you round off your rivets and the method I'm going to focus the Hobby Tip writeup on, but this is straightforwards enough that you could likely settle on a sandpaper shaping method without too much trouble (and I'd recommend rounding down the styrene with a fingertip pressing the very end of the rod lightly onto the paper, from past experience).
There's several pin vises in the image - one of which is home made. The one without the rotating "hand rest" was the first one I bought (from Sears, I believe, although not a Craftsman product but a "generic" brand) and is perfectly fine and very inexpensive - it also came with an assortment of different bits. The other, slightly fancier one, was picked up at a train/model hobby store and was slightly more expensive (but still under $12) and did not come with bits but came with several "chuck" inserts of varying hole diameters. The reason I mention this is that ideally, for very tiny rivets using the method I'll be laying out, you need to drill shallow holes of matching diameter; the plain pin vise doesn't tighten enough to grip the size drill bit needed, whereas using a very small size drill bit in the slightly fancier one was a relative piece of cake. The third "pin vise" in the picture is actually a length of wooden dowel (end rounded with sandpaper for comfort) with the appropriate-sized bit glued into (via two-part epoxy and a thorough soaking of CA+ glue) a matching diameter hole to just below the beginning of the "threads" on the tiny drill bit itself - not the most elegant of handles, but it gets the job done and is easily portable.
Now we get to the drill bit: a size #74 high speed twist drill bit made by Precision Twist Drill Co. (one of a bag of like 20 or so matching-sized bits) and the same diameter as the small "standard" rivet size as represented by Games Workshop on a large number of their 40K figures - also the perfect size to make holes to inset the previously-mentioned .015"/0.4mm diameter round styrene rod.
Now for the process! (In my next entry, of course...)
Somewhat building upon last week's Hobby Tip, this one is geared specifically towards making rounded rivets in 28mm (or roughly 1/35th scale) as a part of converting your figures/models. The reason I say "converting" specifically is that it's a little involved and slightly time intensive to get set up, but once you're rolling along you can make any number of rivets for use at a later time - and the rivet "setting" can be done at any point if you have an appropriate-sized drill bit and pin vise (or improvise, as I'll get to).
To start with, here's a picture of the materials you might likely need:
Out of all the items in the picture, the most important material would be styrene rod of a very small diameter: here we have .015"/0.4mm diameter in a package of 10 - it might not seem a lot of round styrene rod, but given the output product it tends to last quite a while (of course, that also assumes you're not covering an entire Games Workshop Baneblade conversion with these - if you were, I'd probably recommend a larger diameter of styrene and a less involved method and/or the services of a good, professional psychiatrist). By personal preference in making rounded rivets, I'd recommend Plastruct styrene products as they seem a little more accurate/precise in their measurements and also seem to be generally available in smaller diameter sizing, but conversely are also slightly more expensive (or so it seems locally) than other generally available manufacturers, such as Evergreen Scale Models. Just for comparison's sake, I included a length of the 0.4mm round styrene rod next to a length of 0.5mm rod: there is a difference appearance-wise and scale-wise on the final figure, but you can reasonably use this rounded rivet method with any diameter of styrene rod - I'm thinking that for "chunkier" sizes, though, you'd have to be a bit more thorough in your rounding off, whereas the smaller diameters will look good even if slightly uneven.
In the image above we also have two grades of sandpaper - medium-fine grit (120) and 800 grit wet/dry - both of which you might try, although I'd lean more towards the medium-fine 120 grit myself if I'd be doing this manually. I've shown my variable-speed Dremel with a medium grit sanding disc mounted - this is actually the means by which I'd recommend you round off your rivets and the method I'm going to focus the Hobby Tip writeup on, but this is straightforwards enough that you could likely settle on a sandpaper shaping method without too much trouble (and I'd recommend rounding down the styrene with a fingertip pressing the very end of the rod lightly onto the paper, from past experience).
There's several pin vises in the image - one of which is home made. The one without the rotating "hand rest" was the first one I bought (from Sears, I believe, although not a Craftsman product but a "generic" brand) and is perfectly fine and very inexpensive - it also came with an assortment of different bits. The other, slightly fancier one, was picked up at a train/model hobby store and was slightly more expensive (but still under $12) and did not come with bits but came with several "chuck" inserts of varying hole diameters. The reason I mention this is that ideally, for very tiny rivets using the method I'll be laying out, you need to drill shallow holes of matching diameter; the plain pin vise doesn't tighten enough to grip the size drill bit needed, whereas using a very small size drill bit in the slightly fancier one was a relative piece of cake. The third "pin vise" in the picture is actually a length of wooden dowel (end rounded with sandpaper for comfort) with the appropriate-sized bit glued into (via two-part epoxy and a thorough soaking of CA+ glue) a matching diameter hole to just below the beginning of the "threads" on the tiny drill bit itself - not the most elegant of handles, but it gets the job done and is easily portable.
Now we get to the drill bit: a size #74 high speed twist drill bit made by Precision Twist Drill Co. (one of a bag of like 20 or so matching-sized bits) and the same diameter as the small "standard" rivet size as represented by Games Workshop on a large number of their 40K figures - also the perfect size to make holes to inset the previously-mentioned .015"/0.4mm diameter round styrene rod.
Now for the process! (In my next entry, of course...)
9/01/2009
Hobby Tip - Balanced Tools
Are your tools balanced? (This concerns using Dremel High Speed Rotary Tools, specifically, but I think the underlying idea is important enough to warrant making a Hobby Tip out of it.)
I went back the other day and just for the heck of it, reread the manual for my Dremel Rotary Tool - I'm fairly sure I read it when I first started using the thing years ago, but the significance probably escaped me. Now, thankfully, I haven't been severely injured by any of the workshop or hobby tools I've used (*knocks on wood*), well, barring the occasional stab from a hobby knife when I should've known better - and the only problematic thing that's happened with the Dremel has been a few cut-off wheel "explosions" when I've obviously bit off more than I could chew in one go.
It hit me all of a sudden, though, in one particular section I read that there's a lot of things I just sort of take for granted in using my hobby tools and working with miniatures, and that if I actually stopped and thought about what I was doing - the actual process of what I was doing, mind, and whether I was actually working in the most efficient manner possible - there's probably a lot of things I could change to make my hobby more, um... expedient? Smoother? Easier? Quieter?
I hope the Dremel company forgives me for quoting from their product manual directly (that, or floats me some advertising bonuses as it's a helluva tool and I use it in hundreds of ways in working with and prepping miniatures and terrain):
There - fairly simple. It sounds fairly common-sense, doesn't it? Well, yeah, in theory - but how many people have actually took a few moments before charging in with hot wire cutters, Dremels, paintbrushes, or unthinned glues to think whether how they were going about things and whether they about to work, process-wise, in the most efficient manner?
Any of you have any suggestions or comments along this line in terms of things to think about prior to "setting to work" in this fine-scale miniature and -model hobby?
I went back the other day and just for the heck of it, reread the manual for my Dremel Rotary Tool - I'm fairly sure I read it when I first started using the thing years ago, but the significance probably escaped me. Now, thankfully, I haven't been severely injured by any of the workshop or hobby tools I've used (*knocks on wood*), well, barring the occasional stab from a hobby knife when I should've known better - and the only problematic thing that's happened with the Dremel has been a few cut-off wheel "explosions" when I've obviously bit off more than I could chew in one go.
It hit me all of a sudden, though, in one particular section I read that there's a lot of things I just sort of take for granted in using my hobby tools and working with miniatures, and that if I actually stopped and thought about what I was doing - the actual process of what I was doing, mind, and whether I was actually working in the most efficient manner possible - there's probably a lot of things I could change to make my hobby more, um... expedient? Smoother? Easier? Quieter?
I hope the Dremel company forgives me for quoting from their product manual directly (that, or floats me some advertising bonuses as it's a helluva tool and I use it in hundreds of ways in working with and prepping miniatures and terrain):
BALANCING ACCESSORIES - For precision work, it is important that all accessories be in good balance (much the same as the tires on your automobile). To true up or balance an accessory, slightly loosen [the] collet nut and give the accessory or collet a 1/4 turn. Re-tighten [the] collet nut and run the Rotary Tool. You should be able to tell by the sound and feel if your accessory is running in balance. Continue adjusting in this fashion until best balance is achieved.
There - fairly simple. It sounds fairly common-sense, doesn't it? Well, yeah, in theory - but how many people have actually took a few moments before charging in with hot wire cutters, Dremels, paintbrushes, or unthinned glues to think whether how they were going about things and whether they about to work, process-wise, in the most efficient manner?
Any of you have any suggestions or comments along this line in terms of things to think about prior to "setting to work" in this fine-scale miniature and -model hobby?
8/29/2009
Commissioned Tzeentch Chaos Lord WIP #2
Well, now that I've got some things squared away with the figure, I can post some pictures. The first thing (and main picture) is that I've got him stripped down to his bare minimum, more or less, and everything from here out will be building him back up - you know, kinda like Steve Austin?

There was an accident of sorts with this guy - I don't know how many people are necessarily familiar with the model (since looking for reference pics online, he doesn't seem to be all that "popular"). Essentially, he's attached to the tab at the bottom by his chain and a replica "spiked backpack skull top," meaning the only thing keeping him stuck in a slottabase and upright is about the width of the slottabase tab - not even, actually. In transit or movement or maybe just my absent-minded ignorance, he must've been getting bent back and forth to weaken the join with the tab, because when I went to "unglue" him from the base with some acetone he simply sheared off at the tab.
I had a chance to talk with the customer about this and my potential plans as to how to resolve it (various methods of pinning, pretty much) and clarified some things so far as the conversion, so with the figure stripped down at this point, I'm basically good to go.
Oh, and the color scheme is more or less decided:
Tutankhamun_MainPicture.jpg
Tut_coffinette.jpg
falcon_03.jpg
800px-AncientEgyptianMummy-Antjau-CloseUp.png
I'll post more later, but right now I'm headed up to the hospital ER with my wife to get a CAT scan of her gastrointestinal system - she's been getting violently ill any time she eats anything substantial. The kids are at my parents, the animals all have food and water, and I'm geared up for a lengthy wait...
I've not been able to find any myself, but does anyone know of any examples of the Chaos Raptor Lord figure pinned to scenery or anything - something other than based with the chained skull, in other words?
There was an accident of sorts with this guy - I don't know how many people are necessarily familiar with the model (since looking for reference pics online, he doesn't seem to be all that "popular"). Essentially, he's attached to the tab at the bottom by his chain and a replica "spiked backpack skull top," meaning the only thing keeping him stuck in a slottabase and upright is about the width of the slottabase tab - not even, actually. In transit or movement or maybe just my absent-minded ignorance, he must've been getting bent back and forth to weaken the join with the tab, because when I went to "unglue" him from the base with some acetone he simply sheared off at the tab.
I had a chance to talk with the customer about this and my potential plans as to how to resolve it (various methods of pinning, pretty much) and clarified some things so far as the conversion, so with the figure stripped down at this point, I'm basically good to go.
Oh, and the color scheme is more or less decided:
Tutankhamun_MainPicture.jpg
Tut_coffinette.jpg
falcon_03.jpg
800px-AncientEgyptianMummy-Antjau-CloseUp.png
I'll post more later, but right now I'm headed up to the hospital ER with my wife to get a CAT scan of her gastrointestinal system - she's been getting violently ill any time she eats anything substantial. The kids are at my parents, the animals all have food and water, and I'm geared up for a lengthy wait...
I've not been able to find any myself, but does anyone know of any examples of the Chaos Raptor Lord figure pinned to scenery or anything - something other than based with the chained skull, in other words?
8/21/2009
Working on a Tzeentch Chaos Lord Commission
I recently started working on a commission for a Tzeentch Chaos Lord figure for a Thousand Sons army, and figured since I haven't really posted much in the way of work-in-progress entries here on Painting by Tinweasel, I'd start things off on this guy with as bare-bones as it gets - more or less what the customer handed over after discussion of the "tentative" final version. No pre-cast resin bases (from a near-to-opening online business elsewhere), no dramatic poses (necessarily), and no diorama-style basing - just a suitable tabletop army leader painted (and converted, even, as things have worked out) to a display quality. I've also never had the opportunity to paint any of the old "official" Chaos Marine Legions, and the Thousand Sons definitely have character in abundance.
The rough design: essentially what the customer gave me at the start:

What the customer is looking for is a Tzeentch-allied Chaos Lord w/ wings and a Daemon Weapon to lead his pure 'Sons army. The swapped-out pieces are to represent his Daemon Weapon meshed with one arm and a mutated close combat weapon on the other - I'll be making some adjustments to both arms to tie things together, and my suggestions seem to have been well-received. We likewise both agreed that an improvement on the current standard Thousand Sons Rubric Marine head would be good, with the understanding that the whole figure still fits the Thousand Sons theme - we discussed options, and I've got the go-ahead to model something I have in mind that ought to fit the bill nicely. I also suggested that the current figure is apparently lacking some sort of ranged weapon in terms of "what you see is what you get" and that with some additional conversion and sculpting that would tie together with the current planned appearance, he could be plainly and obviously game legal while allowing me to do a little additional sculpting. Other than the agreed-upon requirements, the customer has more or less given me free rein otherwise, so I'm going to get creative with this guy (within reason, of course).
The agreed-on color scheme should look like a darker version of the standard Games Workshop Thousand Sons Legion colors, while using analogous and complementary shades for the additional parts. I'd like to try some new effects with zenithal/ambient lighting, given the figure's posing, and am really looking forwards to the planned sculpting and additions to the base model. I've not had a chance to paint any Thousand Sons troops yet (nor Raptors, for that matter), but I'm really looking forwards to working on this. (Did I mention that other than the agreed-upon requirements, I've more or less got free rein from the customer to work on this guy with whatever comes to mind and fits with the overall theme? Yee-haw!)
The rough design: essentially what the customer gave me at the start:
What the customer is looking for is a Tzeentch-allied Chaos Lord w/ wings and a Daemon Weapon to lead his pure 'Sons army. The swapped-out pieces are to represent his Daemon Weapon meshed with one arm and a mutated close combat weapon on the other - I'll be making some adjustments to both arms to tie things together, and my suggestions seem to have been well-received. We likewise both agreed that an improvement on the current standard Thousand Sons Rubric Marine head would be good, with the understanding that the whole figure still fits the Thousand Sons theme - we discussed options, and I've got the go-ahead to model something I have in mind that ought to fit the bill nicely. I also suggested that the current figure is apparently lacking some sort of ranged weapon in terms of "what you see is what you get" and that with some additional conversion and sculpting that would tie together with the current planned appearance, he could be plainly and obviously game legal while allowing me to do a little additional sculpting. Other than the agreed-upon requirements, the customer has more or less given me free rein otherwise, so I'm going to get creative with this guy (within reason, of course).
The agreed-on color scheme should look like a darker version of the standard Games Workshop Thousand Sons Legion colors, while using analogous and complementary shades for the additional parts. I'd like to try some new effects with zenithal/ambient lighting, given the figure's posing, and am really looking forwards to the planned sculpting and additions to the base model. I've not had a chance to paint any Thousand Sons troops yet (nor Raptors, for that matter), but I'm really looking forwards to working on this. (Did I mention that other than the agreed-upon requirements, I've more or less got free rein from the customer to work on this guy with whatever comes to mind and fits with the overall theme? Yee-haw!)
8/13/2009
Hobby Tip - Cuticle Stones
I would highly recommend the purchase of a readily available and fairly inexpensive product for use in prepping miniatures, bases, sculpting, resin, and other decorative bits with your figures - unorthodox as it might sound, a common (and I can't believe I'm linking to this sort of site for an example) cuticle stone. They're known by lots of names, and I'm sure you can readily find one at a local pharmacy, druggist, general goods store, manicurist's shop, or salon.
Essentially, when wet, cuticle stones work like automotive grade wet-dry sandpaper in stick form - I'd wager 600+ grit, maybe more like 800. In other words, this isn't something you'd want to use as your primary tool for filing/sanding of miniatures or scenery materials, but it does a great job at smoothing rough edges, taking things down in tricky hard-to-reach areas, and burnishing. The cuticle stone I've got is shaped like the one I linked to on the beauty supplies website (above) - essentially like a squared-off bullet, with a rectangular body that curves on two faces to a somewhat rounded not-quite-30° angle straight end. So far, I've used it to get a baby-smooth burnished finish on the skull helm of a former white metal Khorne Lord now-Undivided after Dremeling off his "antlers"; stripping the multiple mold lines off of my somewhat soft resin Forge World Renegade Psyker without leaving score marks like a metal file would; adding scoring, gouges, and scrapes to resin basing and chunks of broken resin "concrete" using the right-angles of the rectangular body; and general purpose (but not heavy-duty) filing and smoothing. The nice thing about my cuticle stone is that it's got rounded curves, a broad angle, and 90° corner sanding all in one package.
I'd recommend picking one up to anyone, just to see how they handle - let me know what you think.
Essentially, when wet, cuticle stones work like automotive grade wet-dry sandpaper in stick form - I'd wager 600+ grit, maybe more like 800. In other words, this isn't something you'd want to use as your primary tool for filing/sanding of miniatures or scenery materials, but it does a great job at smoothing rough edges, taking things down in tricky hard-to-reach areas, and burnishing. The cuticle stone I've got is shaped like the one I linked to on the beauty supplies website (above) - essentially like a squared-off bullet, with a rectangular body that curves on two faces to a somewhat rounded not-quite-30° angle straight end. So far, I've used it to get a baby-smooth burnished finish on the skull helm of a former white metal Khorne Lord now-Undivided after Dremeling off his "antlers"; stripping the multiple mold lines off of my somewhat soft resin Forge World Renegade Psyker without leaving score marks like a metal file would; adding scoring, gouges, and scrapes to resin basing and chunks of broken resin "concrete" using the right-angles of the rectangular body; and general purpose (but not heavy-duty) filing and smoothing. The nice thing about my cuticle stone is that it's got rounded curves, a broad angle, and 90° corner sanding all in one package.
I'd recommend picking one up to anyone, just to see how they handle - let me know what you think.
7/11/2009
Hobby Tip - Green Stuff Sculpting
What do all these have in common?
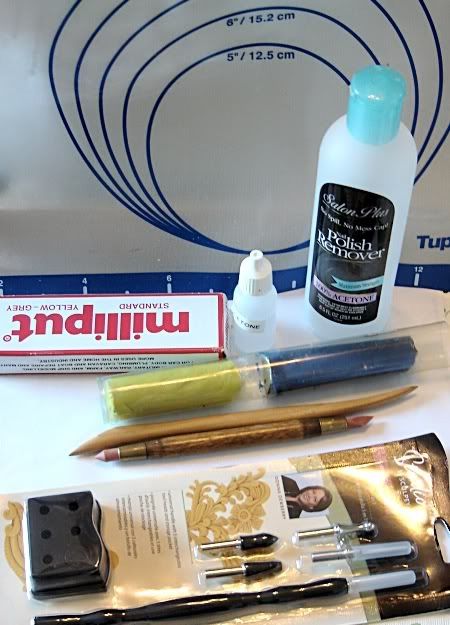
Well, they all have to do with my sculpting of Green Stuff - I'm not the most veteran of sculptors, and have never sculpted a full figure from scratch, but I've used it in smaller amounts on quite a few occasions from simple gap-filling all the way up to re-sculpts of joints and fill-ins of missing (or mutated) body parts. It's been suggested that when blogging, pictures say a lot more than simple text alone (Thanks, Ron!). The long and the short of it is that Green Stuff is the nickname for yellow-and-blue Kneadatite epoxy putty. The blue part is the hardener and the yellow part is the filler: more blue in the two-part mixture will make the putty cure faster and harder, whereas using more yellow will result in a softer mixture that takes details better but sets more slowly.
A wide range of tools can be used for sculpting and shaping Green Stuff: wax carving tools, dental tools, pins, hobby knives, and even custom-made molds. Personally, I alternate between using a wooden clay sculpting tool with a sharpened wedge-shaped end and an opposite rounded flat end - you can see it in the picture above. The excellent thing about wood is that it's great for burnishing, since it naturally has some "give" to it compared to a comparable metal sculpting tool, and if it comes right down to it you can reshape the tool itself if you need different angles or something (as I've done, myself, in increasing the sharpness of the point on the wedge-shaped end); the downside is that it doesn't sculpt as crisp an edge as a tool made from something more solid and is less suited for doing hard angles compared to the fairly popular dental tools that a number of sculptors would swear by.
Next to the wooden clay sculpting tool is possibly the next best thing to sliced bread, in my opinion, in terms of shaping Green Stuff: a roughly pencil-length "clay shaper." One tip is somewhat scalpel- or chisel-shaped and the other is round and comes to a point with a slope similar to a 45° angle sharpened pencil - the great thing about clay shapers, and they come in all different tip varieties, is that the rubber ends don't stick to Green Stuff like pretty much everything else does. The unopened package at the bottom of the picture is a 5-in-1 clay tool set produced by Studio by Sculpey that I picked up for cheap at JoAnn Etc. fairly recently, and it hopefully will live up to my expectations - it has similar rounded point and chisel-like tips in the set along the lines of my current clay shaper, but also has interchangeable blade, ball, and needle ends that can all be stored in the container when not in use.
In working with a roughly 50-50 mixture, you have to let it sit about 20-30 minutes to firm up a bit so it's not as sticky or soft. It's always going to have some tackiness to it, but this is a good thing as it allows you to actually put the stuff somewhere (if you're adding detail to an existing figure, say) and have it stay where you want it. Outside of the rubberized tips of clay shapers, Green Stuff sticks to mostly everything else - the way around this is to use moistened tools, whether that be from saliva, water, or more exotic substances. I generally use a thin layer of Vaseline on my wooden sculpting tool (or whatever else I might be using) in order to position the GS and give it a rough initial shape with gentle nudges. After another brief period of firming time, say, 20 more minutes or so, that's when I find I can go back and start to work on fine details as the GS has turned a bit more rubbery and actually holds molded shape without too much deformation elsewhere. In other words, I'd suggest starting with broad shapes and then work down to fine details over several breaks. An alternate method would simply be to block out rough areas with a certain amount of the stuff and once that's fully set, then use a thinner layer for surface details. My understanding of what many professional epoxy putty sculptors do when they're sculpting figures as a whole, for example, is to establish underlying muscle groups over an armature of some sort, apply the clothes in a second pass, apply smaller details in a 3rd pass, and so on.
Other tips:
- It speeds things up when working using multiple layers if you let Green Stuff set under a low-wattage lamp (say, a 40-watt bulb) rather than letting it air-cure, but the down side is that unless well-supported, the GS tends to sag with heat. The maximum working time for GS is roughly an hour to an hour and a half, depending on the temperature of the working environment. Experimenting with various ratios of yellow to blue is also useful, depending on how quickly you want it to set by itself or how malleable you want your sculpting material to be overall.
- Some people use plain ol' water as a lubricant for sculpting GS - it works great and prevents tools from sticking to the stuff, but unfortunately evaporates fairly quickly. Some use Vaseline to help with sculpting (myself included) - it prevents sticking, takes a long time to rub away to the point where you need to add more, and it easily allows for smooth, finger-burnished finishes on your GS sculpture without much work; the downside is that it leaves behind an oily residue which must be removed completely once the GS has cured otherwise you'll have difficulty in sculpting/painting/priming/etc. over the top of it. Nothing a little bit of dish soap, running water, and a little gentle scrubbing can't take care of, though - at worst, an overnight soak in Simple Green will take care of any leftover petroleum jelly on your sculpting when followed by a gentle scrub with a toothbrush. I'd imagine about halfway between the various properties of water and Vaseline would be saliva. A lot of folks use nothing but saliva to keep their sculpting equipment moistened so as not to stick - personal preference, really. Probably the oddest thing I've heard of to use in working with GS would be the use of a water-based "personal lubricant" like KY, Astroglide, or something similar - it's water based so there's no leftover residue (unlike Vaseline), it doesn't evaporate quickly (unlike water), and it's available in ready supply (unlike saliva, I guess)... I just can't see myself hitting up the condom 'n' lotion aisle of the grocery store for the sake of buying something to use in miniature sculpting, much less explaining it to my family - but to each their own.
- The cheapest and easiest way to sculpt with Green Stuff is to not use Green Stuff at all - no slight to Games Workshop (since they're the reason I'm back in this hobby), but their Green Stuff as sold in blister packs and consisting of two ribbons of yellow and blue stuck together is fairly expensive when compared to other options (and wasteful, considering the seam where the two colors meet is already set when you buy it off the shelf). Both Games Workshop and Reaper Miniatures both sell essentially repackaged and higher-priced versions of Kneadatite, as manufactured by Polymeric Systems, Inc. I bought the tube of Kneadatite Blue/Yellow Sculptors Epoxy Putty in the picture above for roughly $11 - holding about 2-3 times the amount of repackaged Green Stuff. (I'm to understand there's eBay stores selling Kneadatite for as little as $6 US or so, even, but I've had my tube for several years now and haven't needed to buy more.) One other good alternative to GS, as shown in my picture, is Milliput - it comes in several different grades of fineness (with White-White being the finest but most expensive) and has a longer set time compared to Green Stuff (roughly 4 hours), but is also able to be drilled, sanded, filed and sets fairly hard. A good workable plan when custom sculpting might be to use a different underlying material, like Milliput, Apoxie Sculpt, sprue, styrene, or even aluminum foil to bulk out a rough shape, and then go back and do detail work with Green Stuff after the fact.
- One of the best investments you could get if you're planning on sculpting with Green Stuff frequently is a non-stick flexible baking sheet (containing Teflon). I have one made by Tupperware that I use as a work surface when sculpting with Green Stuff - not only does GS not stick to it whatsoever, but it has metric and English measurements along the edges, can turn any relatively flat surface into a good place to sculpt, and conveniently rolls up compactly for easy storage. (I wouldn't recommend using it for baking after you start rolling around epoxy putty on it, though - I'm sure that can't be at all healthy. The one in the background of my pic above was co-opted upon discovery from our kitchen - with my wife's blessing, of course.)
- A small amount of kneaded Green Stuff mixed with decent amounts of pure acetone makes a slurry of paste-like consistency (hence the nail polish remover in the pic at the beginning of this blog entry). This concoction is perfect for spackling into gaps, brushing over unwanted crevices, or when thinned sufficiently can be "painted" over an existing surface to smooth it out. Once set, GS and acetone don't interact at all, but while still firming up they can be mixed together and used for all sorts of things that firmer molding-required GS can't be as easily - like radiation burns, the beginnings of corruption by Chaos, or minor mutation. A word of warning, though - acetone will begin to melt any plastic GW figures into a shapeless mass if spilled (hence the labeled Vallejo dropper bottle I use) and begin to deform surface details even in the amounts you'd use to make a GS paste.
- A few sheets of plasticard/sheet styrene coated with a fine layer of Vaseline make an excellent press for a blob of Green Stuff between them, if you have something hard to flatten them together against and you take pains to make sure that you're squashing the GS evenly flat. You can always carve squared-off sections of this flattened piece away for use as shoulder pad- or decorative armor trim - the set GS still remains somewhat flexible (depending on your mixing ratio) and can easily be set into position on your figures with CA glue.
7/09/2009
Hobby Tip - Miniature Preparation
One of the best things you can do to ensure a smooth and tidy paint job on your figures is to invest a little more time in preparation of the miniatures prior to painting. Removal of mold lines - the unsightly raised "flash" that encircles each figure (or each piece of multi-part castings) where the two halves of the mold come together during casting/pouring - is very important to the overall look of a finished model. There's nothing more annoying once a paint job's been finished to discover an untouched mold line, and nothing that screams "sloppy modeler" than leaving mold lines, venting tails, and the like completely untouched.
The most common and expedient method, especially with plastic figures, is to use the edge of a hobby knife dragged backwards across the mold lines at roughly a 45° angle. For this type of work it's always best to use as sharp a blade as possible and to take extreme care not to cut or stab yourself, generally by cutting away from you. Another common method - a little more involved but producing smoother results, I feel - is using needle/hobby files to smooth out the flash and other irregularities in the figure. Personally, I seem to get the most use out of my Flat, Half-Round, Round, and 3-Square (triangle) needle files. A combination of knife "scraping" and filing produces the best results, but this all depends on personal choice, the tools available, or maybe more importantly: the actual mold of the miniature.
If you're looking for more worn but straightforwards notching than you get with a hobby knife blade on things like sword and axe blades, I'd recommend using a 3-Square (triangle-shaped) hobby file - it's got nice sharp angles and a little bit of filing will get you a solid, nice-looking notch with a minimum of fuss. Another bonus of the 3-square file is that it's excellent for filing off lengthwise mold lines from ribbed power cable sculpting and the like without deforming the ribbing.
The most common and expedient method, especially with plastic figures, is to use the edge of a hobby knife dragged backwards across the mold lines at roughly a 45° angle. For this type of work it's always best to use as sharp a blade as possible and to take extreme care not to cut or stab yourself, generally by cutting away from you. Another common method - a little more involved but producing smoother results, I feel - is using needle/hobby files to smooth out the flash and other irregularities in the figure. Personally, I seem to get the most use out of my Flat, Half-Round, Round, and 3-Square (triangle) needle files. A combination of knife "scraping" and filing produces the best results, but this all depends on personal choice, the tools available, or maybe more importantly: the actual mold of the miniature.
If you're looking for more worn but straightforwards notching than you get with a hobby knife blade on things like sword and axe blades, I'd recommend using a 3-Square (triangle-shaped) hobby file - it's got nice sharp angles and a little bit of filing will get you a solid, nice-looking notch with a minimum of fuss. Another bonus of the 3-square file is that it's excellent for filing off lengthwise mold lines from ribbed power cable sculpting and the like without deforming the ribbing.
7/08/2009
Hobby Tip - Prepping Forge World Resin (Actually, Minis in General)
Somebody asked me regarding my mention of soaking the resin Renegade Psyker I'm working on in Simple Green - since Simple Green (or "Flash" in the UK, I believe) is commonly used to strip the paint off of figures, and this guy is unprimed resin.
One thing I would highly recommend everyone do after all the sanding and filing and shaping is done - possibly even before gluing any parts together - is to give your figures/parts a good scrub under warm water with a toothbrush and some dish soap ("fairy liquid," again, for folks in the UK). The reason being that for metal and plastic figures, there's generally a certain amount of the mold release agent left on the surface of the figure from the manufacturing process - think essentially ultra-diluted liquid petroleum jelly being sprayed in the mold prior to the metal or plastic being injected in. Depending on the primer you use, this may or may not be a problem, but generally you want your primer and anything else (Green Stuff, base texturing, water effects) to stick as well as possible to your miniature and so a simple scrub before with a degreasing surfactant like dish soap can make a big difference.
Now in the case of my Forge World figure, their pieces are fairly well-known for having a decent amount of residual mold release agent, with this often being problematic to the priming/painting process. Simple Green, while having ingredients that help to release paint and primer adhering to a figure, has its main use as a high-strength cleaning and degreasing product. (As an aside, Simple Green has a lot of the same "stripping agents" as in Castrol Super Clean, etc. if you check the company's product Material Safety Data Sheets online - but without all the fun "desiccating and invasively stripping the oils and moisture from your skin" stuff.) Since many mold release agents are petroleum-based, my soaking of the figure in Simple Green overnight was just an added preemptive step prior to my usual toothbrush 'n' dish soap scrub. It seems to have worked, though, as there's no "greasiness" left on the figure and the Simple Green (presumably) caused some of the leftover release agent to congeal visibly in the figure's deeper crevices - easily removed with the follow-up scrubbing.
It might be obvious, but I'd also recommend saving the scrub until the very last thing before priming your figures, if at all possible - the same way that mold release agent can interfere with adherence, well, so can fingerprints, dust from filing, Cheetos crumbs, etc. A clean mini is a happy mini!
One thing I would highly recommend everyone do after all the sanding and filing and shaping is done - possibly even before gluing any parts together - is to give your figures/parts a good scrub under warm water with a toothbrush and some dish soap ("fairy liquid," again, for folks in the UK). The reason being that for metal and plastic figures, there's generally a certain amount of the mold release agent left on the surface of the figure from the manufacturing process - think essentially ultra-diluted liquid petroleum jelly being sprayed in the mold prior to the metal or plastic being injected in. Depending on the primer you use, this may or may not be a problem, but generally you want your primer and anything else (Green Stuff, base texturing, water effects) to stick as well as possible to your miniature and so a simple scrub before with a degreasing surfactant like dish soap can make a big difference.
Now in the case of my Forge World figure, their pieces are fairly well-known for having a decent amount of residual mold release agent, with this often being problematic to the priming/painting process. Simple Green, while having ingredients that help to release paint and primer adhering to a figure, has its main use as a high-strength cleaning and degreasing product. (As an aside, Simple Green has a lot of the same "stripping agents" as in Castrol Super Clean, etc. if you check the company's product Material Safety Data Sheets online - but without all the fun "desiccating and invasively stripping the oils and moisture from your skin" stuff.) Since many mold release agents are petroleum-based, my soaking of the figure in Simple Green overnight was just an added preemptive step prior to my usual toothbrush 'n' dish soap scrub. It seems to have worked, though, as there's no "greasiness" left on the figure and the Simple Green (presumably) caused some of the leftover release agent to congeal visibly in the figure's deeper crevices - easily removed with the follow-up scrubbing.
It might be obvious, but I'd also recommend saving the scrub until the very last thing before priming your figures, if at all possible - the same way that mold release agent can interfere with adherence, well, so can fingerprints, dust from filing, Cheetos crumbs, etc. A clean mini is a happy mini!
Subscribe to:
Posts (Atom)