I'm not sure how many people have followed the link to my actual static Painting by Tinweasel website, but I'm in the process of tweaking things with it and my Blogger blog, essentially trying to integrate things together.
I'd greatly appreciate it if folks could go to the website and poke around (primarily on the main page, but hey...) and hopefully with help from people viewing it with different browsers (and Comments on the blog, assuming I have things figgered out correctly), I can make sure that everything is laid out properly.

7/25/2009
Commissioned Work
At this time, I am currently available to accept painting and/or conversion commissions on figures. Ideally, I primarily wish to focus on single models, but would be open to negotiation on a small-scale group/unit or figure display, depending on customer request. For any conversion work to be done, I would appreciate if any expected necessary parts were supplied in advance and with at least minimal preparation work done on them (trimming, filing, mold line removal, etc.) since, to be blunt, this is generally what takes me the longest time to accomplish since I am used to preparing figures for competition or display quality. Due to time constraints, I would not personally be willing to scratch-build display bases and the like for customers, but would be willing to paint a pre-made display base or something similar in addition to commissioned figures - again, that would be open to negotiation depending on specific customer needs. Likewise, due to time constraints, I would not be personally willing to do wholesale sculpting or scratch-building on conversion pieces, but would be agreeable to some modification to existing parts or "bitz" by negotiation depending on specific customer needs.
If you would like to commission painting or conversion work from myself or simply wish more information, please contact me through the following link with a request, and I will get back to you as soon as I can: Commission Request from Painting by Tinweasel. I have email filtering set fairly high to limit spam, so unless the Subject Line of email correspondence is fairly specific, it may possibly be overlooked.
Ideally, all details of the work to be done will be agreed upon prior to commencement of the commission. If desired, I can provide periodic updates as the work is completed and/or in-progress pictures during the process. Regardless, I will take pictures when work is done and will send an email with pictures of your commissioned figure(s) - I expect a reply with an approval or request for any final adjustments in return. I am open to requests for minor alterations or touch-up work before approval of the figure and acceptance of the final payment, but am not willing to engage in wholesale adjustment to the commissioned figure(s) once initial details of the work to be done have been agreed upon. (Ideally, the finished figure(s) will look like what was initially agreed upon, so any drastic change in appearance, pose, color scheme or painting style shouldn't even crop up!) All finished painted figures will receive at least two coats of protective sealant and be carefully packaged to protect them during shipping.
I reserve the right to photograph any commissioned works for display or advertisement purposes for my painting and conversion services. I take pride in my work with fine-scale miniatures, with time and effort put into each piece; as such, I would like to showcase it! If for any reason you are unable to pay for a completed commission, the figure(s) will be held for 30 days. If payment has still not been received at that time, I will then make the figure(s) available for sale to another customer or through eBay. Also note that extra parts from model/figure sets that I purchase for a commissioned work are not returned except on request.
This price list is posted as a general guideline and is specifically intended to be open-ended - the finalized price following discussion of the work to be done may include such variables as amount of conversion or reposing, freehand paint work, decorative basing, number of figures in a commission, unusual painting methods, etc.
All figures are wrapped individually and separately from packing material - care will be taken to ensure that painted and/or converted figures do not shift or move in transit to minimize possible damage, and arrive with the commissioned work ideally intact.
The remaining payment of 75% plus shipping costs will come due upon final completion of all work, and is expected prior to actual shipment of the finished miniature(s).
If you would like to commission painting or conversion work from myself or simply wish more information, please contact me through the following link with a request, and I will get back to you as soon as I can: Commission Request from Painting by Tinweasel. I have email filtering set fairly high to limit spam, so unless the Subject Line of email correspondence is fairly specific, it may possibly be overlooked.
What to Expect:
Unless otherwise requested, I attempt to paint every figure to my highest ability - I enjoy the process of painting and get great satisfaction from seeing a solid, finished work at the end. The same standards of quality I try to put into my own painted display figures, I will likewise apply to commissioned works. When contacting me regarding a request for commission, please include as many specifics as possible of what you would like: which figure(s) you would like painted, whether they will be supplied or purchased by myself, overall color scheme, appearance, weathering effects, basing style, links to reference material, etc. When the work to be done has been agreed upon, and overall cost for commission decided upon, I expect an initial down-payment of at least 25% of the quoted final price in addition to the cost of any extra purchases needed for the commissioned figure(s) prior to starting work.Ideally, all details of the work to be done will be agreed upon prior to commencement of the commission. If desired, I can provide periodic updates as the work is completed and/or in-progress pictures during the process. Regardless, I will take pictures when work is done and will send an email with pictures of your commissioned figure(s) - I expect a reply with an approval or request for any final adjustments in return. I am open to requests for minor alterations or touch-up work before approval of the figure and acceptance of the final payment, but am not willing to engage in wholesale adjustment to the commissioned figure(s) once initial details of the work to be done have been agreed upon. (Ideally, the finished figure(s) will look like what was initially agreed upon, so any drastic change in appearance, pose, color scheme or painting style shouldn't even crop up!) All finished painted figures will receive at least two coats of protective sealant and be carefully packaged to protect them during shipping.
I reserve the right to photograph any commissioned works for display or advertisement purposes for my painting and conversion services. I take pride in my work with fine-scale miniatures, with time and effort put into each piece; as such, I would like to showcase it! If for any reason you are unable to pay for a completed commission, the figure(s) will be held for 30 days. If payment has still not been received at that time, I will then make the figure(s) available for sale to another customer or through eBay. Also note that extra parts from model/figure sets that I purchase for a commissioned work are not returned except on request.
| Pricing: | |
|---|---|
| Figure Type | Price Range |
| Single Figures (Games Workshop, Reaper, Privateer Press characters/smaller Warjacks, etc.) | $40.00 - $70.00 US |
| Mounted Figures (Figures on horseback, motorcycles, eagles, etc.) | $70.00 - $90.00 US |
| Large Figures (Dreadnoughts, Heavy Warjacks, trolls, Ogres, etc.) | $60.00 - $90.00 US |
| Large Vehicles (Catapults w/ crew, tanks, Land Raiders, etc.) | $80.00 - $110.00 US |
| Huge Models (Giants, dragons, involved pieces with large display bases, etc.) | $100.00 - $130.00 US |
| Single Figure Units (Games Workshop, Reaper, Privateer Press, etc.) | Negotiable |
This price list is posted as a general guideline and is specifically intended to be open-ended - the finalized price following discussion of the work to be done may include such variables as amount of conversion or reposing, freehand paint work, decorative basing, number of figures in a commission, unusual painting methods, etc.
Shipping:
Figures will be shipped via U.S. Postal Service Priority Mail, unless discussed otherwise on a case by case basis (International Shipping, additional insurance, etc.) and USPS Priority Mail rates may be found here: U.S. Postal Service Domestic & International Shipping RatesAll figures are wrapped individually and separately from packing material - care will be taken to ensure that painted and/or converted figures do not shift or move in transit to minimize possible damage, and arrive with the commissioned work ideally intact.
Payment:
I accept Pay Pal for ease of use, insurability, and tracking purposes in case of difficulties that may crop up. Following a discussion of work to be done, expectations, materials and the like, I expect an initial down-payment of 25% of the finalized quoted price up front before work is started, plus cost of any additional supplies (miniatures, decorative materials, basing supplies, and so forth). Since my own time is limited I ask for a down-payment primarily to cover cost of my own materials and start-up supplies if needed, and to ensure the "earnestness" of commission painting requests, in a manner of speaking. I'm hoping that this doesn't come across as offensive or unreasonable, but to be blunt I would rather be working on a figure for someone who genuinely wants my services and is willing to pay for a quality finished piece done to a high standard, than spending time and resources on someone who is simply "window shopping." On the other hand, I can certainly understand concerns someone may have about commissioning my services and from that standpoint would gladly answer any additional questions or perhaps complete an initial piece with subsequent commissions to follow after there's an actual example of my work in-hand.The remaining payment of 75% plus shipping costs will come due upon final completion of all work, and is expected prior to actual shipment of the finished miniature(s).
7/20/2009
Games Workshop Kroot Hound, Honorable Mention - 2008 Chicago Golden Demons
Here is the revised Kroot Hound that I reworked for the Games Workshop 2008 Chicago Golden Demon painting competition. Since a majority of the work on the figure itself was already done, I focused on adding more character and depth of color to the figure. Spots on the hide were something I've been wanting to do since I worked on him the first time around, likewise color and highlight touch-ups on the leather and metallics. The adding of unique color to the skin tones was by suggestion, and I ran with it. The additional paint work was initially a little awkwards as the yellow and original green shades did not seem to like one another in terms of applying the newer color accents to get things to look like they "belonged," but I can definitely say that overall I'm very happy with how he turned out (likewise that he placed as one of very few 40K Single Figure Honorable Mentions and had his picture posted for posterity on the Games Workshop website.)


Here is the figure as finished originally - revisiting it, it's amazing to see how much detail and depth I left out, and I mean simple stuff like additional highlights and shading, when originally I thought he looked great. Well, as they say, hindsight is 20/20 and I'm glad I revisited him and put in the extra work since the improvement appearance-wise is pretty striking, and I much prefer this new color palette than the old, plainer coloration.


Here is the figure as finished originally - revisiting it, it's amazing to see how much detail and depth I left out, and I mean simple stuff like additional highlights and shading, when originally I thought he looked great. Well, as they say, hindsight is 20/20 and I'm glad I revisited him and put in the extra work since the improvement appearance-wise is pretty striking, and I much prefer this new color palette than the old, plainer coloration.


7/17/2009
Forge World Renegade Psyker WIP [Update 7/16/2009]
Well, (I think) I've finally finished filling out the concrete/dust cloud to the point where I'm relatively satisfied with it. It's been slow going, because the process is slightly involved and I've only been able to work on it in fits and starts. The side leaning directly away from the Psyker is mostly smooth and the outward dust cloud is fairly thin but is randomly "puffy" (like a cumulus cloud, I suppose) especially around the base of the flying concrete chunks - I'm assuming they'd have smallish contrails of dust when exploding outwards?


Any suggestions or feedback would be greatly appreciated! Is the thickness and/or presentation of the concrete dust cloud okay? Does it look like the front section of paving he is on exploding away from him?
Any suggestions or feedback would be greatly appreciated! Is the thickness and/or presentation of the concrete dust cloud okay? Does it look like the front section of paving he is on exploding away from him?
When I've got it looking about right, I'm going to flock the dust cloud over with some extra-fine grit and add smaller pieces of the broken "concrete" material that were just too tiny to be pinned springing outwards from the figure.
7/11/2009
Hobby Tip - Green Stuff Sculpting
What do all these have in common?
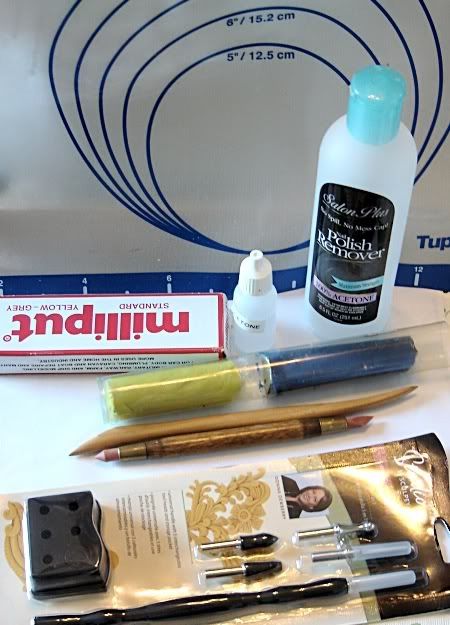
Well, they all have to do with my sculpting of Green Stuff - I'm not the most veteran of sculptors, and have never sculpted a full figure from scratch, but I've used it in smaller amounts on quite a few occasions from simple gap-filling all the way up to re-sculpts of joints and fill-ins of missing (or mutated) body parts. It's been suggested that when blogging, pictures say a lot more than simple text alone (Thanks, Ron!). The long and the short of it is that Green Stuff is the nickname for yellow-and-blue Kneadatite epoxy putty. The blue part is the hardener and the yellow part is the filler: more blue in the two-part mixture will make the putty cure faster and harder, whereas using more yellow will result in a softer mixture that takes details better but sets more slowly.
A wide range of tools can be used for sculpting and shaping Green Stuff: wax carving tools, dental tools, pins, hobby knives, and even custom-made molds. Personally, I alternate between using a wooden clay sculpting tool with a sharpened wedge-shaped end and an opposite rounded flat end - you can see it in the picture above. The excellent thing about wood is that it's great for burnishing, since it naturally has some "give" to it compared to a comparable metal sculpting tool, and if it comes right down to it you can reshape the tool itself if you need different angles or something (as I've done, myself, in increasing the sharpness of the point on the wedge-shaped end); the downside is that it doesn't sculpt as crisp an edge as a tool made from something more solid and is less suited for doing hard angles compared to the fairly popular dental tools that a number of sculptors would swear by.
Next to the wooden clay sculpting tool is possibly the next best thing to sliced bread, in my opinion, in terms of shaping Green Stuff: a roughly pencil-length "clay shaper." One tip is somewhat scalpel- or chisel-shaped and the other is round and comes to a point with a slope similar to a 45° angle sharpened pencil - the great thing about clay shapers, and they come in all different tip varieties, is that the rubber ends don't stick to Green Stuff like pretty much everything else does. The unopened package at the bottom of the picture is a 5-in-1 clay tool set produced by Studio by Sculpey that I picked up for cheap at JoAnn Etc. fairly recently, and it hopefully will live up to my expectations - it has similar rounded point and chisel-like tips in the set along the lines of my current clay shaper, but also has interchangeable blade, ball, and needle ends that can all be stored in the container when not in use.
In working with a roughly 50-50 mixture, you have to let it sit about 20-30 minutes to firm up a bit so it's not as sticky or soft. It's always going to have some tackiness to it, but this is a good thing as it allows you to actually put the stuff somewhere (if you're adding detail to an existing figure, say) and have it stay where you want it. Outside of the rubberized tips of clay shapers, Green Stuff sticks to mostly everything else - the way around this is to use moistened tools, whether that be from saliva, water, or more exotic substances. I generally use a thin layer of Vaseline on my wooden sculpting tool (or whatever else I might be using) in order to position the GS and give it a rough initial shape with gentle nudges. After another brief period of firming time, say, 20 more minutes or so, that's when I find I can go back and start to work on fine details as the GS has turned a bit more rubbery and actually holds molded shape without too much deformation elsewhere. In other words, I'd suggest starting with broad shapes and then work down to fine details over several breaks. An alternate method would simply be to block out rough areas with a certain amount of the stuff and once that's fully set, then use a thinner layer for surface details. My understanding of what many professional epoxy putty sculptors do when they're sculpting figures as a whole, for example, is to establish underlying muscle groups over an armature of some sort, apply the clothes in a second pass, apply smaller details in a 3rd pass, and so on.
Other tips:
- It speeds things up when working using multiple layers if you let Green Stuff set under a low-wattage lamp (say, a 40-watt bulb) rather than letting it air-cure, but the down side is that unless well-supported, the GS tends to sag with heat. The maximum working time for GS is roughly an hour to an hour and a half, depending on the temperature of the working environment. Experimenting with various ratios of yellow to blue is also useful, depending on how quickly you want it to set by itself or how malleable you want your sculpting material to be overall.
- Some people use plain ol' water as a lubricant for sculpting GS - it works great and prevents tools from sticking to the stuff, but unfortunately evaporates fairly quickly. Some use Vaseline to help with sculpting (myself included) - it prevents sticking, takes a long time to rub away to the point where you need to add more, and it easily allows for smooth, finger-burnished finishes on your GS sculpture without much work; the downside is that it leaves behind an oily residue which must be removed completely once the GS has cured otherwise you'll have difficulty in sculpting/painting/priming/etc. over the top of it. Nothing a little bit of dish soap, running water, and a little gentle scrubbing can't take care of, though - at worst, an overnight soak in Simple Green will take care of any leftover petroleum jelly on your sculpting when followed by a gentle scrub with a toothbrush. I'd imagine about halfway between the various properties of water and Vaseline would be saliva. A lot of folks use nothing but saliva to keep their sculpting equipment moistened so as not to stick - personal preference, really. Probably the oddest thing I've heard of to use in working with GS would be the use of a water-based "personal lubricant" like KY, Astroglide, or something similar - it's water based so there's no leftover residue (unlike Vaseline), it doesn't evaporate quickly (unlike water), and it's available in ready supply (unlike saliva, I guess)... I just can't see myself hitting up the condom 'n' lotion aisle of the grocery store for the sake of buying something to use in miniature sculpting, much less explaining it to my family - but to each their own.
- The cheapest and easiest way to sculpt with Green Stuff is to not use Green Stuff at all - no slight to Games Workshop (since they're the reason I'm back in this hobby), but their Green Stuff as sold in blister packs and consisting of two ribbons of yellow and blue stuck together is fairly expensive when compared to other options (and wasteful, considering the seam where the two colors meet is already set when you buy it off the shelf). Both Games Workshop and Reaper Miniatures both sell essentially repackaged and higher-priced versions of Kneadatite, as manufactured by Polymeric Systems, Inc. I bought the tube of Kneadatite Blue/Yellow Sculptors Epoxy Putty in the picture above for roughly $11 - holding about 2-3 times the amount of repackaged Green Stuff. (I'm to understand there's eBay stores selling Kneadatite for as little as $6 US or so, even, but I've had my tube for several years now and haven't needed to buy more.) One other good alternative to GS, as shown in my picture, is Milliput - it comes in several different grades of fineness (with White-White being the finest but most expensive) and has a longer set time compared to Green Stuff (roughly 4 hours), but is also able to be drilled, sanded, filed and sets fairly hard. A good workable plan when custom sculpting might be to use a different underlying material, like Milliput, Apoxie Sculpt, sprue, styrene, or even aluminum foil to bulk out a rough shape, and then go back and do detail work with Green Stuff after the fact.
- One of the best investments you could get if you're planning on sculpting with Green Stuff frequently is a non-stick flexible baking sheet (containing Teflon). I have one made by Tupperware that I use as a work surface when sculpting with Green Stuff - not only does GS not stick to it whatsoever, but it has metric and English measurements along the edges, can turn any relatively flat surface into a good place to sculpt, and conveniently rolls up compactly for easy storage. (I wouldn't recommend using it for baking after you start rolling around epoxy putty on it, though - I'm sure that can't be at all healthy. The one in the background of my pic above was co-opted upon discovery from our kitchen - with my wife's blessing, of course.)
- A small amount of kneaded Green Stuff mixed with decent amounts of pure acetone makes a slurry of paste-like consistency (hence the nail polish remover in the pic at the beginning of this blog entry). This concoction is perfect for spackling into gaps, brushing over unwanted crevices, or when thinned sufficiently can be "painted" over an existing surface to smooth it out. Once set, GS and acetone don't interact at all, but while still firming up they can be mixed together and used for all sorts of things that firmer molding-required GS can't be as easily - like radiation burns, the beginnings of corruption by Chaos, or minor mutation. A word of warning, though - acetone will begin to melt any plastic GW figures into a shapeless mass if spilled (hence the labeled Vallejo dropper bottle I use) and begin to deform surface details even in the amounts you'd use to make a GS paste.
- A few sheets of plasticard/sheet styrene coated with a fine layer of Vaseline make an excellent press for a blob of Green Stuff between them, if you have something hard to flatten them together against and you take pains to make sure that you're squashing the GS evenly flat. You can always carve squared-off sections of this flattened piece away for use as shoulder pad- or decorative armor trim - the set GS still remains somewhat flexible (depending on your mixing ratio) and can easily be set into position on your figures with CA glue.
7/09/2009
Hobby Tip - Miniature Preparation
One of the best things you can do to ensure a smooth and tidy paint job on your figures is to invest a little more time in preparation of the miniatures prior to painting. Removal of mold lines - the unsightly raised "flash" that encircles each figure (or each piece of multi-part castings) where the two halves of the mold come together during casting/pouring - is very important to the overall look of a finished model. There's nothing more annoying once a paint job's been finished to discover an untouched mold line, and nothing that screams "sloppy modeler" than leaving mold lines, venting tails, and the like completely untouched.
The most common and expedient method, especially with plastic figures, is to use the edge of a hobby knife dragged backwards across the mold lines at roughly a 45° angle. For this type of work it's always best to use as sharp a blade as possible and to take extreme care not to cut or stab yourself, generally by cutting away from you. Another common method - a little more involved but producing smoother results, I feel - is using needle/hobby files to smooth out the flash and other irregularities in the figure. Personally, I seem to get the most use out of my Flat, Half-Round, Round, and 3-Square (triangle) needle files. A combination of knife "scraping" and filing produces the best results, but this all depends on personal choice, the tools available, or maybe more importantly: the actual mold of the miniature.
If you're looking for more worn but straightforwards notching than you get with a hobby knife blade on things like sword and axe blades, I'd recommend using a 3-Square (triangle-shaped) hobby file - it's got nice sharp angles and a little bit of filing will get you a solid, nice-looking notch with a minimum of fuss. Another bonus of the 3-square file is that it's excellent for filing off lengthwise mold lines from ribbed power cable sculpting and the like without deforming the ribbing.
7/08/2009
Hobby Tip - Prepping Forge World Resin (Actually, Minis in General)
Somebody asked me regarding my mention of soaking the resin Renegade Psyker I'm working on in Simple Green - since Simple Green (or "Flash" in the UK, I believe) is commonly used to strip the paint off of figures, and this guy is unprimed resin.
One thing I would highly recommend everyone do after all the sanding and filing and shaping is done - possibly even before gluing any parts together - is to give your figures/parts a good scrub under warm water with a toothbrush and some dish soap ("fairy liquid," again, for folks in the UK). The reason being that for metal and plastic figures, there's generally a certain amount of the mold release agent left on the surface of the figure from the manufacturing process - think essentially ultra-diluted liquid petroleum jelly being sprayed in the mold prior to the metal or plastic being injected in. Depending on the primer you use, this may or may not be a problem, but generally you want your primer and anything else (Green Stuff, base texturing, water effects) to stick as well as possible to your miniature and so a simple scrub before with a degreasing surfactant like dish soap can make a big difference.
Now in the case of my Forge World figure, their pieces are fairly well-known for having a decent amount of residual mold release agent, with this often being problematic to the priming/painting process. Simple Green, while having ingredients that help to release paint and primer adhering to a figure, has its main use as a high-strength cleaning and degreasing product. (As an aside, Simple Green has a lot of the same "stripping agents" as in Castrol Super Clean, etc. if you check the company's product Material Safety Data Sheets online - but without all the fun "desiccating and invasively stripping the oils and moisture from your skin" stuff.) Since many mold release agents are petroleum-based, my soaking of the figure in Simple Green overnight was just an added preemptive step prior to my usual toothbrush 'n' dish soap scrub. It seems to have worked, though, as there's no "greasiness" left on the figure and the Simple Green (presumably) caused some of the leftover release agent to congeal visibly in the figure's deeper crevices - easily removed with the follow-up scrubbing.
It might be obvious, but I'd also recommend saving the scrub until the very last thing before priming your figures, if at all possible - the same way that mold release agent can interfere with adherence, well, so can fingerprints, dust from filing, Cheetos crumbs, etc. A clean mini is a happy mini!
7/07/2009
I feel like an idiot!
I went out of town with my family for the holiday weekend to visit with my wife's parents, with the plan of working on the basing of my Renegade Psyker when not busy with family stuff in order to finish adding texture and remaining "atmosphere" to it prior to priming. I had my box of tools with everything packed in (loaded for bear: sanding, cutting, filing, and scraping tools, several types of glue, brushes, my full set of Craftsman hobby pliers - you name it), three different tubs of ground cover texture (mixed gravel from individual grains to smallish rocks, dry kitty litter, and cornmeal), a separate tub with all my collected "scenic debris" for rubble and ruined machinery, several different jars of brush-on mixtures with varying concentrations of Future Floor Finish (it makes an excellent fixative for ground cover), and my Dremel set w/ carrying case (wasn't sure if I'd need to re-texture the ground cover if things didn't pan out). Now this isn't nearly as massive a gathering of gear as it might sound, since I have a few compartmentalized trays that hold a lot of this stuff (with the exception of the Dremel and assorted bits in its own carrying case) - but it took nearly an hour the nught before we left to get everything together from being scattered on my painting desk, and packed away for travel.)
The Renegade Psyker as he currently stands, needing some bulking out of the base with added texture to represent a "concussion wave" of dust and shattered concrete:

So it's just me and my 4-month-old son the day after we drive up - Dad got assigned baby detail as the rest of the family was out in town checking out garage sales and holiday festivities - and he falls asleep after his bottle around the time of his usual afternoon nap. I put him in his crib and he settles back down quickly, thankfully. With the baby monitor on and no need for the Dremel, I figger it's a perfect time to get everything out to start gluing the initial "dust cloud" onto the Psyker's base. Stuff gets moved out to a spare table in the back room, tubs of groud cover get unpacked, I get myself situated... that's when I realize that prior to leaving our house downstate, I never packed the based figure itself after setting it on the high shelf of the computer desk the night before to keep him from being toyed with by either of our jumping cats or "carefully" inspected by our 5-year-old daughter who loves her daddy's miniatures. Gah!
At least I got to do some prepping and assembly on some of the Khorne Berzerkers for my Chaos Warband, since I also packed box of figure parts, but it wasn't at all what I was hoping to do - I'm chomping at the bit to get painting on this guy, but I want to finish tidying up the "visual effects" of the base first and get everything looking "just right" before moving on to the next step.
Anyone else do something asinine like this when really looking forwards to working on a particular miniature?
Subscribe to:
Posts (Atom)
LinkWithin
