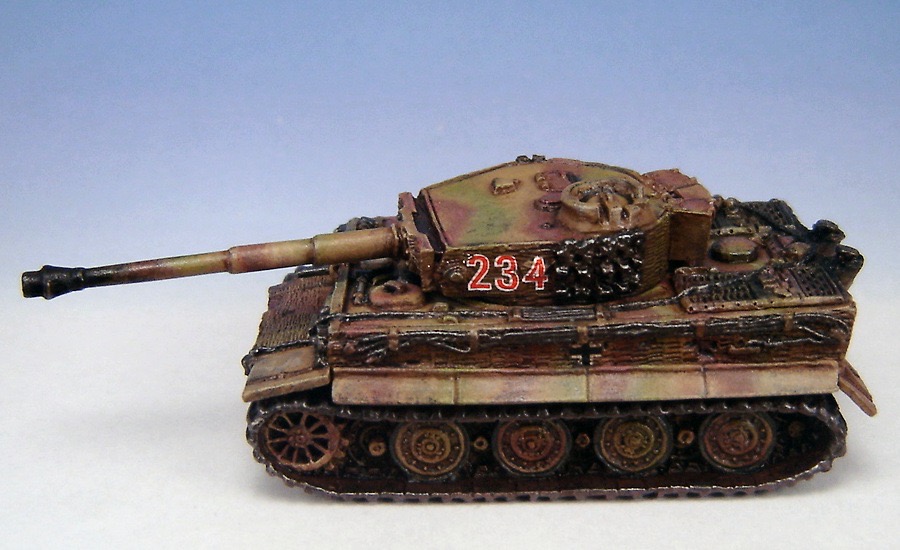
So I ran into some trouble last night trying to assemble a resin model with CA (cyanoacrylate AKA 'Super') glue. I use a number of different glues, this one happens to be CA glue from the (Privateer Press) P3 range, and I've had the bottle for well over a year now (maybe even several?). I haven't had any problems with it so far, really, but it's a reasonably large bottle and I don't use it all that often.
I did, however, run into a problem last night: I was trying to prep a resin figure as one of my entries for Gen Con coming up at the end of July and noticed the figure's ankle had broken while still attached by sprues. Oh well - just get some CA glue, dab it on, and done! Yeah, not so much... While I've used the glue a bunch of times for small odds and ends-type stuff, I've not used it for gluing anything intensive in at least half a year. I forgot there's a shelf life for glue!
While it's worked fine for smaller stuff - porous clay cat litter glued to bases as rocks, or pinned plastic figures sunk into bases by a good 1/8" and not inclined to move anyway - something requiring solid and quick bonding needs glue that is relatively fresh. The same glue I've used for at least a year to reasonably good effect on small stuff not only wouldn't firm up quickly on this resin figure, it also wouldn't bond at all!
Long story short: unless you use it often or in large amounts, there really is no reason to buy an over-large bottle of CA glue because it does lose effectiveness over time, especially if the bottle no longer seals completely airtight due to buildup on the spout. CA glue works by absorbing moisture to complete its chemical bond.
Before doing any time-intensive project where you absolutely need your materials to be at the top of your game, make sure you're using fresh glue, if nothing else!

Showing posts with label #hobbytiptuesday. Show all posts
Showing posts with label #hobbytiptuesday. Show all posts
6/04/2015


5/26/2015
How to Make Your Own Iconography and Put It On... Stuff, Pt. 2
Here's Part Two of my "How to Make Your Own Iconography and Put It On... Stuff" tutorial series and you can refer to Part One here. Ideally at this point, you've got iconography that you can use on something and are able to get it into a printable sheet format - the question is what to do now.
Fortunately, there's a number of answers. With printed or copied graphics, you can transfer them onto a great number of mediums. For this particular section, however, I'm going to focus on the more frequently used output - water slide decals. Essentially, anything that you can make into a printable format you can theoretically make into a water slide decal - with some limitations, primarily being size.
As of my last attempt at creating decals, I've found four different types of water slide decal paper available and in a variety of sizes ranging from quarter sheet all the way up to full letter-size paper sheets. I went physically to places like hobby stores, craft/scrapbooking stores, and RC/scale modeling shops because I wanted to set eyes on the decal paper firsthand - but out of all the different sizes I found, I eventually settled on A5 size (5"x8") which I tried first and then Letter (8 1/2"x11") when I decided I wanted more decals with a different appearance. I'd imagine even more custom decal paper sizes might be available online, but I stuck with these two straightforward sizes of water slide transfer paper from both Testor's and Micro-Mark as they were pre-existing paper size settings in Word document and Adobe PDF format for creating sheets and I thought therefore would be easiest for printing at home or at a copy shop.
The different types of water slide decal paper are all essentially the same in form and function - a face-up sheet (possibly with an underlying layer of adhesive) over a layer of dextrose allowing for both adhesion and release from a colored backing sheet. For fine scale models/miniatures I'd recommend against using paper with the additional layer of adhesive as it makes for thicker decals and really isn't necessary if you use additional products like Micro-Mark's MicroSet and MicroSol (to be discussed later). The differences are simple - recommended printer type and sheet color. There are different papers for both inkjet or laser printers as well as clear decal sheets and white colored decal sheets. The A5 paper I tried first was clear and meant for inkjet printers - this was my first run with strictly black decals and a potentially maddening time cutting out all the little spikes from my original iconography design. I used Letter sized paper for laser printer (or copier!) in white for my second attempt with a filled-in design and this was much easier. The bottom line is that if you just want black lettering or something non-fancy, clear paper will show up just fine. If you want iconography or decals in any sort of color, I'd recommend using white decal paper to print to as the end result will show up much brighter over anything you apply a decal onto, regardless of how dark the surface is, even if that means you need to trim your decals more closely to avoid any white showing around the edges. Now there are very rare printers that print in white ink and cost thousands of dollars (ALPS printers) - barring those, the best you can do to get the color "white" in a decal is to use white decal paper and trim back to the edge of your design.
I'll admit - I personally didn't notice a significant difference in the output quality between the sheets I printed using my home inkjet printer onto inkjet water slide decal paper versus my second attempt with a different design printed out on a laser copy shop machine onto laser-variety water slide paper. Hypothetically, though, I'd have to imagine that the laser-variety output is a little more precise as there is no spreading of wet ink and the design is heat-bonded to the paper as a part of the printing process, but then the inkjet paper itself is designed to accomodate wet inkjet color and a slower drying time. The one thing I did notice, at least to start, was smearing - handling an inkjet decal sheet before it is fully dry is very messy, and I'd highly recommend only handling printed sheets by the edges whenever possible.
As near as I can tell, the sole difference between professionally-printed or store-bought water slide decals and those homemade is a permanent sealing layer over the top of the decal to prevent the design from dissolving or smearing during the application process. No problem!
From here on out, I'll be using the following picture to refer to in the way of tools to use:

After printing out your graphics onto a water slide decal sheet, it is simply a matter of sealing it once it has dried. I've seen reference to people using strong hold hairspray, but personally I've found a thorough spraying of gloss sealant (I used Krylon UV-Resistant Clear Gloss to prevent yellowing) to do the job of sealing the decal sheet excellent to prevent the printed graphics (both inkjet- and laser-printer-based) from smearing. In the case of my last set of printed decals, I used a second light coat of Krylon Matte Finish spray to tone down the glossiness. Once cut out from the decal sheet and applied to the model, I feel the matte surface helped the decal to blend in with the background a little better.
In researching water slide decals and how to apply them, it seems there are a lot of approaches. I'm going to describe mine - primarily to save other people reading the time and effort of looking elsewhere, but secondarily... because it works! To start with, I'd recommend trimming as close to the design on your intended decal as possible - this is especially necessary if you've printed on a white decal sheet as any white visible around the edges of your design will look awkward or possibly need to be painted over.
Recommended materials:
So to apply homemade decals, what I do is the following:


Fortunately, there's a number of answers. With printed or copied graphics, you can transfer them onto a great number of mediums. For this particular section, however, I'm going to focus on the more frequently used output - water slide decals. Essentially, anything that you can make into a printable format you can theoretically make into a water slide decal - with some limitations, primarily being size.
As of my last attempt at creating decals, I've found four different types of water slide decal paper available and in a variety of sizes ranging from quarter sheet all the way up to full letter-size paper sheets. I went physically to places like hobby stores, craft/scrapbooking stores, and RC/scale modeling shops because I wanted to set eyes on the decal paper firsthand - but out of all the different sizes I found, I eventually settled on A5 size (5"x8") which I tried first and then Letter (8 1/2"x11") when I decided I wanted more decals with a different appearance. I'd imagine even more custom decal paper sizes might be available online, but I stuck with these two straightforward sizes of water slide transfer paper from both Testor's and Micro-Mark as they were pre-existing paper size settings in Word document and Adobe PDF format for creating sheets and I thought therefore would be easiest for printing at home or at a copy shop.
The different types of water slide decal paper are all essentially the same in form and function - a face-up sheet (possibly with an underlying layer of adhesive) over a layer of dextrose allowing for both adhesion and release from a colored backing sheet. For fine scale models/miniatures I'd recommend against using paper with the additional layer of adhesive as it makes for thicker decals and really isn't necessary if you use additional products like Micro-Mark's MicroSet and MicroSol (to be discussed later). The differences are simple - recommended printer type and sheet color. There are different papers for both inkjet or laser printers as well as clear decal sheets and white colored decal sheets. The A5 paper I tried first was clear and meant for inkjet printers - this was my first run with strictly black decals and a potentially maddening time cutting out all the little spikes from my original iconography design. I used Letter sized paper for laser printer (or copier!) in white for my second attempt with a filled-in design and this was much easier. The bottom line is that if you just want black lettering or something non-fancy, clear paper will show up just fine. If you want iconography or decals in any sort of color, I'd recommend using white decal paper to print to as the end result will show up much brighter over anything you apply a decal onto, regardless of how dark the surface is, even if that means you need to trim your decals more closely to avoid any white showing around the edges. Now there are very rare printers that print in white ink and cost thousands of dollars (ALPS printers) - barring those, the best you can do to get the color "white" in a decal is to use white decal paper and trim back to the edge of your design.
I'll admit - I personally didn't notice a significant difference in the output quality between the sheets I printed using my home inkjet printer onto inkjet water slide decal paper versus my second attempt with a different design printed out on a laser copy shop machine onto laser-variety water slide paper. Hypothetically, though, I'd have to imagine that the laser-variety output is a little more precise as there is no spreading of wet ink and the design is heat-bonded to the paper as a part of the printing process, but then the inkjet paper itself is designed to accomodate wet inkjet color and a slower drying time. The one thing I did notice, at least to start, was smearing - handling an inkjet decal sheet before it is fully dry is very messy, and I'd highly recommend only handling printed sheets by the edges whenever possible.
As near as I can tell, the sole difference between professionally-printed or store-bought water slide decals and those homemade is a permanent sealing layer over the top of the decal to prevent the design from dissolving or smearing during the application process. No problem!
From here on out, I'll be using the following picture to refer to in the way of tools to use:

After printing out your graphics onto a water slide decal sheet, it is simply a matter of sealing it once it has dried. I've seen reference to people using strong hold hairspray, but personally I've found a thorough spraying of gloss sealant (I used Krylon UV-Resistant Clear Gloss to prevent yellowing) to do the job of sealing the decal sheet excellent to prevent the printed graphics (both inkjet- and laser-printer-based) from smearing. In the case of my last set of printed decals, I used a second light coat of Krylon Matte Finish spray to tone down the glossiness. Once cut out from the decal sheet and applied to the model, I feel the matte surface helped the decal to blend in with the background a little better.
In researching water slide decals and how to apply them, it seems there are a lot of approaches. I'm going to describe mine - primarily to save other people reading the time and effort of looking elsewhere, but secondarily... because it works! To start with, I'd recommend trimming as close to the design on your intended decal as possible - this is especially necessary if you've printed on a white decal sheet as any white visible around the edges of your design will look awkward or possibly need to be painted over.
Recommended materials:
- A shallow dish or saucer with room-temperature distilled water
- A pair of tweezers and/or sharp hobby knife
- Brush-on gloss acrylic/Future Floor Finish/etc.
- MicroSet and MicroSol
So to apply homemade decals, what I do is the following:
- Brush on gloss acrylic medium/Future Floor Finish/something similar in the area where you want to apply your decal. This will smooth out the surface, allowing for easy transfer and minimizing the likelihood of bubbles beneath your decal. Allow to dry.
- Neatly cut out your decal - as mentioned before, when printing on white water slide decal paper you want to cut as close to your design as possible to avoid stray white space around the edges. For clear paper the less overhang you've got, the less chance for bubbles or wrinkles forming at the edges and the better your decal will conform to curved or uneven shapes.
- Allow the cut-out decal to soak in a very shallow saucer (even a small plate will do - the shallowed the water, the easier to wrangle wayward decals) for about 10 seconds or until it starts to slide easily on the backing material - take care not to let the decal slip off the backing material entirely!
- Brush on a quick coating of MicroSet in the area you want the decal to sit on your figure or model - this prepares the area and allows for better decal adherence.
- Pick up the backing material with decal on it (tweezers make this infinitely easier) and align an edge of the decal and the backing with where you want the final location to be.
- Gently and carefully slide the decal off the edge of the backing on your model, holding the edge where you want the decal to sit with the point of a hobby knife or toothpick while carefully sliding the backing out from underneath - one needs to be very careful at this stage, because any quick motions can cause the decal to tear or move out of alignment.
- Before all the water dries or is absorbed by the decal, quickly (but carefully) slide your decal to its final placement location.
- Apply a thin brush-on coat of MicroSol over your decal - this aids with adherence because it softens the decal somewhat. Perfect if you're trying to get it to conform to panel lines, curved shapes, rivets beneath and the like.
- If there are any small air bubbles trapped beneath your decal, you can use the point of a hobby knife or scalpel to piece the decal and release the trapped air - just be careful not to cut or move your decal, otherwise it may tear.
- Once fully dry, you may want to brush a little more gloss acrylic medium/Future Floor Finish/something similar around the edge of the decal and the surface its adhered on, depending on the thickness of your water slide decal - if you need to blend the edges into the background surface a little more smoothly.



5/19/2015
#hobbytiptuesday - Bleaching Color
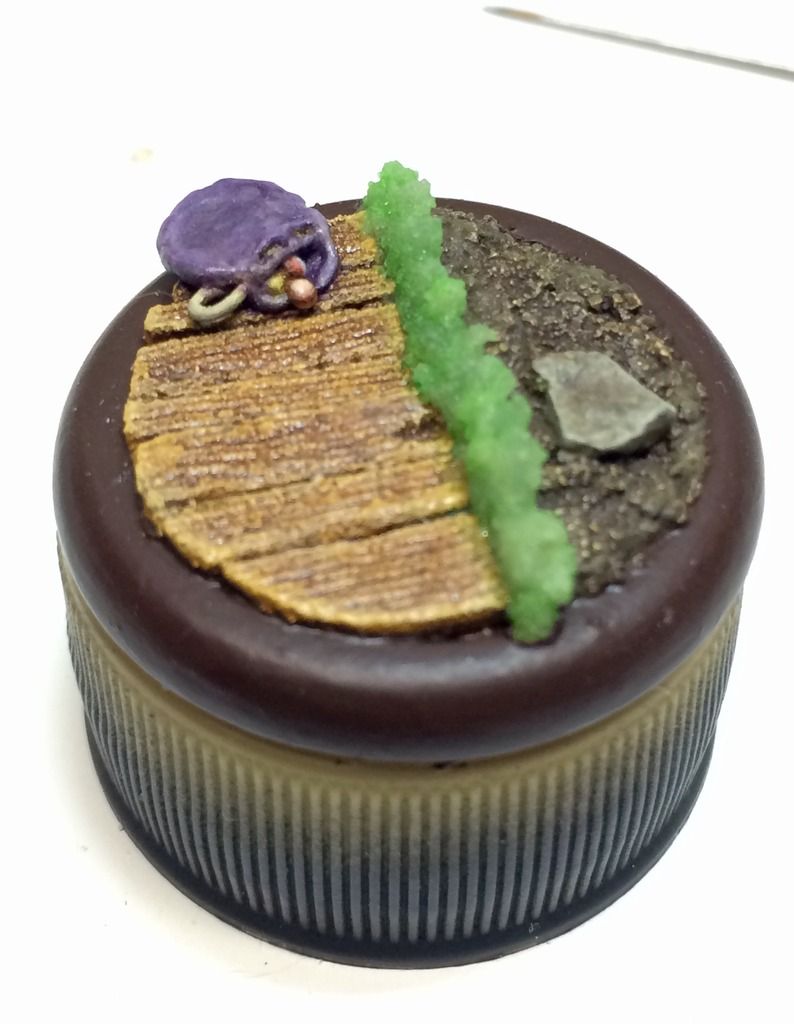
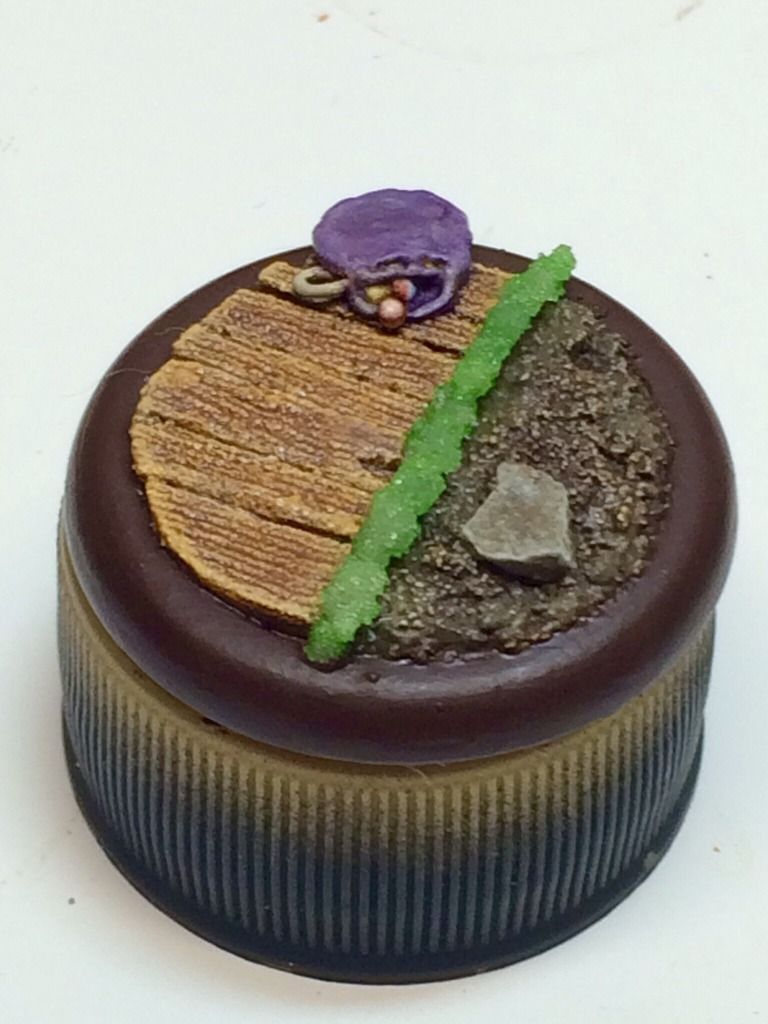
Want some slightly more washed-out color on your painting or to cut back the intensity of inks and such?
Brushed-on household bleach - it's not just for whitening socks!
Pic #1 shows post-bleaching of the top half of the green ink-tinted divider
Pic #2 shows the unbleached green ink-tinted divider


Brushed-on household bleach - it's not just for whitening socks!
Pic #1 shows post-bleaching of the top half of the green ink-tinted divider
Pic #2 shows the unbleached green ink-tinted divider
5/12/2015
How to Make Your Own Iconography and Put It On... Stuff, Pt. 1
This is the start of a series on making iconography for use with fine-scale miniatures - in this case, I'm specifically creating iconography for use with my Warhammer 40K Chaos Space Marine Warband, the Disciples of the Four. Ideally, I'll be covering a number of things:
This is what your own image editing/illustration program ought to be able to do in order to replicate what I'm going to show: use image resolution of higher than 300 pixels per inch, save your images in a higher resolution format, and be able to save your image with actual transparency as opposed to dithering (if you want your final insignia to have uneven shapes w/ crisp edges, that is). Ideally, you'd be able to draw using vectors, multiple layers, and both background and layer transparency (whether via alpha channel or by default) as it makes things much easier and allows for many more options in what you can put in your iconography.
Here is the example I will be using for the remainder of the tutorial:

The entire image was drawn on a transparent background, as I wanted to use 4 spiked cog shapes to represent the 4 Chaos Powers in 40K that my Chaos Marines worship. I went through quite a few test designs - adjusting the length of the spikes, the shape of the spikes, the size of the circles, their relationship to each other, etc. before finally settling on at least the design of the 4 cogs. My version of Paint Shop Pro allows you to draw images formed out of multiple vector "parts," group them, and then save them altogether as a reuseable "preset shape." Since the shoulder pad color for my Chaos Marine Warband is purple, I wanted to have white iconography - but for the sake of printing on white decal paper, also went with a thin black outline for all the shapes.
What you can see here is one of the spiked cog shape layers "opened up," showing the component vector parts of the design - a hollow circle and eight evenly spaced triangles. As the "spiked cog" preset shape, though, it's an easy thing to rotate and resize things - so what the rest of the picture shows is that the overall spiked cog design is actually made up of two sets of 4 cogs: one white, which is the actual insignia design; one black, which has each of its spiked cogs centered under a white one and at a slightly larger size. The 45° angled lines in the background on the underlying "Alignment" layer are there for the sake of having the iconography itself aligned evenly, to a certain extent, even though the spikes on the cogs themselves are of different widths, lengths, and overall "balance" - that's how I'm hoping to get across the sense of "chaos" in the imagery although the icon itself is proportionately spaced so as to be "aesthetically pleasing." That's the idea, anyhow.
It wasn't until I printed out the design and tried cutting it out that I realized that although trimming around all the individual spikes was manageable (for me, anyways, although I'm told I have a higher tolerance for mindless tedium than some), it was going to take so long across an entire army's worth of shoulder pad insignia that it was more trouble than it was worth. Rather than scrap the entire design, as I rather liked it after all the work I put in, I decided instead to add a colored background to fill in some of the space and cut down on the overall "pointiness" of things. I actually was inspired by an image of the Omega/Swan Nebula (M17) that I found on the official Hubble Space Telescope site, which is the "Image" layer after some trimming and tweaking. To put a black edge around the colored area and blend everything together, I used a hollowed-out partially transparent color gradient - the "Shadow" layer.
This is where problems started to crop up. Although I had created everything as vector graphics for transparency and accuracy across multiple formats, when I went to flatten my design to a standard image in normal resolution so as to make it printable on a decal sheet (or other medium) it ended up pixellating things so horribly as to make the end result ugly and useless for anything.
In effect, I went from this:
 To this:

Not so good, obviously. I figured out an easy enough workaround, though, which was simply to save the original 600 pixels/inch resolution vector image at the actual size I created it in (2.117cm x 2.117cm) and then import that into another program where I could not only create a sheet format suitable for decal printing but also resize images as vectors without losing resolution or image quality. For reference's sake, the image format I used to keep layers/transparency and resolution intact was Portable Network Graphics (.png) format and the program I was able to use for accurate resizing and layout was MS Word - I've created an Adobe format for my decal sheet since, but I didn't have access to a .pdf editor at the time. In any case, the important thing when I imported the graphics into Word was to set the Measurement units of the particular document into Millimeters - as seen below, but File Options may vary depending on version and program used:

At this point, it was just simply a matter of importing in multiple copies of different icon styles I wanted to print out in multiple - some with background, some without, some with a single spiked "cog," etc. - and lay them out as needed, and then use Word itself to adjust the image size to what I needed. As can be seen in the below picture, I settled on a height of slightly larger than 7mm (or 4% the height of my original image) for my particular icon - a perfect fit for the available space on my Chaos Space Marine shoulder pads:

In the image before, the careful observer will note that I have the sheet labeled "Print as A5" - that was the original size of the white-background decal paper I was able to lay hands on. Ideally, you can lay out the format of your Word (or Adobe) document to suit whatever size you'd be printing to. I ended up moving everything to a "Letter" size 8 1/2" x 11" format for the final version. I saved my finished document file on a flash drive, took it to a copy center, and had it printed in color laser format onto a "Letter" size white-background decal sheet.

It was several years before I made it to the point where I actually used one of my decals on a finished figure, but this is how the "single spiked cog" variety turned out:

I hope this was some help to anyone trying to make printable insignia or other items for fine-scale models. As always, comments and feedback are appreciated!
- How to create an icon in a paint program
- How to transfer a saved icon via a Laser copier/printer
- How to transfer a saved icon image from your computer via an inkjet printer
- How to transfer a saved icon onto other mediums
This is what your own image editing/illustration program ought to be able to do in order to replicate what I'm going to show: use image resolution of higher than 300 pixels per inch, save your images in a higher resolution format, and be able to save your image with actual transparency as opposed to dithering (if you want your final insignia to have uneven shapes w/ crisp edges, that is). Ideally, you'd be able to draw using vectors, multiple layers, and both background and layer transparency (whether via alpha channel or by default) as it makes things much easier and allows for many more options in what you can put in your iconography.
Here is the example I will be using for the remainder of the tutorial:

The entire image was drawn on a transparent background, as I wanted to use 4 spiked cog shapes to represent the 4 Chaos Powers in 40K that my Chaos Marines worship. I went through quite a few test designs - adjusting the length of the spikes, the shape of the spikes, the size of the circles, their relationship to each other, etc. before finally settling on at least the design of the 4 cogs. My version of Paint Shop Pro allows you to draw images formed out of multiple vector "parts," group them, and then save them altogether as a reuseable "preset shape." Since the shoulder pad color for my Chaos Marine Warband is purple, I wanted to have white iconography - but for the sake of printing on white decal paper, also went with a thin black outline for all the shapes.
What you can see here is one of the spiked cog shape layers "opened up," showing the component vector parts of the design - a hollow circle and eight evenly spaced triangles. As the "spiked cog" preset shape, though, it's an easy thing to rotate and resize things - so what the rest of the picture shows is that the overall spiked cog design is actually made up of two sets of 4 cogs: one white, which is the actual insignia design; one black, which has each of its spiked cogs centered under a white one and at a slightly larger size. The 45° angled lines in the background on the underlying "Alignment" layer are there for the sake of having the iconography itself aligned evenly, to a certain extent, even though the spikes on the cogs themselves are of different widths, lengths, and overall "balance" - that's how I'm hoping to get across the sense of "chaos" in the imagery although the icon itself is proportionately spaced so as to be "aesthetically pleasing." That's the idea, anyhow.
It wasn't until I printed out the design and tried cutting it out that I realized that although trimming around all the individual spikes was manageable (for me, anyways, although I'm told I have a higher tolerance for mindless tedium than some), it was going to take so long across an entire army's worth of shoulder pad insignia that it was more trouble than it was worth. Rather than scrap the entire design, as I rather liked it after all the work I put in, I decided instead to add a colored background to fill in some of the space and cut down on the overall "pointiness" of things. I actually was inspired by an image of the Omega/Swan Nebula (M17) that I found on the official Hubble Space Telescope site, which is the "Image" layer after some trimming and tweaking. To put a black edge around the colored area and blend everything together, I used a hollowed-out partially transparent color gradient - the "Shadow" layer.
This is where problems started to crop up. Although I had created everything as vector graphics for transparency and accuracy across multiple formats, when I went to flatten my design to a standard image in normal resolution so as to make it printable on a decal sheet (or other medium) it ended up pixellating things so horribly as to make the end result ugly and useless for anything.
In effect, I went from this:


Not so good, obviously. I figured out an easy enough workaround, though, which was simply to save the original 600 pixels/inch resolution vector image at the actual size I created it in (2.117cm x 2.117cm) and then import that into another program where I could not only create a sheet format suitable for decal printing but also resize images as vectors without losing resolution or image quality. For reference's sake, the image format I used to keep layers/transparency and resolution intact was Portable Network Graphics (.png) format and the program I was able to use for accurate resizing and layout was MS Word - I've created an Adobe format for my decal sheet since, but I didn't have access to a .pdf editor at the time. In any case, the important thing when I imported the graphics into Word was to set the Measurement units of the particular document into Millimeters - as seen below, but File Options may vary depending on version and program used:

At this point, it was just simply a matter of importing in multiple copies of different icon styles I wanted to print out in multiple - some with background, some without, some with a single spiked "cog," etc. - and lay them out as needed, and then use Word itself to adjust the image size to what I needed. As can be seen in the below picture, I settled on a height of slightly larger than 7mm (or 4% the height of my original image) for my particular icon - a perfect fit for the available space on my Chaos Space Marine shoulder pads:

In the image before, the careful observer will note that I have the sheet labeled "Print as A5" - that was the original size of the white-background decal paper I was able to lay hands on. Ideally, you can lay out the format of your Word (or Adobe) document to suit whatever size you'd be printing to. I ended up moving everything to a "Letter" size 8 1/2" x 11" format for the final version. I saved my finished document file on a flash drive, took it to a copy center, and had it printed in color laser format onto a "Letter" size white-background decal sheet.

It was several years before I made it to the point where I actually used one of my decals on a finished figure, but this is how the "single spiked cog" variety turned out:

I hope this was some help to anyone trying to make printable insignia or other items for fine-scale models. As always, comments and feedback are appreciated!
3/17/2015
#hobbytiptuesday - Working with Epoxy Putty
I had posted this picture on my Painting by Tinweasel Facebook page and a teaser that I would be putting up something about it for a hobby tip - didn't quite get to it then, so making up for lost time now.


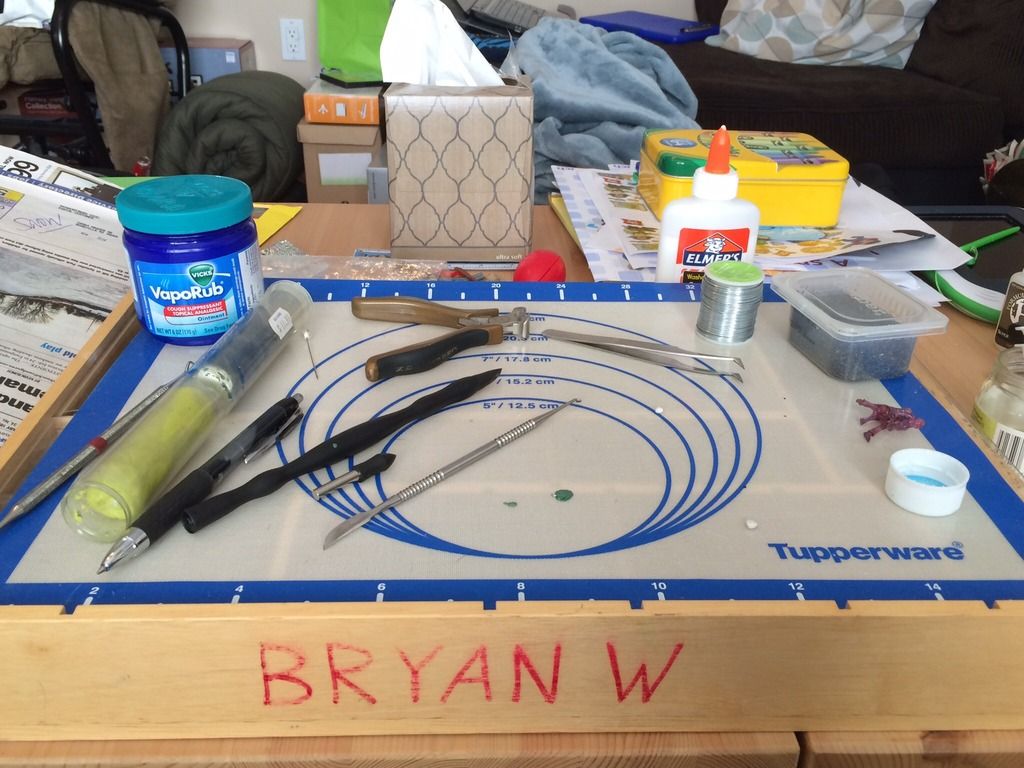
So I've got a couple of things going on in this picture related to epoxy putty sculpting. The main one I want to mention is the Tupperware baking sheet to sculpt on - this thing is great! It's made of silicone and for me is essentially a flat non-stick sheet to work from when sculpting. It rolls up for convenience, is non-stick to two-part epoxy putty and similar materials and is easy to clean off. Much easier than working on a plastic bag or lubricated sheet of styrene. It's officially called the "Tupperware Silicone Wonder Mat" and can be bought online or retail for roughly $20-25 US. (A little pricey maybe, but the use I've gotten out of this thing and the messes avoided have made it worth it.)
For another, I want to point out the Vicks VapoRub. Using this was a suggestion from Joe Orteza when I attended a sculpting seminar of his at GenCon 2014: use VapoRub instead of petroleum jelly to prevent epoxy medium from sticking to sculpting tools. Not only does it work just as well as petroleum jelly to prevent epoxy sculpting putty from sticking, it either gets absorbed or eventually evaporates from sculpting material, thus preventing lubricant causing problems when applying multiple layers of sculpting putty - it was an excellent suggestion by Joe that I've been using since!
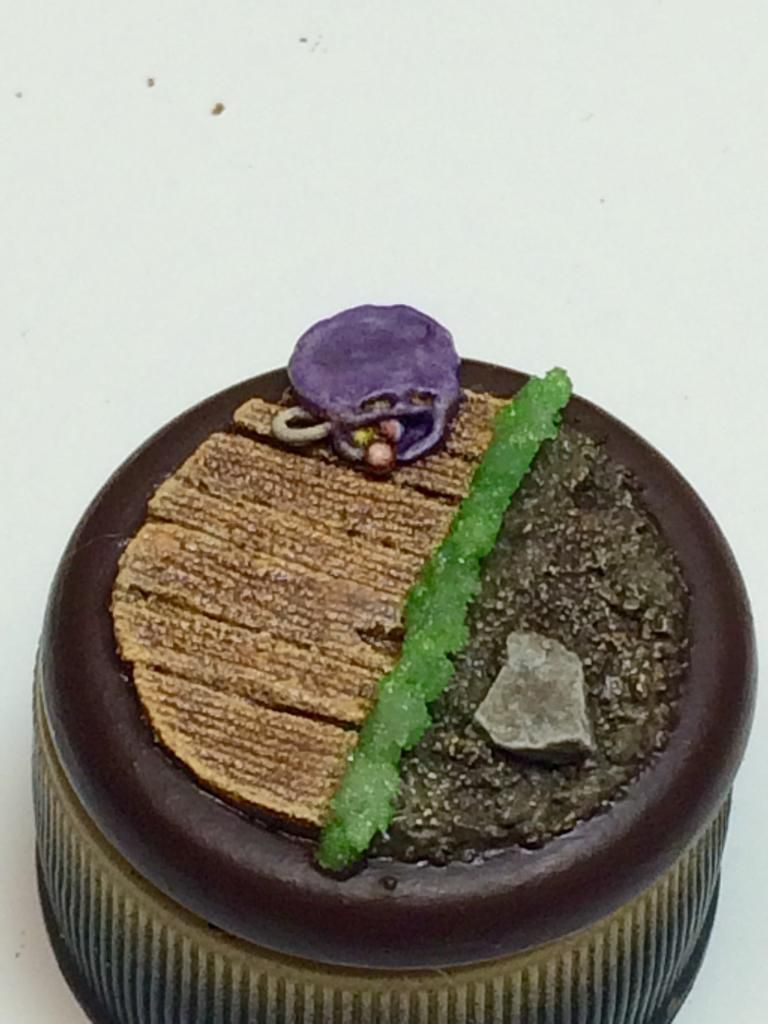
Last, but not least, I wanted to show off a little! The green blob on the mat in the above picture is my first attempt at sculpting in a long, long time. I wanted to sculpt a marble bag for a figure's base with small plastic beads embedded in the epoxy putty for the marbles remaining in the bag. I'll have a bunch of loose ones scattered on the finished base when all's said and done. Here's how it turned out painted:
1/20/2015
#hobbytiptuesday - Agitators!
Thought I'd share this (again) because it's a practice I still follow, and I think it's been key in maintaining my paints over the years: using agitators in my paint bottles. Every paint bottle I own has an agitator in it, and here's why - over time paints separate, just like any other solid medium in a liquid suspension. The pigment and binder come out of solution from the carrier liquid - with metallics, this is even more pronounced as the aluminum (maybe mica) precipitating to the bottom due to weight.
Every once in a while, it's a good idea to give your paints and inks a good shaking - not just prior to use. I have a 6mm glass bead in all my paint bottles, and adding this is still a ritual whenever I get a new color, same as "labeling" the bottle with some of the shaken paint afterwards. I've been a few times now to retail craft stores, usually with weekly coupon in hand, to pick up glass bead necklaces for a few dollars.
Why an agitator, you may ask? Well, because it helps to more thoroughly mix the paint in the bottle, for one, without the need of toothpicks or brush ends or anything else that will take away from your supply of paint while mixing. For another, it acts as a force multiplier - you may be shaking the outside of the bottle and sloshing the paint around inside, which may be good enough; on the inside, you have a weighted object that's churning the paint back together at an even faster rate.
What to use? Something with some weight to it, something that's inert, a and something that won't catch inside your paint bottle. This is why I use 6mm glass beads- they're small enough to fit down the necks of dropper paint bottles like those by Vallejo and Reaper, they've got some heft, they're made from inert material so as to not react with your paint itself (I've tried metal sprue and zinc-plated BB's and both of those turn ugly after a few years), and even better, you can get them in large numbers for cheap (did I mention craft store coupons for lengths of bead necklace?).
Oh, and a blog post from many years back, which still holds true:
Shaking Violently Being the Next Best Thing to Strangling
Every once in a while, it's a good idea to give your paints and inks a good shaking - not just prior to use. I have a 6mm glass bead in all my paint bottles, and adding this is still a ritual whenever I get a new color, same as "labeling" the bottle with some of the shaken paint afterwards. I've been a few times now to retail craft stores, usually with weekly coupon in hand, to pick up glass bead necklaces for a few dollars.
Why an agitator, you may ask? Well, because it helps to more thoroughly mix the paint in the bottle, for one, without the need of toothpicks or brush ends or anything else that will take away from your supply of paint while mixing. For another, it acts as a force multiplier - you may be shaking the outside of the bottle and sloshing the paint around inside, which may be good enough; on the inside, you have a weighted object that's churning the paint back together at an even faster rate.
What to use? Something with some weight to it, something that's inert, a and something that won't catch inside your paint bottle. This is why I use 6mm glass beads- they're small enough to fit down the necks of dropper paint bottles like those by Vallejo and Reaper, they've got some heft, they're made from inert material so as to not react with your paint itself (I've tried metal sprue and zinc-plated BB's and both of those turn ugly after a few years), and even better, you can get them in large numbers for cheap (did I mention craft store coupons for lengths of bead necklace?).
Oh, and a blog post from many years back, which still holds true:
Shaking Violently Being the Next Best Thing to Strangling
12/30/2014
#hobbytiptuesday - Priming Foam
I tend to use a decent amount of foam in my basing, either to build up areas before I add texture, or EPS insulation for large scenery pieces - or in this case, using extra hard foam cuttings for making to-scale wood planks.
In ay case, using any sort of aerosol or plastic cement will melt foam (I believe it's the xylene/toluene thinners in rattle can sprays that does that). This limits your options when priming foam and likewise limits your options when gluing plastic figures. As a planned workaround for future gluing, I inset cut sheet styrene pieces and built the rest of the base scenery around them - one problem solved!
But what about priming? An easy fix is to either seal the foam prior to any rattle-can spraying with watered-down wood glue (in the case of larger pieces of scenery), to just directly paint it (craft paints plus large foam scenery are a cheap alternative), in this example: to use a brush-on primer on the foam areas to seal those prior to using my regular rattle-can primer on the rest of the base. Problem #2 solved!

In ay case, using any sort of aerosol or plastic cement will melt foam (I believe it's the xylene/toluene thinners in rattle can sprays that does that). This limits your options when priming foam and likewise limits your options when gluing plastic figures. As a planned workaround for future gluing, I inset cut sheet styrene pieces and built the rest of the base scenery around them - one problem solved!
But what about priming? An easy fix is to either seal the foam prior to any rattle-can spraying with watered-down wood glue (in the case of larger pieces of scenery), to just directly paint it (craft paints plus large foam scenery are a cheap alternative), in this example: to use a brush-on primer on the foam areas to seal those prior to using my regular rattle-can primer on the rest of the base. Problem #2 solved!

12/09/2014
#hobbytiptuesday - Fun with Plastic Glue!
I'm not sure how many people have ever played around with plastic weld glue or pure acetone, but both can be used to smooth rough features on plastic models or even remove mold lines... if you are very careful!
I generally use Testor's Model Master Liquid Cement for Plastic Models when gluing plastic figures together as it has a nice thin metal applicator tube that doesn't clog and comes in a slightly thicker viscosity. After the fact, or if it's parts I can hold together, I generally use Tenax 7R plastic welder (possibly discontinued, I've had it a while) or Ambroid ProWeld (still available in a goodly-sized bottle) for the same thing.
Now for the tricky stuff - using a fine tip nylon/synthetic/Taklon brush (as this will eat natural hair brushes alive), you can actually apply either of the thin viscosity plastic weld glues directly by gentle brushing and they will smooth out modeling imperfections like file marks, mold lines, and the like. You need to be very careful with the amount of liquid and how much pressure you apply, as this literally melts the plastic of your model, but trial and error are your friend. Acetone also works, but evaporates much quicker and is even more runny. What to do when your nylon brush gets clogged with plastic? Give it a quick dip in acetone and clean it - caked-in plastic gone!
Hopefully goes without saying that anything that welds plastic is toxic and has fumes you shouldn't be inhaling...
Now for the tricky stuff - using a fine tip nylon/synthetic/Taklon brush (as this will eat natural hair brushes alive), you can actually apply either of the thin viscosity plastic weld glues directly by gentle brushing and they will smooth out modeling imperfections like file marks, mold lines, and the like. You need to be very careful with the amount of liquid and how much pressure you apply, as this literally melts the plastic of your model, but trial and error are your friend. Acetone also works, but evaporates much quicker and is even more runny. What to do when your nylon brush gets clogged with plastic? Give it a quick dip in acetone and clean it - caked-in plastic gone!
Hopefully goes without saying that anything that welds plastic is toxic and has fumes you shouldn't be inhaling...
11/25/2014
#hobbytiptuesday - Drybrushing
If you need to drybrush, I recommend a Taklon/nylon/synthetic brush, as the bristles are much more durable than natural hair brushes and won't get chewed up as quickly.
What you can do is take a pair of scissors and cut all the bristles to an even length, that way the application of pigment onto your target is much more even and controlled.
11/18/2014
#hobbytiptuesday - Brush Cleaning
Don't use dishwashing soap to clean natural hair brushes after use. These will strip the natural oils from the brush hairs and quickly ruin the brush.
Ideally, use a purpose-made brush cleaner with built-in conditioner (or even hair shampoo w/ conditioner).
11/25/2009
#hobbytiptuesday - Windex
Nothing but a simple, straightforward tip here - it's late, I'm tired, and I've not made any entries in a while since I've been working behind-the-scenes on converting a Rhino for my Disciples of the Four army's Chaos Lord and his Berzerker retinue: specifically, a Mk. II Rhino reworked to look like an upgraded Mk. I Rhino with added "bling." (I'm getting near the point where it's publicly presentable, I think, if not completely finished. Watch this space for updates "soonish!")
Today's tip is essentially this: if you use a palette of any sort, whether it be a cheap white ceramic tile or an 8 well "daisy"-style plastic watercolor one, I've found that spraying it down with ol' classic blue Windex and letting it sit for a little while (say, 15 minutes or so) is great for making cleanup a lot quicker and easier. After squirting down the palette with Windex and letting it soak, the paint generally sloughs right off, especially when ran under warm or hot water.
I don't know if it's the ammonia or the fact that Windex is also designed as a surfactant to make cleaning glass (and countertops!) easier, but I find it works great on palettes. On a related note, I find it also works excellently for sloughing dried paint off of the 1mL medication dispensing syringes I use for mixing and dispensing my paints and thinners - I seem to be in the minority, though, when it comes to using syringes or similar tools for precise measurement when I'm painting.
Note: unlike Simple Green, which I would recommend to anyone for stripping paint from white metal or plastic figures and models with a minimum of effort and no damage to the figures at all, I wouldn't say the same about Windex. While the palettes and graduated syringes I use are plastic, they are "industrial" grade plastic and not molded polystyrene like most of my current figures - although I've not tested it for stripping paint, I have the sneaking suspicion that Windex might be a bit harsh on polystyrene, much like Pine Sol.
Today's tip is essentially this: if you use a palette of any sort, whether it be a cheap white ceramic tile or an 8 well "daisy"-style plastic watercolor one, I've found that spraying it down with ol' classic blue Windex and letting it sit for a little while (say, 15 minutes or so) is great for making cleanup a lot quicker and easier. After squirting down the palette with Windex and letting it soak, the paint generally sloughs right off, especially when ran under warm or hot water.
I don't know if it's the ammonia or the fact that Windex is also designed as a surfactant to make cleaning glass (and countertops!) easier, but I find it works great on palettes. On a related note, I find it also works excellently for sloughing dried paint off of the 1mL medication dispensing syringes I use for mixing and dispensing my paints and thinners - I seem to be in the minority, though, when it comes to using syringes or similar tools for precise measurement when I'm painting.
Note: unlike Simple Green, which I would recommend to anyone for stripping paint from white metal or plastic figures and models with a minimum of effort and no damage to the figures at all, I wouldn't say the same about Windex. While the palettes and graduated syringes I use are plastic, they are "industrial" grade plastic and not molded polystyrene like most of my current figures - although I've not tested it for stripping paint, I have the sneaking suspicion that Windex might be a bit harsh on polystyrene, much like Pine Sol.
9/08/2009
#hobbytiptuesday - Making Sharpened Teeth
Note: for simplicity's sake, I'm simply going to use reference "teeth" throughout this Hobby Tip writeup, but the technique is applicable for just about anything on a figure that one would want as a length of pointed object: sharp teeth, spines, spikes, claws, studs, spurs, and all the way up to tusks and the like with thicker lengths of styrene. I've been using this method for a while and found it useful in shaping a wide variety of add-on details with my miniatures.
I would imagine a lot of people sculpt pointed teeth, spikes, etc. from the same material with which they are doing customization or additional sculpting onto a figure. Personally, I prefer to make sharp teeth and similar details out of length of styrene rod, which I can buy in a variety of pre-sized diameters and grind to shape. I find it gives me a bit more freedom to sculpt details on a figure, drill in holes for the "sharp bits" afterward, and then (if necessary) sculpt gums or additional flesh around the solid styrene. I also find that by making teeth out of a firmer material beforehand, it allows me to make adjustments directly to the teeth as the project goes along, if need be, before putting them in their "final" position. Personal opinion again, but I figger that added details sculpted around the teeth respond more dynamically to having them there as an existing hard physical object what I than I feel I'd get if I were trying to do them as a part of the overall process with a medium like Green Stuff or Milliput - to each their own, though.
Here are the materials I generally use in making teeth to add to figures:

Lengths of styrene rod, available in many hobby stores or through suppliers of Evergreen and Plastruct products; sandpaper - I use a 120 "medium" grit here, although that's a matter of personal preference from trial and error; Tenax 7-R Plastic Welder - couldn't recommend this stuff more highly for a variety of uses with plastic miniatures and bitz; a sharp hobby knife of some type; and alternatively, a Dremel or other high speed rotary tool with medium or coarse sanding discs - it goes a bit faster in terms of shaping a point, but is a bit sloppier due to melting of the styrene in the process (I'll focus on strictly sandpaper here in this Hobby Tip, but you can get the same results with careful quick taps of your styrene rod on a sanding disc at a low speed).

Holding the styrene rod at roughly a 45° angle to the sandpaper, you want to shape a quick point first with application of pressure slightly behind the end of the rod and short, quick drags of the rod backwards on the paper. I find that you get better results if you work near the outer edge of a piece of sandpaper on a flat surface, twisting the rod as you go with your other fingers to keep a different surface of the styrene against the paper with every burst of friction - eventually, if you keep twisting it evenly, you end up with a centered point.

Once you have your initial centered point, you move your grip slightly so as to make light, quick drags of the styrene rod backwards along more of the flat surface behind the shaped point. Again twisting as you go, you'll find that the surface of the sharpened shape begins to lengthen with repeated dragging across the paper with application of pressure further behind the initial point - in other words, you can vary the length and curve of the tooth's "pointiness" by adjusting how you grind down the remaining styrene rod behind your initial 45° angle. This particular example tooth in the picture ended up being about 3mm in length with a gradual curve to the top as I used a thicker styrene rod and drew out the "point" by sanding against the "flat" of the styrene rod.
A few steps not shown, but hopefully self-explanatory:
After shaping the tooth to whatever curve and length desired, I generally give the tooth still attached to the end of the styrene rod a quick dip into the jar of Tenax 7-R - what the stuff normally does is liquefy plastic it comes in contact with, so you can brush it on in small doses and let capillary action and a little pressure "glue" plastic parts together seamlessly. In my case, with just a quick dip of the piece I've sanded to shape, it "firms" the whole dipped tooth up to a hard, smooth length of styrene so fine points at the end of long gradual tapers are less likely to get broken off. (Barring having a jar of Tenax 7-R handy, a similar effect could be achieved from an extra- extra-fast dip in straight acetone - acetone, however, is more likely to ruin the shape of your sanded tooth if it is left suspended in the liquid too long, and it takes a little longer for the styrene to solidify completely again as compared to using Tenax.)
All that remains is cutting your sanded tooth off the end of your length of styrene rod. Generally I make teeth two at a time - one on each end of the rod following the same process - and then trim them both off the length of styrene, for the sake of saving some time and effort. I would also recommend leaving a little extra length of un-shaped styrene at the base of your teeth to allow for sinking an inset hole for them on your figure, or drilling in a pin in the base for purposes of mounting a home-made tusk or something a little thicker.
Here we have an assortment of finished sanded teeth ready for use:

Through experience, I've found that teeth and spikes and the like made this way prove a bit more durable if you leave a slight length behind your curved point and you mount them on your figure glued into a shallow hole from a suitably-sized fine drill bit. You can then go and shape the gums or flesh around the base of the tooth - or in the case of spiked armor, leave it as-is if you have the length of sharpened styrene rod in a hole of matching diameter.
As always, I'd appreciate any comments or feedback and if anything is a little unclear wording-wise, I'd be more than happy to explain any part of the process in a bit more detail. (Any excuse to make another entry here, you know...)
I would imagine a lot of people sculpt pointed teeth, spikes, etc. from the same material with which they are doing customization or additional sculpting onto a figure. Personally, I prefer to make sharp teeth and similar details out of length of styrene rod, which I can buy in a variety of pre-sized diameters and grind to shape. I find it gives me a bit more freedom to sculpt details on a figure, drill in holes for the "sharp bits" afterward, and then (if necessary) sculpt gums or additional flesh around the solid styrene. I also find that by making teeth out of a firmer material beforehand, it allows me to make adjustments directly to the teeth as the project goes along, if need be, before putting them in their "final" position. Personal opinion again, but I figger that added details sculpted around the teeth respond more dynamically to having them there as an existing hard physical object what I than I feel I'd get if I were trying to do them as a part of the overall process with a medium like Green Stuff or Milliput - to each their own, though.
Here are the materials I generally use in making teeth to add to figures:

Lengths of styrene rod, available in many hobby stores or through suppliers of Evergreen and Plastruct products; sandpaper - I use a 120 "medium" grit here, although that's a matter of personal preference from trial and error; Tenax 7-R Plastic Welder - couldn't recommend this stuff more highly for a variety of uses with plastic miniatures and bitz; a sharp hobby knife of some type; and alternatively, a Dremel or other high speed rotary tool with medium or coarse sanding discs - it goes a bit faster in terms of shaping a point, but is a bit sloppier due to melting of the styrene in the process (I'll focus on strictly sandpaper here in this Hobby Tip, but you can get the same results with careful quick taps of your styrene rod on a sanding disc at a low speed).

Holding the styrene rod at roughly a 45° angle to the sandpaper, you want to shape a quick point first with application of pressure slightly behind the end of the rod and short, quick drags of the rod backwards on the paper. I find that you get better results if you work near the outer edge of a piece of sandpaper on a flat surface, twisting the rod as you go with your other fingers to keep a different surface of the styrene against the paper with every burst of friction - eventually, if you keep twisting it evenly, you end up with a centered point.

Once you have your initial centered point, you move your grip slightly so as to make light, quick drags of the styrene rod backwards along more of the flat surface behind the shaped point. Again twisting as you go, you'll find that the surface of the sharpened shape begins to lengthen with repeated dragging across the paper with application of pressure further behind the initial point - in other words, you can vary the length and curve of the tooth's "pointiness" by adjusting how you grind down the remaining styrene rod behind your initial 45° angle. This particular example tooth in the picture ended up being about 3mm in length with a gradual curve to the top as I used a thicker styrene rod and drew out the "point" by sanding against the "flat" of the styrene rod.
A few steps not shown, but hopefully self-explanatory:
After shaping the tooth to whatever curve and length desired, I generally give the tooth still attached to the end of the styrene rod a quick dip into the jar of Tenax 7-R - what the stuff normally does is liquefy plastic it comes in contact with, so you can brush it on in small doses and let capillary action and a little pressure "glue" plastic parts together seamlessly. In my case, with just a quick dip of the piece I've sanded to shape, it "firms" the whole dipped tooth up to a hard, smooth length of styrene so fine points at the end of long gradual tapers are less likely to get broken off. (Barring having a jar of Tenax 7-R handy, a similar effect could be achieved from an extra- extra-fast dip in straight acetone - acetone, however, is more likely to ruin the shape of your sanded tooth if it is left suspended in the liquid too long, and it takes a little longer for the styrene to solidify completely again as compared to using Tenax.)
All that remains is cutting your sanded tooth off the end of your length of styrene rod. Generally I make teeth two at a time - one on each end of the rod following the same process - and then trim them both off the length of styrene, for the sake of saving some time and effort. I would also recommend leaving a little extra length of un-shaped styrene at the base of your teeth to allow for sinking an inset hole for them on your figure, or drilling in a pin in the base for purposes of mounting a home-made tusk or something a little thicker.
Here we have an assortment of finished sanded teeth ready for use:

Through experience, I've found that teeth and spikes and the like made this way prove a bit more durable if you leave a slight length behind your curved point and you mount them on your figure glued into a shallow hole from a suitably-sized fine drill bit. You can then go and shape the gums or flesh around the base of the tooth - or in the case of spiked armor, leave it as-is if you have the length of sharpened styrene rod in a hole of matching diameter.
As always, I'd appreciate any comments or feedback and if anything is a little unclear wording-wise, I'd be more than happy to explain any part of the process in a bit more detail. (Any excuse to make another entry here, you know...)
Subscribe to:
Posts (Atom)
LinkWithin
