Showing posts with label Genestealer. Show all posts

7/29/2010

De Profundis Clamavi!

 Some of you may have noticed the silence from this end of the universe (and there's apparently more Followers than when I took an unofficial "leave," which is pleasant and boggling both at the same time) - safe to say I've not been doing much in the way of working on miniatures.

 There's been a lot of stress and distraction going on since about May, what with allergies this year being so bad that my vision was blurry most days right on through June. There's also been my daughter's first year of schooling ending and the subsequent change in available time, especially since I'm still unemployed and looking for work, so we've needed to cut back on the amount of paid child care for both our kids. The worst part of all this would be that with all the changes and unexpected stress, I've been rather depressed, and having to deal with a lack of energy and motivation to do much of anything on top of everything else. I think things are starting to turn around, though.

 I thoroughly apologize to those few whose commissions I took on - I don't think I have the time or means to work on any commissions for the foreseeable future. I hope I've made amends for missed expectations, and the thing that upsets me most is that with everything going on, I just wasn't able to follow through on work I promised - there were some great projects and I hope they see their way to completion elsewhere, since I'd definitely like to see them done justice.


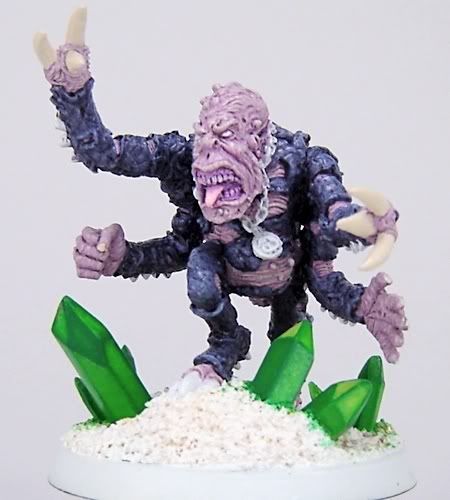
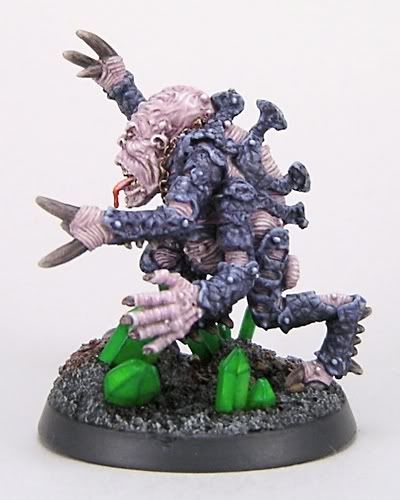
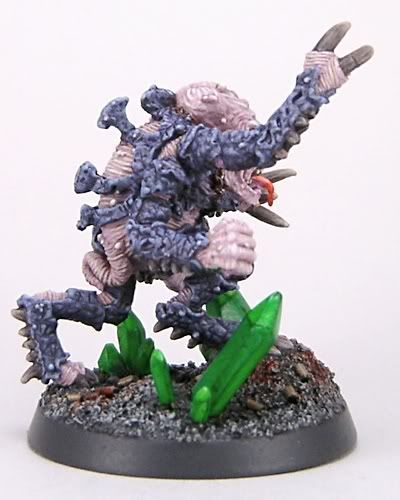
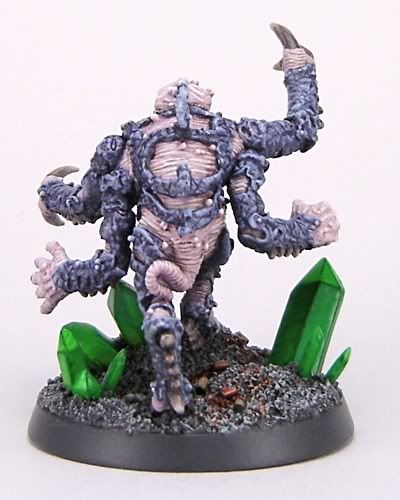
 As to the name of the post, I figgered it was appropriate - a phrase in Latin which more or less means (with some slack for my minimal familiarity with the language), "From the Depths I Cry Out." I used it as the engraving on the display plaque for an Old School™ GW Genestealer Patriarch that I entered in the 2007 Chicago Golden Demon Competition. I thought it was appropriate in relation to the Patriarchs' old role as the leaders of Genestealer infestations that themselves served as harbingers and living signals for a full-on Hive Fleet invasion. The beastie in question with an updated picture:

5/13/2010

A Genestealer And A Rogue Psyker Walk Into A Bar...

"Ouch!"

(Man, that one never gets old.)


So what do a Genestealer and a Renegade Psyker actually have in common? Well, not much, but I added pages for the both of them to my painting website and there's now links in the Gallery. That is all the bad humor for the moment. Carry on.

3/24/2010

Tyranids, New School Style!

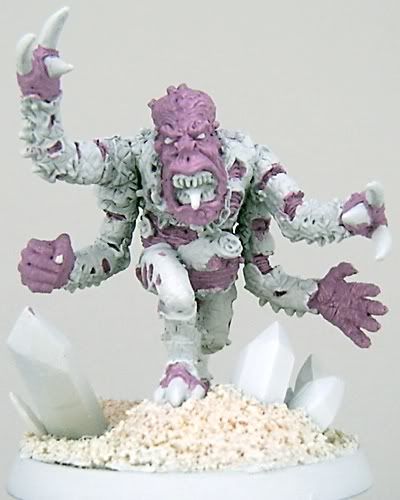
 I made reference to this way back in my entry called "Tyranids, Both Old and New" - I was going to paint up one of the Genestealers from Games Workshop's old Battle for Macragge set for a painting competition. Well, I managed to squeeze in some time while prepping a few figures and waiting for primer to dry, and cranked this guy out in about four hours spread out between last Monday night and Tuesday:


 I was aiming to paint him up something along the lines of the color scheme on the cover of the recently-released GW Codex: Tyranids, but the red turned out extremely pink and the bluish-purple turned out pale blue when highlighted initially (I should've known, given the colors I was using). I just ran with it...

 After I put the primary color down for the skin areas I realized that desaturating the chitin colors by adding grey might help - so I ended up giving the whole figure a wash of the skin shade color. After building up and shading the blue-purple I went back and added in Khaki for highlights on the red and blue instead of anything yellowish or white, which worked moderately well. It's still a funky color scheme and I wasn't wanting to waste time by drybrushing thinned Khaki by itself after the fact to get it a bit closer to the Codex: Tyranids cover art, so again I just ran with it... It'll probably be a while before I get around to vague plans to convert up a Tervigon and a modified Brood Lord, and then crank out a whole bunch of 'Nids, but I think I'll stick with this scheme. It's not amazingly difficult and could be painted assembly-line style, which is what I was aiming for with this guy to begin with - more of a "high end tabletop standard."


 I'd also like to add that Liquitex Flow Aid is the whip - I tried it out with this guy after buying some of the stuff a few weeks back. The top of the base was painted with nothing more than a highlight color and two shade colors thinned down with my "new and improved" wash thinning mixture. I think it's a keeper!

 Any comments or suggestions? I wasn't aiming for anything overly fancy here, but I liked the color scheme on the cover of the newest Codex: Tyranids. With the exception of the color transition across the chitin areas, everything else was painted more or less using thick washes and then highlighted (the chitin was done the same way, only I started with red across the board and then went back across with progressively darker blues before highlighting).

1/30/2010

Tyranids, Old School Style!

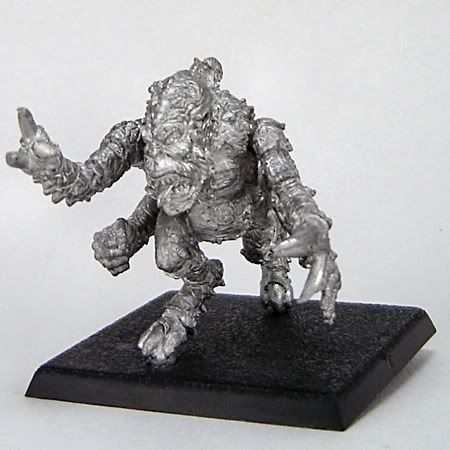
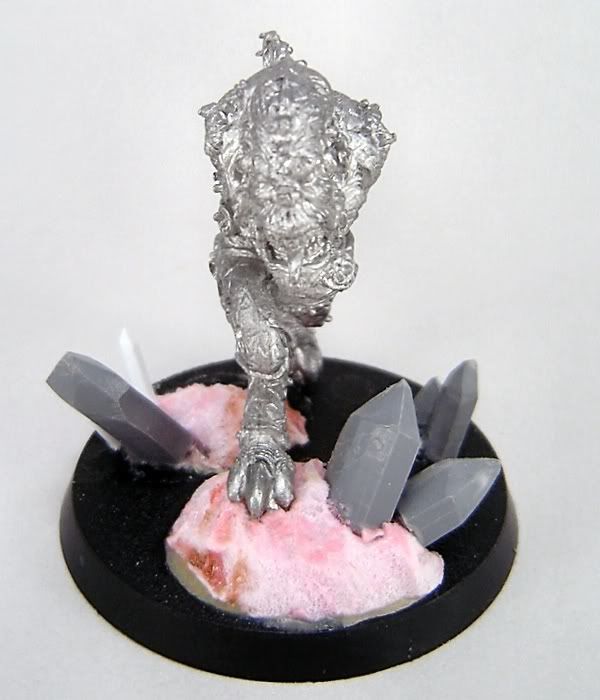
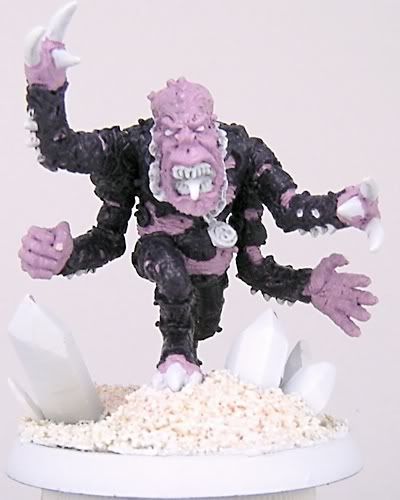
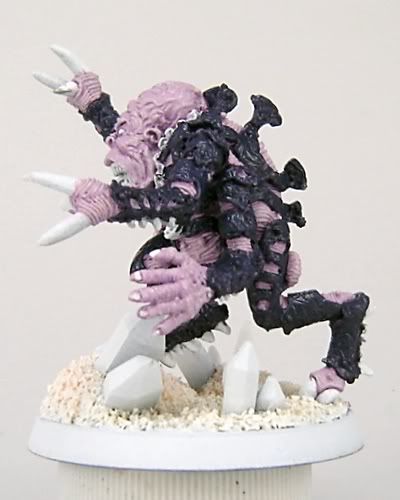
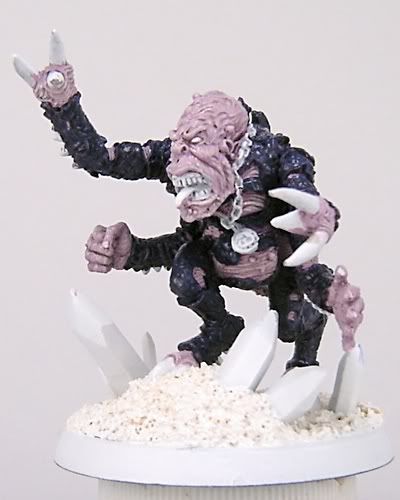
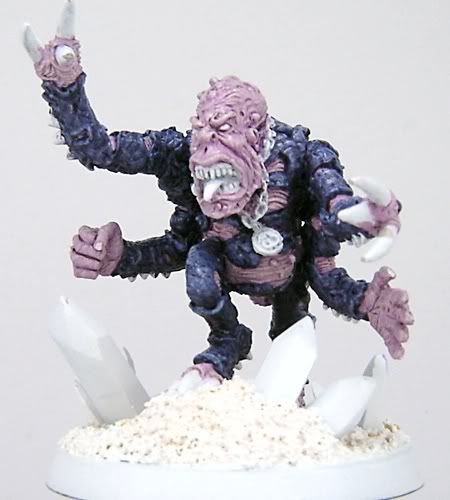
 Frankly, I'm shocked I never got off my butt and wrote up a tutorial for this guy, since I essentially had the makings of one in a forum thread I started for him for a Relicnews Painting & Modeling Forum competition - but here's some stuff on a way, way "old school" Genestealer Patriarch I painted in 2007. After some additional work on him following the Relicnews P&M Forum competition, he was one of the figures I took to my first-ever Golden Demon Competition and he was fairly well received - I ended up getting a lot of nice compliments. I seem to recall being told he was an "Honorable Mention" along with all my other entries, but I'll admit I was a little stunned at the time by news that my Lord of the Rings entry had apparently won Silver - I had just come down to the main hall after attending a very well-presented painting seminar by Jérémie Bonamant-Teboul, and someone else from the West Oaks Hobby Center group I rode with to Chicago came up and told me about my Gandalf LotR entry.

 I was more or less like a deer caught in the headlights from about that point until the bus ride back towards home. My Patriarch did actually make First Cut but never got pictures taken of him by GW staff as far as I know, and likewise never made it onto the US GW website or into the White Dwarf magazine issue later that year. While seeing this guy in print would've been nice, I do realize it's a very old, very ugly figure (which I personally think is part of the charm) and there's also the fact that the Brood Lord had just come out in the Tyranid Codex released that year - they essentially fulfill a similar role in the "fluff," and of course Games Workshop would choose to play up a newly-released figure with new rules as opposed to a pure lead casting out-of-production relic from the late 80's.


Without further ado, here's something like a work-in-progress thread but without all the excess verbiage:


Here's the final version of my Genestealer Patriarch that ended up going to the 2007 Chicago Golden Demon Competition:


And for anyone who's curious, here's most of the color recipes I used in painting him up:

Patriarch Skin:
  • Basecoat 2:1:1 Vallejo Model Color Deck Tan/Games Workshop Skull White/Games Workshop Purple Ink
  • Layer 4:2:1 Deck Tan/Skull White/Purple Ink
  • Layer 2:1 Deck Tan/Skull White +1 drop Purple Ink @ 1:10 ink/thinner consistency
  • Layer 2:2 Deck Tan/Skull White + 1 drop Purple Ink @ 1:10 ink/thinner concentration
  • Wash with 1:1 GW Codex Grey/VMC Russian Uniform @ 1:20 paint/thinner consistency
  • Wash with 1:20 Vallejo Game Color Hexed Lichen @ 1:20 paint/thinner consistency
  • Highlight 2:2 Deck Tan/Skull White + 1 drop Hexed Lichen @ 1:10 paint/thinner consistency
  • Add + 1 drop of VMC White to above mixture and highlight
  • Extreme highlight with 2 drops VMC White + 1 drop Hexed Lichen at 1:10 paint/thinner consistency

Carapace:
  • Basecoat 2:2:1 GW Black/VGC Hexed Lichen/GW Ultramarine Blue
  • Layer 2:1:1 Ultramarine Blue/Black/Hexed Lichen
  • Layer 2:1 Ultramarine Blue/Hexed Lichen
  • Add + 2 drops of Deck Tan to above mixture and highlight carapace edges
  • Highlight edges 1:2 Ultramarine Blue/Deck Tan
  • Add + 2 drops of VMC White to above mixture and extreme highlight carapace edges
  • Line in between carapace patterning with 2:1:1 Chaos Black/Ultramarine Blue/Hexed Lichen at 1:20 paint/thinner consistency
  • Repeat lining-in of extreme shaded areas with above mixture

Claws:
  • Basecoat with 1:1 GW Red Gore/Chaos Black
  • Paint initial striations with +1 drop of VMC Buff/Russian Uniform @ 1/10 paint//thinner consistency to above mixture
  • Layer additional striated highlights with + 1 drop of Deck Tan to the above mixture

Crystals:
  • Basecoat crystal sides with 1:1 GW Dark Angels Green/thinner
  • Layer side opposite light source with + 6 drops of GW Striking Scorpion Green added to above mixture
  • Add + 1 drop DA Green to above mixture and layer next adjacent crystal face
  • Add + 1 drop of DA Green to above mixture and layer opposite adjacent crystal face
  • Repeat above steps with + 1 drop of DA Green added until all crystal faces are painted
  • Darken interior of crystal faces depending on appearance with glaze of GW Green Ink at 1:20 ink/thinner consistency
  • Extreme highlight crystal edges with 3:1:10 DA Green/Green Ink/thinner

8/25/2009

Hobby Tip - Basing

I like 'em cheap and easy! ... Figure bases, that is.

 Today's Hobby Tip focuses on basing. Whether it be for rank and file army models or for competition entries, such as Games Workshop's Golden Demons, the base is an integral part of the overall "atmosphere" of the figure; that said, despite being fairly important compositionally, that does not mean you need to spend large amounts of money to get reasonable-looking basing. Since getting into miniature painting again several years back, I suppose I've generally been of the opinion that unless I necessarily need to go out of my way for some fancy name-brand product or expensive, spectacular method that I absolutely have to use in order to get a certain appearance or end result, by and large I prefer to do it with cheap and readily-accessible "substitutes." Tools are one thing I don't skimp on: Kolinsky Red Sable paintbrushes, assorted stainless steel needle files in a number of shapes, assorted angles of side- and end-cutters (with some specifically set aside for rough work like sprue- and wire-clipping, and some for fine conversion), a variable-speed Dremel with a ton of attachments and bits, general workshop tools (band saw, router, jigsaw, scroll saw, pyrogravure, etc.), an overhead adjustable daylight painting lamp - I'm sure you get the picture.

Cheap Basing Materials
 I've pretty much used the same materials for basing since starting back in the hobby, and you can see them laid out in the background of the picture above: (from left to right) "ant dirt" and small rocks taken from outdoors, clean non-clumping clay kitty litter, wood glue (aka PVA glue), cornmeal, and bits of extruded polystyrene insulation foam left over from other projects. In the foreground, you can see an assortment of bases themselves - they all use the same materials, with the addition of a few "found objects" in the case of the Ork Nob's base, some shaped lengths of sprue and clipped paperclip segments on the Genestealer Patriarch base, tinted Future Floor Finish and clippings from a $0.99 wall edging brush on the base of the Privateer Press Deathripper, and on the bases of the Necron constructs, um... I guess the only inexpensive oddity there would be the 0.3mm music wire holding up the Scarabs (I've never liked clear plastic flying bases or the built-in risers for Scarabs, so I made my own variable-height ones).

 For clarification's sake, what I call "ant dirt" is the ultra-fine to small-grade grit that the ants living between the blocks of my driveway were nice enough to gather, process, sort, and collect for me every summer. Aside from picking out the occasional tiny piece of grass or plant material as I use it (personal preference there, I suppose), it goes straight from a backyard ant mound to the container, and then right to figure bases with a bit of glue. I find it's excellent for anything where I need extra-fine grit or minor texturing (and have gone so far as to "paint it" using thinned wood glue straight onto basing or even models, especially if I want a rusty or muddy texture). The overall mixture from the tub is great for mixing amongst larger pieces rubble or scree in order to fill in gaps, or even just applied to a base as-is to simulate uneven rocky/sandy ground cover.

 The cornmeal is pretty straightforwards: it comes in a large can from the grocery store, is pretty much a uniform grain size (slightly larger than the finer ant dirt), is already dried out so I needn't worry about mold growth, and is somewhat moisture absorbent so it dries nice and compactly on a base when spread over already-applied thinned wood glue. It also clumps naturally when wet, and so is good for effects like "built up" texture for footprints or wind-blown debris (basically, when mixed with a little thinned wood glue to thicken it up, I can apply it like a "paste" and push it around with an old brush. I use corn meal on the majority of my basing, by and large, just because it's so versatile; generally I apply it straight on with thinned wood glue.

 The clay kitty litter is good because it comes in a variety of "natural" fine-scale rock shapes, can easily be broken into smaller particles or filed down to weird angles for effect, and is probably the cheapest material in bulk out of the lot. Even a small bag of cat litter should last ages and ages. It makes for great fine-scale rubble, miscellaneous debris, rock piles, and even broken concrete depending on the shape and size of the pieces used.

 The wood glue in the picture has lasted me quite a while (yeah, it's Elmer's) and is slightly more durable, in my opinion, than regular household white PVA craft glue (probably Elmer's also) and a helluva lot cheaper than the repackaged stuff some companies sell at a profit for modeling (again, probably Elmer's as well). It comes in much larger containers than white PVA glue and (don't quote me) is cheaper because it isn't bleached/doesn't have the whitening agents added to household glue in order to make it "pretty." It dries clear and rock hard, and doesn't leave any more of a "footprint" than CA glue, even.

 Extruded polystyrene insulation foam (pink foam, blue foam, EPS foam) is fairly easy to come by in most areas that have warmer temperatures. You can buy it in bulk in large sheets from home improvement/DIY stores (mine was originally 4' by 8' but got broke in half over my knee when it became belligerent about fitting into the hatchback) and is more or less equal in hardness and consistency, regardless of color. (Pink = Home Depot, Blue = Lowe's Home Improvement, and a large 1" thick sheet that's cheap per square foot and can be squirreled away in the garage rafters until needing to get a chunk cut off for a project = pure win!) Yeah, you could go even cheaper and use the white polystyrene that comes boxed with new "toys" as a "shock absorber," but that stuff is a rougher texture, has a larger "grain," and just isn't as convenient to store as a large flat sheet. (Remember I said I generally go cheaper when possible but buy "quality" when I need to - this is one of those instances.) So far as uses: the small off cut chunks like what you see here make great rocky debris, especially with a little texture added. They're also good for use underneath other basing material, such as the "mound" on the base of the Genestealer Patriarch from my picture.

A few asides:
 I've personally never used static grass on any of my based miniatures (although I bought a small tub of it some months back when I finally found a brand and shade that didn't have any extra odd colors mixed throughout), but I think I still manage to get a reasonable variety of base appearances - that's why it's not on my short list here.

 So far as display/competition pieces go, I've generally used the same style and materials in basing those as I do for "less fancy" figures. I still like to make a good presentation and get across a certain "atmosphere," though, so by and large I've made small-scale "dioramas" with insets to match the basing of most of the models I've entered in painting competitions. My Golden Demon entry at the Games Workshop 2007 Chicago Games Day for example, Gandalf at the Bridge of Khazad-Dûm, was converted and reposed in attempted replica of the "challenging the Balrog" scene from "The Fellowship of the Ring" movie, with the figure atop a 15" long span made from pink insulation foam, Spackle, fine grit, and a reinforcing wood dowel.

 I'm sure I'll probably make a fancy multilevel display base at some point - I just haven't yet. The "fanciest" I've gotten so far has been a round 1 1/2" tall resin display plinth with a piece of trimmed-to-shape metal air duct sheeting flush with the top. It had the edges deburred and rounded down with a bastard file (I love that name!) so it can be used - even held upside down - with any of my figures where I've epoxy glued rare earth magnets underneath (so far pretty much all of them).


 Hopefully I've gotten across the idea that if you are so inclined you can have basing for your figures that looks good with a little creative use of inexpensive and readily-available materials. I'd appreciate any feedback or other comments on figure basing that people care to throw my way - what do the rest of you use?

LinkWithin

Related Posts with Thumbnails

Followers: