5/26/2015

How to Make Your Own Iconography and Put It On... Stuff, Pt. 2

 Here's Part Two of my "How to Make Your Own Iconography and Put It On... Stuff" tutorial series and you can refer to Part One here. Ideally at this point, you've got iconography that you can use on something and are able to get it into a printable sheet format - the question is what to do now.

 Fortunately, there's a number of answers. With printed or copied graphics, you can transfer them onto a great number of mediums. For this particular section, however, I'm going to focus on the more frequently used output - water slide decals. Essentially, anything that you can make into a printable format you can theoretically make into a water slide decal - with some limitations, primarily being size.

 As of my last attempt at creating decals, I've found four different types of water slide decal paper available and in a variety of sizes ranging from quarter sheet all the way up to full letter-size paper sheets. I went physically to places like hobby stores, craft/scrapbooking stores, and RC/scale modeling shops because I wanted to set eyes on the decal paper firsthand - but out of all the different sizes I found, I eventually settled on A5 size (5"x8") which I tried first and then Letter (8 1/2"x11") when I decided I wanted more decals with a different appearance. I'd imagine even more custom decal paper sizes might be available online, but I stuck with these two straightforward sizes of water slide transfer paper from both Testor's and Micro-Mark as they were pre-existing paper size settings in Word document and Adobe PDF format for creating sheets and I thought therefore would be easiest for printing at home or at a copy shop.

 The different types of water slide decal paper are all essentially the same in form and function - a face-up sheet (possibly with an underlying layer of adhesive) over a layer of dextrose allowing for both adhesion and release from a colored backing sheet. For fine scale models/miniatures I'd recommend against using paper with the additional layer of adhesive as it makes for thicker decals and really isn't necessary if you use additional products like Micro-Mark's MicroSet and MicroSol (to be discussed later). The differences are simple - recommended printer type and sheet color. There are different papers for both inkjet or laser printers as well as clear decal sheets and white colored decal sheets. The A5 paper I tried first was clear and meant for inkjet printers - this was my first run with strictly black decals and a potentially maddening time cutting out all the little spikes from my original iconography design. I used Letter sized paper for laser printer (or copier!) in white for my second attempt with a filled-in design and this was much easier. The bottom line is that if you just want black lettering or something non-fancy, clear paper will show up just fine. If you want iconography or decals in any sort of color, I'd recommend using white decal paper to print to as the end result will show up much brighter over anything you apply a decal onto, regardless of how dark the surface is, even if that means you need to trim your decals more closely to avoid any white showing around the edges. Now there are very rare printers that print in white ink and cost thousands of dollars (ALPS printers) - barring those, the best you can do to get the color "white" in a decal is to use white decal paper and trim back to the edge of your design.

 I'll admit - I personally didn't notice a significant difference in the output quality between the sheets I printed using my home inkjet printer onto inkjet water slide decal paper versus my second attempt with a different design printed out on a laser copy shop machine onto laser-variety water slide paper. Hypothetically, though, I'd have to imagine that the laser-variety output is a little more precise as there is no spreading of wet ink and the design is heat-bonded to the paper as a part of the printing process, but then the inkjet paper itself is designed to accomodate wet inkjet color and a slower drying time. The one thing I did notice, at least to start, was smearing - handling an inkjet decal sheet before it is fully dry is very messy, and I'd highly recommend only handling printed sheets by the edges whenever possible.

 As near as I can tell, the sole difference between professionally-printed or store-bought water slide decals and those homemade is a permanent sealing layer over the top of the decal to prevent the design from dissolving or smearing during the application process. No problem!

From here on out, I'll be using the following picture to refer to in the way of tools to use:

 After printing out your graphics onto a water slide decal sheet, it is simply a matter of sealing it once it has dried. I've seen reference to people using strong hold hairspray, but personally I've found a thorough spraying of gloss sealant (I used Krylon UV-Resistant Clear Gloss to prevent yellowing) to do the job of sealing the decal sheet excellent to prevent the printed graphics (both inkjet- and laser-printer-based) from smearing. In the case of my last set of printed decals, I used a second light coat of Krylon Matte Finish spray to tone down the glossiness. Once cut out from the decal sheet and applied to the model, I feel the matte surface helped the decal to blend in with the background a little better.

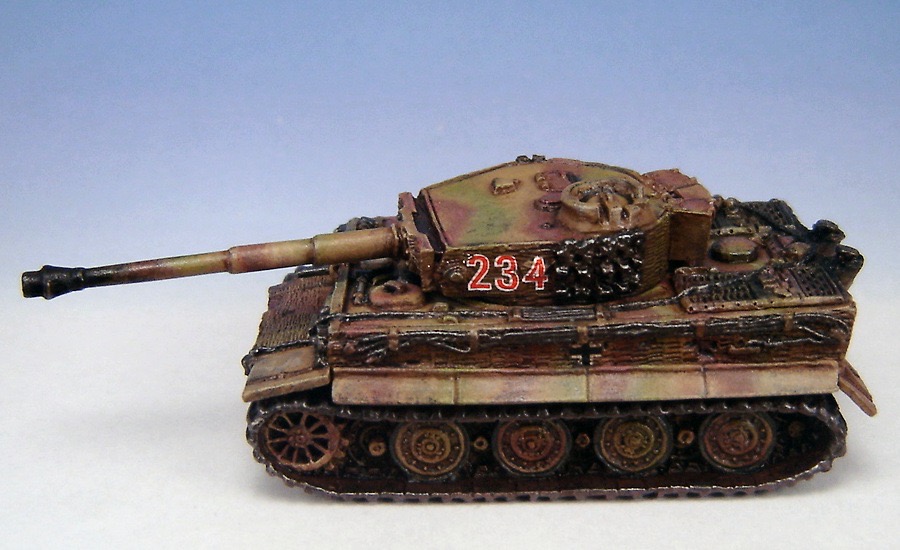
 In researching water slide decals and how to apply them, it seems there are a lot of approaches. I'm going to describe mine - primarily to save other people reading the time and effort of looking elsewhere, but secondarily... because it works! To start with, I'd recommend trimming as close to the design on your intended decal as possible - this is especially necessary if you've printed on a white decal sheet as any white visible around the edges of your design will look awkward or possibly need to be painted over.

Recommended materials:
  • A shallow dish or saucer with room-temperature distilled water
  • A pair of tweezers and/or sharp hobby knife
  • Brush-on gloss acrylic/Future Floor Finish/etc.
  • MicroSet and MicroSol
 I recommend distilled or filtered water so as to avoid impurities which can cause your decals to settle unevenly or with bubbles underneath. The brush-on gloss is to smooth out the surface where you plan on applying your decal so as to make for a nice, even finish - in the materials picture, my "Wash" mixture for thinning has acrylic medium mixed with water in it and does the job nicely. The MicroSet and MicroSol are optional, but work excellently and make the job of applying decals infinitely easier than water alone.

 So to apply homemade decals, what I do is the following:
  1. Brush on gloss acrylic medium/Future Floor Finish/something similar in the area where you want to apply your decal. This will smooth out the surface, allowing for easy transfer and minimizing the likelihood of bubbles beneath your decal. Allow to dry.
  2. Neatly cut out your decal - as mentioned before, when printing on white water slide decal paper you want to cut as close to your design as possible to avoid stray white space around the edges. For clear paper the less overhang you've got, the less chance for bubbles or wrinkles forming at the edges and the better your decal will conform to curved or uneven shapes.
  3. Allow the cut-out decal to soak in a very shallow saucer (even a small plate will do - the shallowed the water, the easier to wrangle wayward decals) for about 10 seconds or until it starts to slide easily on the backing material - take care not to let the decal slip off the backing material entirely!
  4. Brush on a quick coating of MicroSet in the area you want the decal to sit on your figure or model - this prepares the area and allows for better decal adherence.
  5. Pick up the backing material with decal on it (tweezers make this infinitely easier) and align an edge of the decal and the backing with where you want the final location to be.
  6. Gently and carefully slide the decal off the edge of the backing on your model, holding the edge where you want the decal to sit with the point of a hobby knife or toothpick while carefully sliding the backing out from underneath - one needs to be very careful at this stage, because any quick motions can cause the decal to tear or move out of alignment.
  7. Before all the water dries or is absorbed by the decal, quickly (but carefully) slide your decal to its final placement location.
  8. Apply a thin brush-on coat of MicroSol over your decal - this aids with adherence because it softens the decal somewhat. Perfect if you're trying to get it to conform to panel lines, curved shapes, rivets beneath and the like.
  9. If there are any small air bubbles trapped beneath your decal, you can use the point of a hobby knife or scalpel to piece the decal and release the trapped air - just be careful not to cut or move your decal, otherwise it may tear.
  10. Once fully dry, you may want to brush a little more gloss acrylic medium/Future Floor Finish/something similar around the edge of the decal and the surface its adhered on, depending on the thickness of your water slide decal - if you need to blend the edges into the background surface a little more smoothly.
 Once your decal is applied, you can use the same techniques on it as you would over a regular painted surface - washes, highlights, and even weathering powders. Here's examples of some decals I put on a Flames of War Tiger I tank several years ago (given washes, minor highlights, tidied up with paint to match over the battle-damaged area, sealed, and with added weathering powders - all over uneven surfaces):


5/19/2015

#hobbytiptuesday - Bleaching Color

 Want some slightly more washed-out color on your painting or to cut back the intensity of inks and such?

Brushed-on household bleach - it's not just for whitening socks!

Pic #1 shows post-bleaching of the top half of the green ink-tinted divider

Pic #2 shows the unbleached green ink-tinted divider

5/12/2015

How to Make Your Own Iconography and Put It On... Stuff, Pt. 1

This is the start of a series on making iconography for use with fine-scale miniatures - in this case, I'm specifically creating iconography for use with my Warhammer 40K Chaos Space Marine Warband, the Disciples of the Four. Ideally, I'll be covering a number of things:
  • How to create an icon in a paint program
  • How to transfer a saved icon via a Laser copier/printer
  • How to transfer a saved icon image from your computer via an inkjet printer
  • How to transfer a saved icon onto other mediums
 For the sake of starting somewhere, I'll assume that anyone reading this is at least computer-savvy (it's posted online, after all) and has access to some sort of image/photo editing/creation software. There's a number of programs out there, from the oft-overlooked MS Paint that comes with Windows, to image editing software available for download from the internet for free/shareware use (GIMP springs to mind, for one), to full-blown (and generally) expensive professional-grade image editing/illustration programs such as Adobe Photoshop and Corel Painter. In the example pics, I'm using Paint Shop Pro 7 - it's quite a few years old now but was more or less comparable to Adobe Photoshop at the time, and the rights are currently owned by Corel with the recent iteration emasculated and stripped down into strictly a photo editing suite. In other words, it doesn't necessarily matter what software you use (old or new), but there's certain things I'm going to be demonstrating and if your own program can't do them you're going to have to either get creative or find some other workaround. If there's any questions about any of my steps, by all means feel free to ask me!

 This is what your own image editing/illustration program ought to be able to do in order to replicate what I'm going to show: use image resolution of higher than 300 pixels per inch, save your images in a higher resolution format, and be able to save your image with actual transparency as opposed to dithering (if you want your final insignia to have uneven shapes w/ crisp edges, that is). Ideally, you'd be able to draw using vectors, multiple layers, and both background and layer transparency (whether via alpha channel or by default) as it makes things much easier and allows for many more options in what you can put in your iconography.


Here is the example I will be using for the remainder of the tutorial:

 The entire image was drawn on a transparent background, as I wanted to use 4 spiked cog shapes to represent the 4 Chaos Powers in 40K that my Chaos Marines worship. I went through quite a few test designs - adjusting the length of the spikes, the shape of the spikes, the size of the circles, their relationship to each other, etc. before finally settling on at least the design of the 4 cogs. My version of Paint Shop Pro allows you to draw images formed out of multiple vector "parts," group them, and then save them altogether as a reuseable "preset shape." Since the shoulder pad color for my Chaos Marine Warband is purple, I wanted to have white iconography - but for the sake of printing on white decal paper, also went with a thin black outline for all the shapes.

 What you can see here is one of the spiked cog shape layers "opened up," showing the component vector parts of the design - a hollow circle and eight evenly spaced triangles. As the "spiked cog" preset shape, though, it's an easy thing to rotate and resize things - so what the rest of the picture shows is that the overall spiked cog design is actually made up of two sets of 4 cogs: one white, which is the actual insignia design; one black, which has each of its spiked cogs centered under a white one and at a slightly larger size. The 45° angled lines in the background on the underlying "Alignment" layer are there for the sake of having the iconography itself aligned evenly, to a certain extent, even though the spikes on the cogs themselves are of different widths, lengths, and overall "balance" - that's how I'm hoping to get across the sense of "chaos" in the imagery although the icon itself is proportionately spaced so as to be "aesthetically pleasing." That's the idea, anyhow.

 It wasn't until I printed out the design and tried cutting it out that I realized that although trimming around all the individual spikes was manageable (for me, anyways, although I'm told I have a higher tolerance for mindless tedium than some), it was going to take so long across an entire army's worth of shoulder pad insignia that it was more trouble than it was worth. Rather than scrap the entire design, as I rather liked it after all the work I put in, I decided instead to add a colored background to fill in some of the space and cut down on the overall "pointiness" of things. I actually was inspired by an image of the Omega/Swan Nebula (M17) that I found on the official Hubble Space Telescope site, which is the "Image" layer after some trimming and tweaking. To put a black edge around the colored area and blend everything together, I used a hollowed-out partially transparent color gradient - the "Shadow" layer.

 This is where problems started to crop up. Although I had created everything as vector graphics for transparency and accuracy across multiple formats, when I went to flatten my design to a standard image in normal resolution so as to make it printable on a decal sheet (or other medium) it ended up pixellating things so horribly as to make the end result ugly and useless for anything.
In effect, I went from this:
To this:

 Not so good, obviously. I figured out an easy enough workaround, though, which was simply to save the original 600 pixels/inch resolution vector image at the actual size I created it in (2.117cm x 2.117cm) and then import that into another program where I could not only create a sheet format suitable for decal printing but also resize images as vectors without losing resolution or image quality. For reference's sake, the image format I used to keep layers/transparency and resolution intact was Portable Network Graphics (.png) format and the program I was able to use for accurate resizing and layout was MS Word - I've created an Adobe format for my decal sheet since, but I didn't have access to a .pdf editor at the time. In any case, the important thing when I imported the graphics into Word was to set the Measurement units of the particular document into Millimeters - as seen below, but File Options may vary depending on version and program used:

 At this point, it was just simply a matter of importing in multiple copies of different icon styles I wanted to print out in multiple - some with background, some without, some with a single spiked "cog," etc. - and lay them out as needed, and then use Word itself to adjust the image size to what I needed. As can be seen in the below picture, I settled on a height of slightly larger than 7mm (or 4% the height of my original image) for my particular icon - a perfect fit for the available space on my Chaos Space Marine shoulder pads:

 In the image before, the careful observer will note that I have the sheet labeled "Print as A5" - that was the original size of the white-background decal paper I was able to lay hands on. Ideally, you can lay out the format of your Word (or Adobe) document to suit whatever size you'd be printing to. I ended up moving everything to a "Letter" size 8 1/2" x 11" format for the final version. I saved my finished document file on a flash drive, took it to a copy center, and had it printed in color laser format onto a "Letter" size white-background decal sheet.

 It was several years before I made it to the point where I actually used one of my decals on a finished figure, but this is how the "single spiked cog" variety turned out:

 I hope this was some help to anyone trying to make printable insignia or other items for fine-scale models. As always, comments and feedback are appreciated!

LinkWithin

Related Posts with Thumbnails

Followers: