Showing posts with label tools. Show all posts

3/17/2015

#hobbytiptuesday - Working with Epoxy Putty

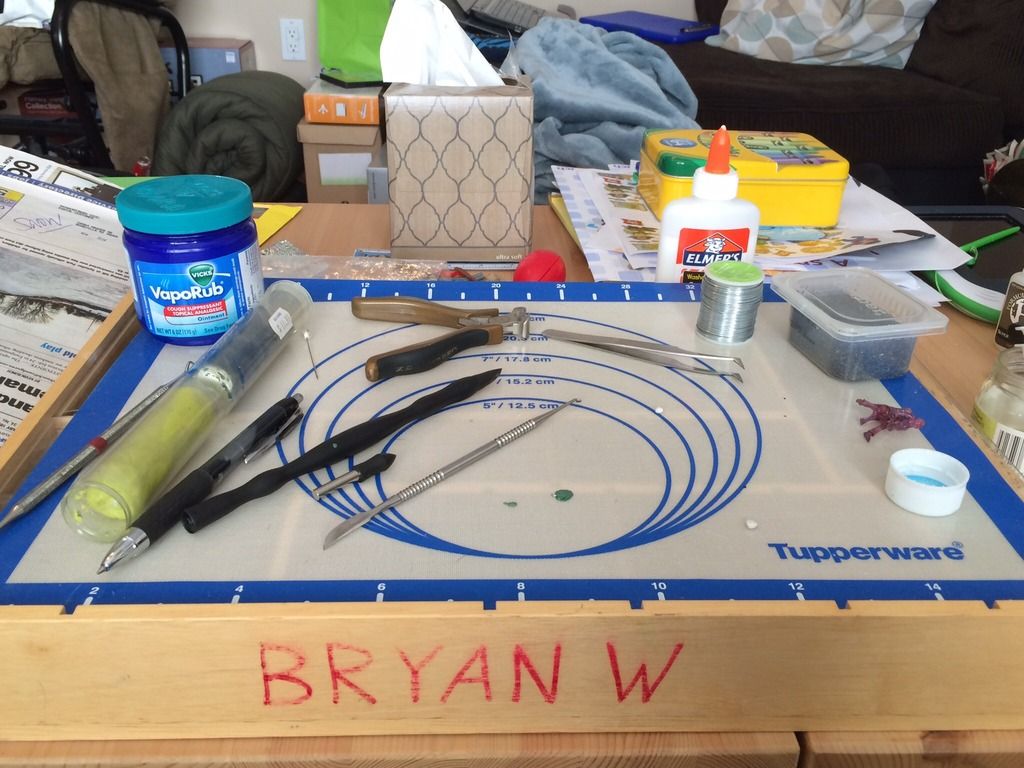
 I had posted this picture on my Painting by Tinweasel Facebook page and a teaser that I would be putting up something about it for a hobby tip - didn't quite get to it then, so making up for lost time now.

 
  So I've got a couple of things going on in this picture related to epoxy putty sculpting. The main one I want to mention is the Tupperware baking sheet to sculpt on - this thing is great! It's made of silicone and for me is essentially a flat non-stick sheet to work from when sculpting. It rolls up for convenience, is non-stick to two-part epoxy putty and similar materials and is easy to clean off. Much easier than working on a plastic bag or lubricated sheet of styrene. It's officially called the "Tupperware Silicone Wonder Mat" and can be bought online or retail for roughly $20-25 US. (A little pricey maybe, but the use I've gotten out of this thing and the messes avoided have made it worth it.)
 
 For another, I want to point out the Vicks VapoRub. Using this was a suggestion from Joe Orteza when I attended a sculpting seminar of his at GenCon 2014: use VapoRub instead of petroleum jelly to prevent epoxy medium from sticking to sculpting tools. Not only does it work just as well as petroleum jelly to prevent epoxy sculpting putty from sticking, it either gets absorbed or eventually evaporates from sculpting material, thus preventing lubricant causing problems when applying multiple layers of sculpting putty - it was an excellent suggestion by Joe that I've been using since!
 
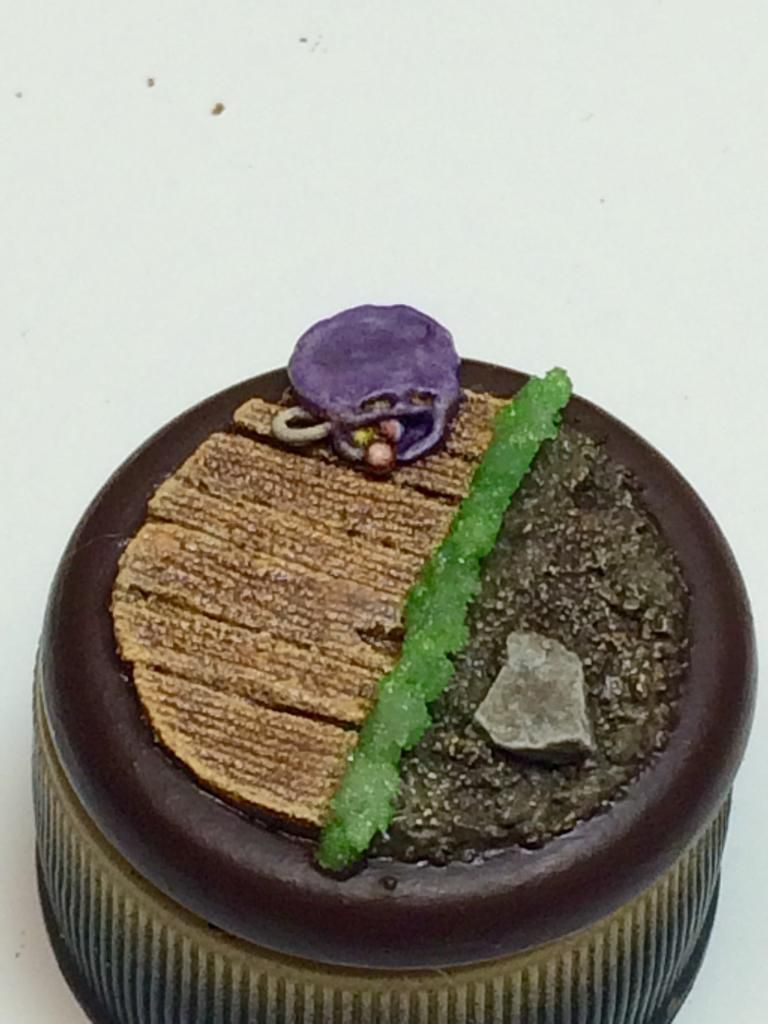
 Last, but not least, I wanted to show off a little! The green blob on the mat in the above picture is my first attempt at sculpting in a long, long time. I wanted to sculpt a marble bag for a figure's base with small plastic beads embedded in the epoxy putty for the marbles remaining in the bag. I'll have a bunch of loose ones scattered on the finished base when all's said and done. Here's how it turned out painted:


5/02/2010

Hobby Tip - I Remembered How To Paint Highlighting

 Like the title says, I literally had to think about it because I'd forgotten, and suddenly remembered the method I used to use to paint highlights. By way of explanation, I've only gotten back to painting again after about a year off, which started shortly before the birth of our son in 2/2009. I've painted a few miniatures in the past few months, but when doing touch-ups on the Plaguebearer I've posted pictures of recently, I ran into a problem - all my highlights (especially edge highlights) turned out looking a little "off." I'd forgotten what technique I used exactly to highlight and get nice, neat lines and couldn't for the life of me get any of them to come out looking the way I wanted them to.

 I realized what the problem was in a sudden flash of insight - I was applying to much pressure and needed to slacken up a bit. Trying my "newly remember" old method, I was back to painting highlights properly on that figure and the commission I'm also working on simultaneously. (Not exactly like riding a bike, but more like getting back into an old "groove.") I figgered since it had "come back to me" pretty clearly as to how I should be approaching highlighting, and in a way that I can (relatively) easily explain in words, and I've taken a picture of my painting in the past to explain a related concept, I figgered that I'd dig up my old tutorial picture and write something up for the site. Enjoy!

 The problem I realized I was having was that I was applying too much pressure on the brush. Ideally what you want to have is thinned paint - something along the lines of a 1:3 or 1:4 paint-to-thinner ratio, or to throw the phrase out that everybody seems fond of, about the consistency of "skim milk." The reason for this is that you want your brush doing most of the work - it's a tool like any other, and if you're working harder than your artist's tool, then you're doing something wrong. The biggest thing to painting highlights (other than thinned paint) is the amount of pressure you apply on your brush. What you ideally want to do is practice applying as little pressure as possible - if you can, try applying so little pressure that barely even the tip of the brush would touch. Do this without paint if you like to get the feel for it, but practice just barely skimming the surface of something with a feather touch and nothing but the very tip of your brush. Got that down after endless repetition? Good! (Realistically speaking, a skilled painter has had lots of practice doing light brush strokes and with a lot of not-so-good painted miniatures back in the past as trial and error - if you're lucky, you can skip all the bad parts and cut straight to painting good highlights!)

 Now to apply some paint - dip the brush into your thinned paint no more than halfway. Any more than that and you risk getting thinned paint up into the metal ferrule holding your brush hairs in place (and we all know that's a good way to ruin a perfectly good brush). If you're comfortable with this paint consistency and you're painting on a broad area, that's fine, but it's generally a good idea just to lay the brush point flat on a paper towel (or give it a quick swipe along a fingernail, by preference) just to wick some of the excess liquid away - what you're doing is loading up with diffused color due to the added thinner and then taking some of the excess liquid off - you're still going to have the same diffusion of color but just not as runny. Now with as light a touch as you can, draw the brush back towards you slowly - it's the slowness here that matters, by the way. The longer you keep the very point of the brush in contact, the more of your color will unload onto the figure, and by keeping a bare minimum of contact you're letting the brush and the thinned paint do the work. Applying pressure won't do anything to help lay down a highlight, all that will do is make it thicker by bringing more of the brush hairs in contact with your painting surface by force.

Here's the final light purple highlight on a broad span of purple, drawn up towards the top of the shoulder pad:


 If you've done it right and let minimal pressure on the brush do all the work, you should ideally end up with a nice, narrow line. Straightness comes with practice, as does the ability to know how "far away" to hold the brush so that you're not pressing on the surface of the figure at all, but simply letting the bristles touch it with their built-in "springiness." If you approach highlights obliquely - that is, head-on - you're going to end up with fine lines. If you approach them with a slight twist to your brush, so that instead of drawing the very tip along you're drawing more of the side of the tip slightly sideways back toward you, you're going to end up with a slightly more diffuse highlight. I prefer the latter, but it's all a matter of style.


 If you've got highlights down, how's about something a little more tricky? Sharp edge highlights? Sure! Essentially, what you want to be doing now with the same consistency paint and the same wicking off of excess moisture, is drawing the side of the brush along a hard edge instead of using more of the tip. If a picture's worth a thousand words, this might help:

 Using thinned paint, drag the side of the brush along the sharp edge of the surface you want to have a crisp narrow highlight at roughly a 45° angle. Rather than the bristles of the tip splaying and making a fuzzy highlight, the side of the brush which doesn't splay (well, at least not so that it affects the highlight overly much) is what you want to be making all the contact. Between the thinned concentration of your color and the positioning of your brush, with a couple careful passes you'll end up with a nice, crisp edge highlight. Same technique as regular highlights and with the same light touch, it's just applied to the hard edges of things rather than straight and with the (side of) the tip.

 Any more questions? Feel free to ask! Now that I've remembered how to highlight again, I'll do my best to answer. This actually helped someone? I'd love to hear that, too!

4/23/2010

Hobby Tip: On My Word, Unleash Nurgle!

 It's somewhat sloppy and disgusting work (isn't that the Nurgle way of it?), but here's a few ways to get your plastic or metal figures looking like they've given over to Papa Nurgle in no time. (For those not familiar, Nurgle in Warhammer 40K is the Chaos god of disease, decay, pestilence, entropy, and fearlessness of death.)

Supplies for adding disgusting texture to your figures:
  •  You'll need some type of PVA glue. I'm partial to Elmer's Wood Glue as it's a bit "stiffer" in consistency than regular White Glue and comes in larger containers by comparison especially if you buy it at a DIY or building surplus store - then again, you can probably find cheap (as in inexpensive) glue, like Elmer's or another good brand name, at some of the higher end dollar stores (Dollar General, Dollar Tree, etc.) especially if they have a school supply section.
  •  You'll probably want some sort of thickener, which ought to serve the added bonus of giving your infected areas some gross texture as well. Anything along the lines of talcum powder, baby powder, or extra-fine grit will do - ideally you want something inert and non-food based (although I've always used cornmeal as a basing material, and I've never had any figure bases turn, um, Nurgly). The thicker the "grain" of your material, the more textured the final result will be - in the example pictures, I used a mixture of fine grit, cornmeal, and baby powder.
  •  Last but not least, you'll want to pick up an assortment of smaller-sized beads. If you get coupons in your weekend paper (JoAnn's) or subscribe online (Michael's, Hobby Lobby) you can probably get 40% off a decent-sized container of seed beads - the kind with tiny holes in them so as to resemble pustules on a figure. In the example pictures, I used a mixture of the larger dessicant beads from a few packets of silica gel (the sort you find in new boxed home items or clothing pockets when bought at the store) as well as the tiny plastic ionized beads from the inside of a water purifying pitcher filter (they are a pain to separate out from the activated charcoal, but well worth it!)

Here's the step-by-step on applying a disgusting texture to your figure:
  •  Sort out your beads first, making sure you have the sizes and appearances you want - maybe even divvying 'em up in groupings according to where you'll be placing them. (It's not rocket science, granted, but I'm all about having stuff at hand and ready to go when you need it as opposed to sorting through piles of beads while your glue slowly dries unused on the figure.)
  •  Mix some powdery thickener into your PVA glue and apply it in a smallish amount where you want your pustules to sprout, preferably not with a good paintbrush unless you want to accidentally make Father Nurgle extra proud.
  •  Stick your beads where you want 'em, making sure they're aligned (sprouting?) just the way you want the final product (crop?) to look.
  •  Slather on more of your glue and thickener mixture around or even on your groupings of pustules, trying to be sloppy but careful - there's an oxymoron for you, but I'm thinking you can picture what I mean. You probably want to steer clear of the tops of your pustules-to-be, unless you want the areas near the top of the sores to be grainy textured - I'd think smooth would be the way to go (like pus-distended skin stretched sickeningly taut by the diseased innar... er, yeah).
 As the glue dries, it'll tighten everything into place and your powdery/gritty thickener ought to generally make a mess of the appearance around and between your pustules, as well as smoothing out reasonably well where the diseased areas meet the "unblessed by Papa Nurgle" portions. You might make several applications (like I did in the example pictures), using more coarsely grained thickener to glue the beads down and then going back with a thickener like baby powder to smooth things out a bit.

A mixture of PVA glue and baby powder:


A mixture of PVA glue, fine grit, and cornmeal:


Adding a look of disease and decay to your figures:
  •  Gather an assortment of fine drill bits, the smaller the better. (In the example pictures, I used drill bits from 1/78" all the way up to 1/8" in size.
  •  Make sure you have a sturdy base to mount your drill bits for use - a good pin vise should have a chuck for extra-small bits or be otherwise adjustable to hold even smaller-sized ones. If your pin vise is not nearly as adjustable for tiny drill bits (my first one wasn't, for example), you can take a short cut-off length of dowel and make a relatively deep hole in it a little larger in diameter than a drill bit you want to mount (I used a pair of locking pliers to grip one of my smaller drill bits initially - it was hard work, but I finally got a nice deep hole to set my 1/78" bit into with room to spare for glue.) Once your preferred drill bit will fit in the dowel, try roughing up the non-spiraling end of it with a file or sandpaper to ensure a good grip for glue. Slather the roughed-up end of the bit with glue and set it in the hole you drilled - I'd recommend epoxy glue since CA glue (AKA "Super Glue") is overly brittle, but even something like rubber cement would work in a pinch.
  •  Drill holes in various sizes across the areas you want to look especially diseased on your figure. It's probably best not to clump larger holes together, but a larger one surrounded by an assortment of smaller-sized ones generally looks good. Make sure not to repeat any particular pattern over the surface of your figure, since this is ideally supposed to be random.
  •  Tidy up any burrs on the edges of your drill holes with a quick, light drag from a scalpel or hobby knife (unless you want the holes to look somewhat inflamed as well).

And here's the finished detail on a figure, a combination of added texture and tiny drilled holes:

2/16/2010

Hobby Tip - Weathering Powders

 My understanding in using weathering powders is that ideally, what you want to do is paint everything you're going to paint and then seal things, with the final coat being matte. (You could use gloss or semi-gloss, but matte has more "texture" to which the weathering powders can stick.) If planning to paint additionally above and beyond the weathering powder stage, a good halfway point sealant-wise is simple (as cheap and plain as you can get it) hair spray. (Extra Hold Suave used here, "borrowed" from the wife.)

 You can use most any liquid to "thin" weathering powders in order to apply them by brush. Weathering powders are essentially just extra-fine-grained dry pigments and you're technically not "thinning" anything by adding liquid to them, but by using the powders suspended in a liquid medium, this allows them to flow wash-like into crevices and the like. Anything that acts as a surfactant is probably best: like rubbing alcohol, Future Floor Finish/water, GW Washes, water/dish washing detergent, turpentine/mineral spirits/white spirits, etc. The problem lies in "thinning" pigment powders when you use something that dissolves acrylic paint - a little too heavy with the brushing and you've started to ruin the underlying paint job (which in itself can be used as a technique, but that's a different writeup); hence the initial step of putting some sort of barrier between the underlying paint job and the pigments.

 In terms of sealing or "fixing" the pigment powders to your model, there's a lot of options you can use. The easiest and best-looking would be to use nothing: this lets the texture of the pigments themselves play itself up to best example, but the downside is that the pigments rub off with any handling - probably best left for display models that won't be handled. Next best would probably be what MIG Pigments recommend: a liquid fixative, along the lines of turpentine, acrylic thinner, or MIG Pigment Fixer - it semi-dissolves your underlying sealing spray when (gently and carefully) brushed on over your pigments and when dry, essentially leaves the pigment powders embedded in the underlying sealant. Maybe last best would be some sort of sealant spray again: pump sprayers would cause the least disruption (but be more prone to causing "puddles" due to spray pooling on the figure) whereas aerosol spray would have a more even finish but be more likely to blow away a decent amount of your placed pigment powders during the process of sealing - kind of a Catch-22, but there you go.

 By way of example on this finished GW Skaven Warlord, I used Old Rust and New Rust colored powders on the blade of the bardiche over metallics tinted with purple, brown, and black - I added a few other colors of pigment powders elsewhere, like Concrete Dust on the clothes, Soot in some of the darker crevices near the hem of his robes, etc. After fixing the weathering powders with MIG Fixer, I went back and emphasized the nicks and dings in the blade of the bardiche with paint, as they had gotten "overwhelmed" a hair by the pigment powders. I then added a bit more selective shading and spotting with brown and black translucent inks. The figure is sealed with a few thin coats of Krylon Gloss Varnish spray (so as to try and play up the pigments and coloration) and then a final coat of Testor's Dull Cote spray (for protection and to tone things down a bit). I went back and emphasized select areas of metallics with brush-on gloss, since Dull Cote (or any ultra-matte sealant by nature) tends to make metallics look flat.

2/13/2010

Hobby Tip - Cyanoacrylate Gluing, pt. 2

 As sort of a follow-up to my last Hobby Tip regarding Cyanoacrylate Gluing and some ongoing frustration regarding fingers sticking to everything while trying to glue paper to sheet styrene as part of an ongoing Rhino conversion, I figgered I may as well share this tip:

 To prevent your fingers from sticking to CA-glued objects, you can either coat them with a thin layer of Vaseline (per my last Hobby Tip regarding CA gluing) or try using an oil- and moisturizer-rich hand lotion just before you apply the glue. Tried this today after much frustration, using some heavy-duty Eucerin lotion that we have in the house and I'm pleased to say that it works wonderfully! Michigan winter and the lovely triple-threat combination of below-freezing temperatures, extremely dry air and high wind is rough on the skin, so we have a ready supply of lotion handy, all I needed to add was some paper, styrene, and Zap-A-Gap for a trial run:

 One important afterthought: as part of ongoing prep work, make sure that you wash and gently scrub with dishwashing soap (or another degreaser/surfactant) and a toothbrush anything that you've stuck together with hand lotion as a barrier on your fingers, prior to doing any additional work on it, as any residual hand lotion on your work will act as a moisture-proof barrier to everything else, too!

11/09/2009

Hobby Tip - Cyanoacrylate Gluing

 This Hobby Tip entry is specifically regarding cyanoacrylate (or CA) glue, one of the more important tools in assembling figures and vehicles. CA glue is unique in that it requires no heat or pressure to bond - it reacts with moisture in its surroundings in order to polymerize (solidify) and will join together anything it is in contact with as a byproduct of its polymerization process. Cyanoacrylate glue has a number of advantages: it sets itself even in an airless environment, it is able to join together different material types since its setting process is more or less "self-sufficient," and the glue itself creates a reasonably strong bond if spread on properly prepared (slightly roughed-up) join surfaces. As a result of using moisture as the main catalyst in its chemical reaction, cyanoacrylate glue is brittle when fully dried as compared to other glues. Another failing is that due to its brittleness, CA glue bonds themselves can "shatter" much easier compared to those of glues that maintain a certain amount of flexibility, like two-part epoxies.

 I've found through trial and error (generally a lot of error) that it is most often a waste to buy a large size bottle of the stuff. Despite various methods to try and keep the stuff from clogging or generally building up to the point where the bottle becomes useless, it invariably seems to happen. I've tried using wood nails/push pins in the top to seal the bottle (inert metal vs. directly stuck cap), wiping off the bottle and slapping the lid on tight as quick as possible (limiting amount of air), transferring the stuff into a smaller precision-drip bottle (despite a metal drip tube this time, it still clogged and wouldn't clean out despite all kinds of tricks), and even experimenting with all different consistencies of CA glue (super thin vs. medium viscosity vs. gel) to try and find one that would "last" longer - I think you get the idea. My advice would be to buy the smallest bottle you can (generally the cheapest, anyhow) and that way you'll have less go to waste. I no longer buy larger repackaged bottles from hobby stores, or even specialty hobby brands like Zap-A-Gap, since they all come in larger containers and are all essentially the same thing - pure cyanoacrylate glue.

 In terms of usage, the gel variety (Krazy Glue Craft Gel, "Gap Filling Formula" Zap-A-Gap) has a longer set time (30-60 seconds) and is good if you need to position a part before the glue hardens it in place - another fringe benefit for assembling models or figures is that the gel variety also fills minor gaps due to the thicker consistency. Super thin CA glue is great for narrow spaces and has a quick set time (5-10 seconds, usually) - it makes the best use of precision applicators and allows capillary action to "draw" itself into narrow crevices due to the surface tension of the liquid CA glue (in other words, if applied to a narrow crack between two close-fitting held-together parts, it will creep in between the parts and join them in a very short time frame. Medium viscosity CA glue behaves, well, somewhere in the middle.

 A lot of people use CA bond time accelerators or "zip kickers" - now while I've never personally bought them, I've likewise never had reason to. The idea behind a CA accelerator is that it essentially serves as a catalyst for the glue's "chemical reaction" - in other words, it increases the amount of moisture in contact with the glue so that it sets quicker. As I mentioned at the start, the key feature of CA glue is that it responds extremely well to moisture of any kind - unsurprisingly enough, even a drop or two of plain water will cause your CA glue to "kick off" immediately when compared to allowing CA glue to draw moisture from the to-be-glued parts and ambient humidity. Even breathing on setting CA glue has much the same effect (with the down side of potential inhalation of glue fumes), while using a hair dryer on parts glued with CA adds funneled air moisture via the directed blower as well as a quicker evaporation rate. You can likewise add a great number of materials to CA glue besides water that have a high "moisture" content and a fast evaporation rate in order to speed up the glue's chemical reaction: acetone, mineral spirits, rubbing alcohol, Tenax 7-R, thin viscosity plastic (polystyrene) cement, and even Green Stuff (AKA Kneadatite) - you'll find that the CA glue sets up much quicker, almost instantly in some cases. The greater the added moisture coupled with a quicker evaporation, the faster the setting time. (Again, I've never bought a "name brand" CA glue bond time accelerator - but I've used plenty "off-brand" kinds!) A few notes on this subject: a lot of chemicals are almost as toxic on inhalation as the glue fumes itself, so be careful, and using some sort of "zip kicker" versus allowing it to "naturally" set results in a weaker join - a forced reaction means less opportunity to spread or establish stronger polymer bonds.

 One thing about CA glue to always keep in mind, is that even though it make have set visibly and bonded parts together physically it is by no means "dry" (although technically this is true about most substances that start out "wet," like paint or even spray primer.) It continues to give off fumes until completely evaporated and these fumes are lighter than air. If you have CA glue inside a sealed container (like a glued-on enclosed canopy or glue-fastened vehicle cockpit, for example), fumes from the drying CA glue will interact with ambient humidity inside the container and you will end up with a hazy coating everywhere that the fumes have spread - great for "tinted glass" effects, but not so good for a clear plastic window. Like it says on the bottle labels, always use CA glue in an open, well-ventilated space: I'd suggest that when allowing CA-glued parts to dry, you should lay them or prop them up so that the fumes have somewhere to vent away other than inside your model.

 In a roundabout way, this brings me back to the problem of preventing clogged glue bottles. The reason they clog or get their lids glued on solidly is the "reacts with moisture" part - after you put the glue bottle cap on, the glue solidifies as it reacts with ambient moisture drawn into the mouth of the glue bottle as well as any moisture on the outside of the bottle opening or inside the cap itself. You're essentially putting a self-sealing cork on your glue bottle if there's any glue in the opening whatsoever, and it will happily adhere the moisture-laden bottle cap to the moisture-laden bottle mouth if you let it - I speak from experience here.
 Here are several methods to minimize your CA glue bottles "clogging" themselves and becoming unusable as a result:
  • Make sure to wipe any excess glue off the opening of the bottle, in order to minimize the amount of chemical bonding after you put the cap on.
  • Use bottles with a smaller opening, or better yet, smaller bottles outright - the smaller the opening and the smaller the amount of glue left behind to react, the easier it will be to break the seal the next time around.
  • Accept that the glue will eventually seal its bottle shut, buy bottles with long "spouts," and simply snip off the blocked end whenever it happens.
  • Coat the open end of your glue bottle before putting the lid on with something that A) does not carry moisture and B) will help to protect the glue inside from additional moisture - smearing a little bit of petroleum jelly (Vaseline) on the mouth of your glue bottle will keep it usable much longer and help to prevent clogs.
 Good luck, and may your cyanoacrylate glue bottles remain forever unclogged! Comments or other gluing suggestions are very welcome...

9/01/2009

Hobby Tip - Balanced Tools

 Are your tools balanced? (This concerns using Dremel High Speed Rotary Tools, specifically, but I think the underlying idea is important enough to warrant making a Hobby Tip out of it.)

 I went back the other day and just for the heck of it, reread the manual for my Dremel Rotary Tool - I'm fairly sure I read it when I first started using the thing years ago, but the significance probably escaped me. Now, thankfully, I haven't been severely injured by any of the workshop or hobby tools I've used (*knocks on wood*), well, barring the occasional stab from a hobby knife when I should've known better - and the only problematic thing that's happened with the Dremel has been a few cut-off wheel "explosions" when I've obviously bit off more than I could chew in one go.

 It hit me all of a sudden, though, in one particular section I read that there's a lot of things I just sort of take for granted in using my hobby tools and working with miniatures, and that if I actually stopped and thought about what I was doing - the actual process of what I was doing, mind, and whether I was actually working in the most efficient manner possible - there's probably a lot of things I could change to make my hobby more, um... expedient? Smoother? Easier? Quieter?

 I hope the Dremel company forgives me for quoting from their product manual directly (that, or floats me some advertising bonuses as it's a helluva tool and I use it in hundreds of ways in working with and prepping miniatures and terrain):
BALANCING ACCESSORIES - For precision work, it is important that all accessories be in good balance (much the same as the tires on your automobile). To true up or balance an accessory, slightly loosen [the] collet nut and give the accessory or collet a 1/4 turn. Re-tighten [the] collet nut and run the Rotary Tool. You should be able to tell by the sound and feel if your accessory is running in balance. Continue adjusting in this fashion until best balance is achieved.

 There - fairly simple. It sounds fairly common-sense, doesn't it? Well, yeah, in theory - but how many people have actually took a few moments before charging in with hot wire cutters, Dremels, paintbrushes, or unthinned glues to think whether how they were going about things and whether they about to work, process-wise, in the most efficient manner?

 Any of you have any suggestions or comments along this line in terms of things to think about prior to "setting to work" in this fine-scale miniature and -model hobby?

8/13/2009

Hobby Tip - Cuticle Stones

 I would highly recommend the purchase of a readily available and fairly inexpensive product for use in prepping miniatures, bases, sculpting, resin, and other decorative bits with your figures - unorthodox as it might sound, a common (and I can't believe I'm linking to this sort of site for an example) cuticle stone. They're known by lots of names, and I'm sure you can readily find one at a local pharmacy, druggist, general goods store, manicurist's shop, or salon.

 Essentially, when wet, cuticle stones work like automotive grade wet-dry sandpaper in stick form - I'd wager 600+ grit, maybe more like 800. In other words, this isn't something you'd want to use as your primary tool for filing/sanding of miniatures or scenery materials, but it does a great job at smoothing rough edges, taking things down in tricky hard-to-reach areas, and burnishing. The cuticle stone I've got is shaped like the one I linked to on the beauty supplies website (above) - essentially like a squared-off bullet, with a rectangular body that curves on two faces to a somewhat rounded not-quite-30­° angle straight end. So far, I've used it to get a baby-smooth burnished finish on the skull helm of a former white metal Khorne Lord now-Undivided after Dremeling off his "antlers"; stripping the multiple mold lines off of my somewhat soft resin Forge World Renegade Psyker without leaving score marks like a metal file would; adding scoring, gouges, and scrapes to resin basing and chunks of broken resin "concrete" using the right-angles of the rectangular body; and general purpose (but not heavy-duty) filing and smoothing. The nice thing about my cuticle stone is that it's got rounded curves, a broad angle, and 90° corner sanding all in one package.

 I'd recommend picking one up to anyone, just to see how they handle - let me know what you think.

8/04/2009

Hobby Tip - Something to Hold Onto

 Hopefully you all prep your figures: remove mold lines and venting tails, fill in any bubbles of missing material, tidy up any unusual molding flaws, and hopefully you all clean your figures prior to priming: a good scrub with a toothbrush or something similar under running water, using dish soap (fairy liquid) or some other suitable cleaner/degreaser/surfactant - but what happens after the painting begins? After all the work of cleaning and stripping and tidying, do you then go and get your figures - your work-in-progress - dirty again?

 One thing I've had a lot of people ask about when they see work-in-progress pictures of mine is, "What's it sitting on?"

Orcus WIP #8
 The short answer would be that the figure is stuck with two-sided masking tape to a 20oz. pop bottle cap. I generally find that this setup is sufficient for most figures, even metal ones. Orcus here, by Grenadier Miniatures circa 198-, is not just any metal but a good ol' solid hunk of sculpted lead - despite the weight, the tape has held him up just fine.

 The reason I stick my figures to something, and a bottle cap with two-sided heavy duty masking tape suits me fine 'cause I'm cheap 'n' easy like that, is that now I've started painting and put in all the previous prep work and cleaning, I don't want to get him dirty again by handling him and getting fingerprints, grease, and food crumbs all over him since that will interfere with paint adhering properly. I also have found that corners and sharp edges that "mysteriously" used to lose paint back when I held figures directly when working on them no longer have that problem. Whatever you use, whether it be an old paint pot with a dab of CA glue or a cork with a pinned-in base stuck through, I'd highly recommend mounting your figure to something to hold onto while painting.

 Oh, and other advantages: you can always stick your figures to something "chunky," like an old film canister or prescription bottle, if holding onto a tiny base causes hand strain; likewise, I've found that having a figure stuck to something a little more mobile that I can hold onto directly allows me the freedom to paint from just about any angle, even upside down (assuming your figure's mounted well on the base); I've also noticed reduced eye strain in mounting my figures to something while working on them - by being able to hold it up to eye height while painting, it's much easier to get better illumination of the work surface and to see tiny details.


 Anyone have any other things that they have found useful in holding or mounting a figure while painting? I'm curious about things to use for extra-large models such as tanks and monsters, although I'm thinking when I start on the Rhino for my squad of Khorne Berzerkers, a length of hardboard and some UHU Tac putty might just do the trick!

LinkWithin

Related Posts with Thumbnails

Followers: