9/01/2009

Hobby Tip - Balanced Tools

 Are your tools balanced? (This concerns using Dremel High Speed Rotary Tools, specifically, but I think the underlying idea is important enough to warrant making a Hobby Tip out of it.)

 I went back the other day and just for the heck of it, reread the manual for my Dremel Rotary Tool - I'm fairly sure I read it when I first started using the thing years ago, but the significance probably escaped me. Now, thankfully, I haven't been severely injured by any of the workshop or hobby tools I've used (*knocks on wood*), well, barring the occasional stab from a hobby knife when I should've known better - and the only problematic thing that's happened with the Dremel has been a few cut-off wheel "explosions" when I've obviously bit off more than I could chew in one go.

 It hit me all of a sudden, though, in one particular section I read that there's a lot of things I just sort of take for granted in using my hobby tools and working with miniatures, and that if I actually stopped and thought about what I was doing - the actual process of what I was doing, mind, and whether I was actually working in the most efficient manner possible - there's probably a lot of things I could change to make my hobby more, um... expedient? Smoother? Easier? Quieter?

 I hope the Dremel company forgives me for quoting from their product manual directly (that, or floats me some advertising bonuses as it's a helluva tool and I use it in hundreds of ways in working with and prepping miniatures and terrain):
BALANCING ACCESSORIES - For precision work, it is important that all accessories be in good balance (much the same as the tires on your automobile). To true up or balance an accessory, slightly loosen [the] collet nut and give the accessory or collet a 1/4 turn. Re-tighten [the] collet nut and run the Rotary Tool. You should be able to tell by the sound and feel if your accessory is running in balance. Continue adjusting in this fashion until best balance is achieved.

 There - fairly simple. It sounds fairly common-sense, doesn't it? Well, yeah, in theory - but how many people have actually took a few moments before charging in with hot wire cutters, Dremels, paintbrushes, or unthinned glues to think whether how they were going about things and whether they about to work, process-wise, in the most efficient manner?

 Any of you have any suggestions or comments along this line in terms of things to think about prior to "setting to work" in this fine-scale miniature and -model hobby?

8/29/2009

Commissioned Tzeentch Chaos Lord WIP #2

 Well, now that I've got some things squared away with the figure, I can post some pictures. The first thing (and main picture) is that I've got him stripped down to his bare minimum, more or less, and everything from here out will be building him back up - you know, kinda like Steve Austin?
Tzeentch Chaos Lord WIP #2

 There was an accident of sorts with this guy - I don't know how many people are necessarily familiar with the model (since looking for reference pics online, he doesn't seem to be all that "popular"). Essentially, he's attached to the tab at the bottom by his chain and a replica "spiked backpack skull top," meaning the only thing keeping him stuck in a slottabase and upright is about the width of the slottabase tab - not even, actually. In transit or movement or maybe just my absent-minded ignorance, he must've been getting bent back and forth to weaken the join with the tab, because when I went to "unglue" him from the base with some acetone he simply sheared off at the tab.

 I had a chance to talk with the customer about this and my potential plans as to how to resolve it (various methods of pinning, pretty much) and clarified some things so far as the conversion, so with the figure stripped down at this point, I'm basically good to go.

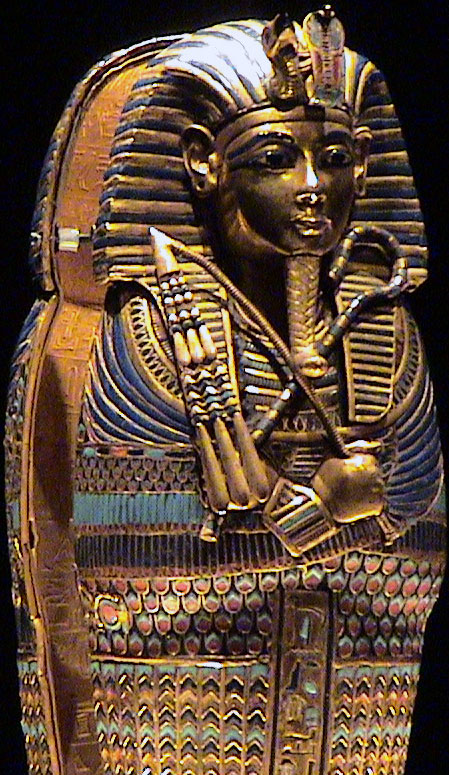
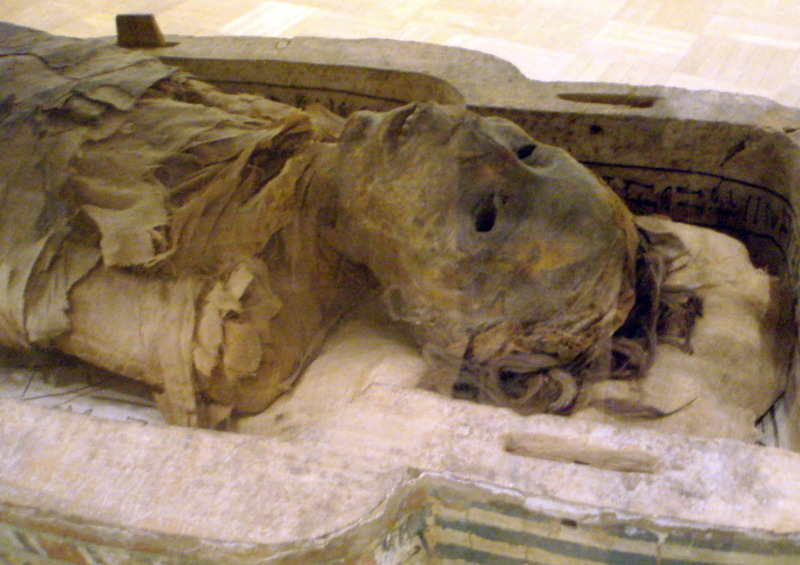
Oh, and the color scheme is more or less decided:
Tutankhamun_MainPicture.jpg
Tut_coffinette.jpg
falcon_03.jpg
800px-AncientEgyptianMummy-Antjau-CloseUp.png


 I'll post more later, but right now I'm headed up to the hospital ER with my wife to get a CAT scan of her gastrointestinal system - she's been getting violently ill any time she eats anything substantial. The kids are at my parents, the animals all have food and water, and I'm geared up for a lengthy wait...

 I've not been able to find any myself, but does anyone know of any examples of the Chaos Raptor Lord figure pinned to scenery or anything - something other than based with the chained skull, in other words?

8/25/2009

Hobby Tip - Basing

I like 'em cheap and easy! ... Figure bases, that is.

 Today's Hobby Tip focuses on basing. Whether it be for rank and file army models or for competition entries, such as Games Workshop's Golden Demons, the base is an integral part of the overall "atmosphere" of the figure; that said, despite being fairly important compositionally, that does not mean you need to spend large amounts of money to get reasonable-looking basing. Since getting into miniature painting again several years back, I suppose I've generally been of the opinion that unless I necessarily need to go out of my way for some fancy name-brand product or expensive, spectacular method that I absolutely have to use in order to get a certain appearance or end result, by and large I prefer to do it with cheap and readily-accessible "substitutes." Tools are one thing I don't skimp on: Kolinsky Red Sable paintbrushes, assorted stainless steel needle files in a number of shapes, assorted angles of side- and end-cutters (with some specifically set aside for rough work like sprue- and wire-clipping, and some for fine conversion), a variable-speed Dremel with a ton of attachments and bits, general workshop tools (band saw, router, jigsaw, scroll saw, pyrogravure, etc.), an overhead adjustable daylight painting lamp - I'm sure you get the picture.

Cheap Basing Materials
 I've pretty much used the same materials for basing since starting back in the hobby, and you can see them laid out in the background of the picture above: (from left to right) "ant dirt" and small rocks taken from outdoors, clean non-clumping clay kitty litter, wood glue (aka PVA glue), cornmeal, and bits of extruded polystyrene insulation foam left over from other projects. In the foreground, you can see an assortment of bases themselves - they all use the same materials, with the addition of a few "found objects" in the case of the Ork Nob's base, some shaped lengths of sprue and clipped paperclip segments on the Genestealer Patriarch base, tinted Future Floor Finish and clippings from a $0.99 wall edging brush on the base of the Privateer Press Deathripper, and on the bases of the Necron constructs, um... I guess the only inexpensive oddity there would be the 0.3mm music wire holding up the Scarabs (I've never liked clear plastic flying bases or the built-in risers for Scarabs, so I made my own variable-height ones).

 For clarification's sake, what I call "ant dirt" is the ultra-fine to small-grade grit that the ants living between the blocks of my driveway were nice enough to gather, process, sort, and collect for me every summer. Aside from picking out the occasional tiny piece of grass or plant material as I use it (personal preference there, I suppose), it goes straight from a backyard ant mound to the container, and then right to figure bases with a bit of glue. I find it's excellent for anything where I need extra-fine grit or minor texturing (and have gone so far as to "paint it" using thinned wood glue straight onto basing or even models, especially if I want a rusty or muddy texture). The overall mixture from the tub is great for mixing amongst larger pieces rubble or scree in order to fill in gaps, or even just applied to a base as-is to simulate uneven rocky/sandy ground cover.

 The cornmeal is pretty straightforwards: it comes in a large can from the grocery store, is pretty much a uniform grain size (slightly larger than the finer ant dirt), is already dried out so I needn't worry about mold growth, and is somewhat moisture absorbent so it dries nice and compactly on a base when spread over already-applied thinned wood glue. It also clumps naturally when wet, and so is good for effects like "built up" texture for footprints or wind-blown debris (basically, when mixed with a little thinned wood glue to thicken it up, I can apply it like a "paste" and push it around with an old brush. I use corn meal on the majority of my basing, by and large, just because it's so versatile; generally I apply it straight on with thinned wood glue.

 The clay kitty litter is good because it comes in a variety of "natural" fine-scale rock shapes, can easily be broken into smaller particles or filed down to weird angles for effect, and is probably the cheapest material in bulk out of the lot. Even a small bag of cat litter should last ages and ages. It makes for great fine-scale rubble, miscellaneous debris, rock piles, and even broken concrete depending on the shape and size of the pieces used.

 The wood glue in the picture has lasted me quite a while (yeah, it's Elmer's) and is slightly more durable, in my opinion, than regular household white PVA craft glue (probably Elmer's also) and a helluva lot cheaper than the repackaged stuff some companies sell at a profit for modeling (again, probably Elmer's as well). It comes in much larger containers than white PVA glue and (don't quote me) is cheaper because it isn't bleached/doesn't have the whitening agents added to household glue in order to make it "pretty." It dries clear and rock hard, and doesn't leave any more of a "footprint" than CA glue, even.

 Extruded polystyrene insulation foam (pink foam, blue foam, EPS foam) is fairly easy to come by in most areas that have warmer temperatures. You can buy it in bulk in large sheets from home improvement/DIY stores (mine was originally 4' by 8' but got broke in half over my knee when it became belligerent about fitting into the hatchback) and is more or less equal in hardness and consistency, regardless of color. (Pink = Home Depot, Blue = Lowe's Home Improvement, and a large 1" thick sheet that's cheap per square foot and can be squirreled away in the garage rafters until needing to get a chunk cut off for a project = pure win!) Yeah, you could go even cheaper and use the white polystyrene that comes boxed with new "toys" as a "shock absorber," but that stuff is a rougher texture, has a larger "grain," and just isn't as convenient to store as a large flat sheet. (Remember I said I generally go cheaper when possible but buy "quality" when I need to - this is one of those instances.) So far as uses: the small off cut chunks like what you see here make great rocky debris, especially with a little texture added. They're also good for use underneath other basing material, such as the "mound" on the base of the Genestealer Patriarch from my picture.

A few asides:
 I've personally never used static grass on any of my based miniatures (although I bought a small tub of it some months back when I finally found a brand and shade that didn't have any extra odd colors mixed throughout), but I think I still manage to get a reasonable variety of base appearances - that's why it's not on my short list here.

 So far as display/competition pieces go, I've generally used the same style and materials in basing those as I do for "less fancy" figures. I still like to make a good presentation and get across a certain "atmosphere," though, so by and large I've made small-scale "dioramas" with insets to match the basing of most of the models I've entered in painting competitions. My Golden Demon entry at the Games Workshop 2007 Chicago Games Day for example, Gandalf at the Bridge of Khazad-Dûm, was converted and reposed in attempted replica of the "challenging the Balrog" scene from "The Fellowship of the Ring" movie, with the figure atop a 15" long span made from pink insulation foam, Spackle, fine grit, and a reinforcing wood dowel.

 I'm sure I'll probably make a fancy multilevel display base at some point - I just haven't yet. The "fanciest" I've gotten so far has been a round 1 1/2" tall resin display plinth with a piece of trimmed-to-shape metal air duct sheeting flush with the top. It had the edges deburred and rounded down with a bastard file (I love that name!) so it can be used - even held upside down - with any of my figures where I've epoxy glued rare earth magnets underneath (so far pretty much all of them).


 Hopefully I've gotten across the idea that if you are so inclined you can have basing for your figures that looks good with a little creative use of inexpensive and readily-available materials. I'd appreciate any feedback or other comments on figure basing that people care to throw my way - what do the rest of you use?

8/23/2009

Selfish? Maybe, but I've never had a blog before...

This might be totally selfish, but I'm the only one doing the writing around here and I feel like asserting my self-promotional authority: Happy Birthday to me! Here's hoping this year will be better overall than last year.

In other news, conversion and prep work continues on the Thousand Sons Chaos Lord. I'll post pictures and discuss the overall "plan" a bit more after I've had a chance to kick some ideas around with the customer.

8/21/2009

Working on a Tzeentch Chaos Lord Commission

 I recently started working on a commission for a Tzeentch Chaos Lord figure for a Thousand Sons army, and figured since I haven't really posted much in the way of work-in-progress entries here on Painting by Tinweasel, I'd start things off on this guy with as bare-bones as it gets - more or less what the customer handed over after discussion of the "tentative" final version. No pre-cast resin bases (from a near-to-opening online business elsewhere), no dramatic poses (necessarily), and no diorama-style basing - just a suitable tabletop army leader painted (and converted, even, as things have worked out) to a display quality. I've also never had the opportunity to paint any of the old "official" Chaos Marine Legions, and the Thousand Sons definitely have character in abundance.

The rough design: essentially what the customer gave me at the start:

Tzeentch Chaos Lord WIP #1
 What the customer is looking for is a Tzeentch-allied Chaos Lord w/ wings and a Daemon Weapon to lead his pure 'Sons army. The swapped-out pieces are to represent his Daemon Weapon meshed with one arm and a mutated close combat weapon on the other - I'll be making some adjustments to both arms to tie things together, and my suggestions seem to have been well-received. We likewise both agreed that an improvement on the current standard Thousand Sons Rubric Marine head would be good, with the understanding that the whole figure still fits the Thousand Sons theme - we discussed options, and I've got the go-ahead to model something I have in mind that ought to fit the bill nicely. I also suggested that the current figure is apparently lacking some sort of ranged weapon in terms of "what you see is what you get" and that with some additional conversion and sculpting that would tie together with the current planned appearance, he could be plainly and obviously game legal while allowing me to do a little additional sculpting. Other than the agreed-upon requirements, the customer has more or less given me free rein otherwise, so I'm going to get creative with this guy (within reason, of course).

 The agreed-on color scheme should look like a darker version of the standard Games Workshop Thousand Sons Legion colors, while using analogous and complementary shades for the additional parts. I'd like to try some new effects with zenithal/ambient lighting, given the figure's posing, and am really looking forwards to the planned sculpting and additions to the base model. I've not had a chance to paint any Thousand Sons troops yet (nor Raptors, for that matter), but I'm really looking forwards to working on this. (Did I mention that other than the agreed-upon requirements, I've more or less got free rein from the customer to work on this guy with whatever comes to mind and fits with the overall theme? Yee-haw!)

8/18/2009

Hobby Tip - Making Raised Details

 One way to achieve fine, raised detail on a figure (short of natural sculpting talent) is to get creative with alternative materials. Sort of like what scrapbookers do with stamps, ink, and embossing powder, a similar, raised effect can fairly easily be accomplished with a fine-grain natural desiccant, such as talc, baby powder (same thing, only scented), or corn starch (same thing, only organic- and not mineral-based) - essentially you want something like these both for their moisture absorbing properties and their fine consistency.

 Using thinned-down PVA glue and a brush, you can essentially "paint" a design, shape, or pattern onto a miniature and then sprinkle on a small, precise amount of your talc over the wet lines or shapes. The moisture in the glue will be absorbed by the powder, which will "bloat" slightly over your added design - if you do this in small amounts or over small areas, you shouldn't have to worry too much about evaporation or your glue firming up before you've finished. When completely dry, your new raised detailing will be permanently set by the glue. I've been using this process in a modified manner for building up ground cover on scenery lately, the primary difference is that I've been using materials with a larger "grain" - you could apply multiple applications of this process if you want variable heights or a final result that is noticeably raised from its base surface, but an easier method might be to use something with a slightly larger "grain" for an underlying layer and then smooth out and blend in the outer surface with thinned PVA glue and a desiccant powder. Any leftover powder will easily clean up when you wash your figure before priming, and should be set firm enough to avoid being rubbed off by a gentle rubbing/scrubbing.

 The only reason I would recommend PVA glue (or thinned Future Floor Finish, alternatively) over something like CA glue is primarily the aspect of drying time - PVA glue sets much slower - but also the ability to accurately "paint on" the design you want added to a figure. Some CA glue bottle applicator tips are small, but don't have quite the level of accuracy (or ease of quick removal if you make a mistake) as a fine brush point. If you want something quick and easy, like lined scarring or patchy, leprous skin, and aren't so concerned about precision in the manner that a unit insignia would need, then CA glue ought to likewise work excellently.

8/13/2009

Hobby Tip - Cuticle Stones

 I would highly recommend the purchase of a readily available and fairly inexpensive product for use in prepping miniatures, bases, sculpting, resin, and other decorative bits with your figures - unorthodox as it might sound, a common (and I can't believe I'm linking to this sort of site for an example) cuticle stone. They're known by lots of names, and I'm sure you can readily find one at a local pharmacy, druggist, general goods store, manicurist's shop, or salon.

 Essentially, when wet, cuticle stones work like automotive grade wet-dry sandpaper in stick form - I'd wager 600+ grit, maybe more like 800. In other words, this isn't something you'd want to use as your primary tool for filing/sanding of miniatures or scenery materials, but it does a great job at smoothing rough edges, taking things down in tricky hard-to-reach areas, and burnishing. The cuticle stone I've got is shaped like the one I linked to on the beauty supplies website (above) - essentially like a squared-off bullet, with a rectangular body that curves on two faces to a somewhat rounded not-quite-30­° angle straight end. So far, I've used it to get a baby-smooth burnished finish on the skull helm of a former white metal Khorne Lord now-Undivided after Dremeling off his "antlers"; stripping the multiple mold lines off of my somewhat soft resin Forge World Renegade Psyker without leaving score marks like a metal file would; adding scoring, gouges, and scrapes to resin basing and chunks of broken resin "concrete" using the right-angles of the rectangular body; and general purpose (but not heavy-duty) filing and smoothing. The nice thing about my cuticle stone is that it's got rounded curves, a broad angle, and 90° corner sanding all in one package.

 I'd recommend picking one up to anyone, just to see how they handle - let me know what you think.

LinkWithin

Related Posts with Thumbnails

Followers: