3/17/2015

#hobbytiptuesday - Working with Epoxy Putty

 I had posted this picture on my Painting by Tinweasel Facebook page and a teaser that I would be putting up something about it for a hobby tip - didn't quite get to it then, so making up for lost time now.

 
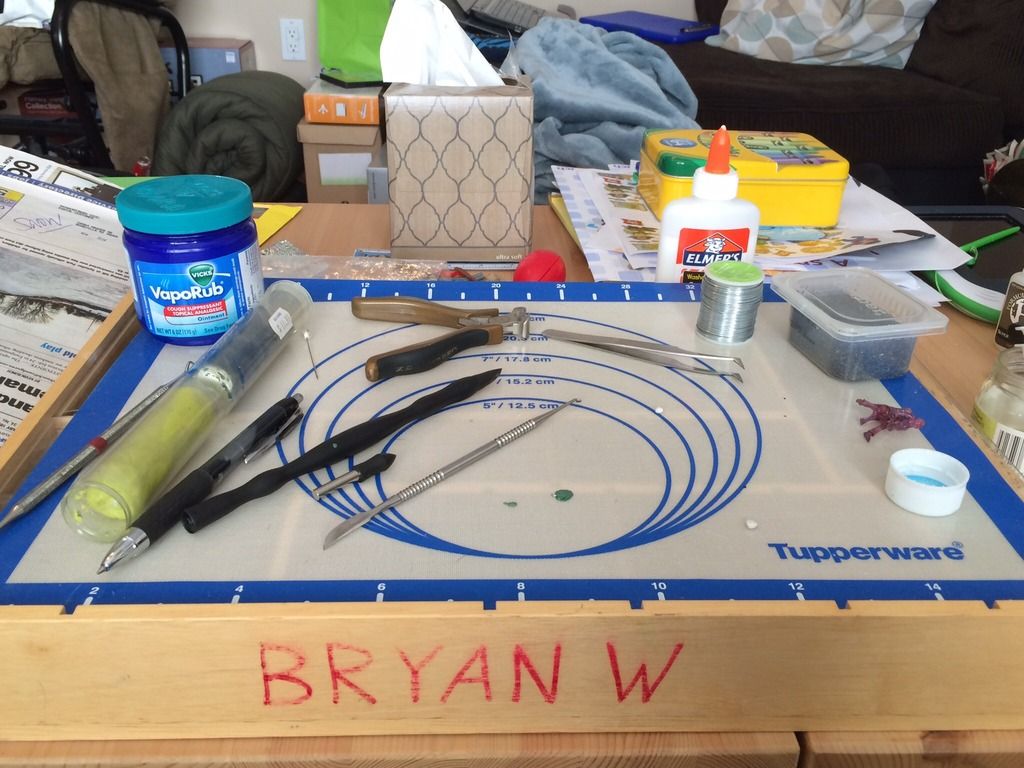
  So I've got a couple of things going on in this picture related to epoxy putty sculpting. The main one I want to mention is the Tupperware baking sheet to sculpt on - this thing is great! It's made of silicone and for me is essentially a flat non-stick sheet to work from when sculpting. It rolls up for convenience, is non-stick to two-part epoxy putty and similar materials and is easy to clean off. Much easier than working on a plastic bag or lubricated sheet of styrene. It's officially called the "Tupperware Silicone Wonder Mat" and can be bought online or retail for roughly $20-25 US. (A little pricey maybe, but the use I've gotten out of this thing and the messes avoided have made it worth it.)
 
 For another, I want to point out the Vicks VapoRub. Using this was a suggestion from Joe Orteza when I attended a sculpting seminar of his at GenCon 2014: use VapoRub instead of petroleum jelly to prevent epoxy medium from sticking to sculpting tools. Not only does it work just as well as petroleum jelly to prevent epoxy sculpting putty from sticking, it either gets absorbed or eventually evaporates from sculpting material, thus preventing lubricant causing problems when applying multiple layers of sculpting putty - it was an excellent suggestion by Joe that I've been using since!
 
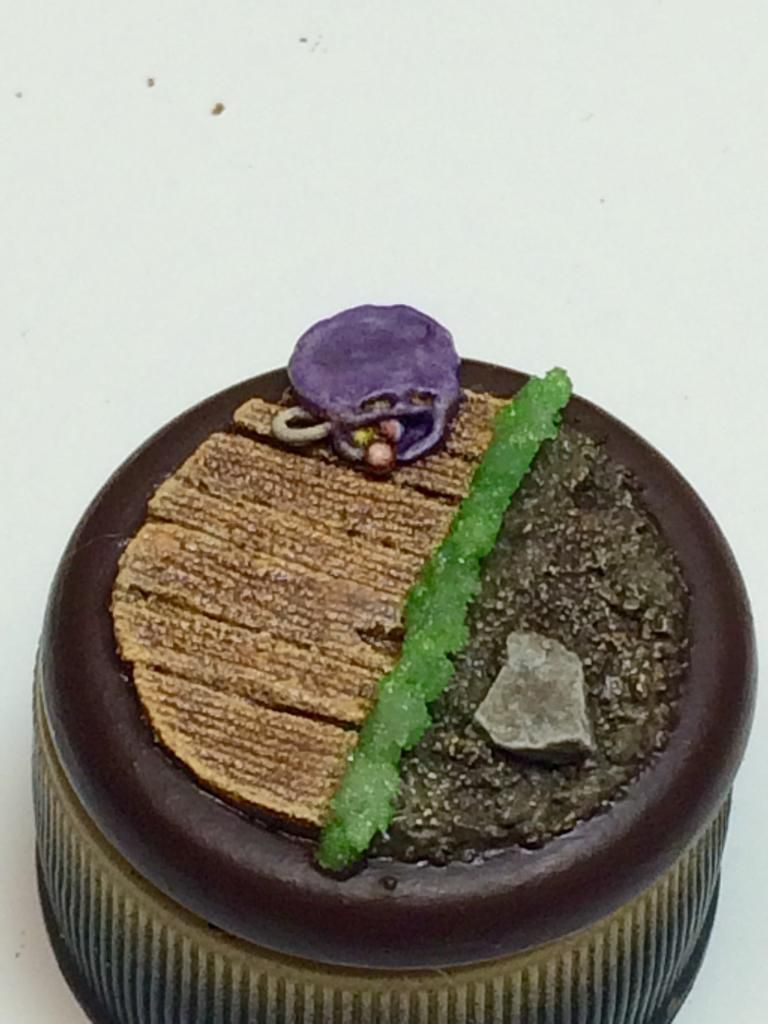
 Last, but not least, I wanted to show off a little! The green blob on the mat in the above picture is my first attempt at sculpting in a long, long time. I wanted to sculpt a marble bag for a figure's base with small plastic beads embedded in the epoxy putty for the marbles remaining in the bag. I'll have a bunch of loose ones scattered on the finished base when all's said and done. Here's how it turned out painted:


3/08/2015

Tutorial: A Cheap 'n' Easy Light Diffusion Box

 So it occurred to me that in all the time I've had my blog, I haven't made a post about the light diffusion box I use for taking photos of miniatures. While I've wanted to make a fancy upgraded version, or possibly even buy a "real" one, I can honestly say that I haven't really seen the need and any issues I've had with my cheap and easy home-made one have been easily rectified.

 So what is a light diffusion box, you ask? By way of a disclaimer, I am by no means an expert on the subject nor a professional photographer. That said, the idea of having a light diffusion box for taking photographs of objects inside it is that rather than directly lighting your miniature subject, thus causing glare or uneven lighting and shading in the final image, you illuminate your photo subject indirectly (via ambient lighting) which results in a much better final photograph.

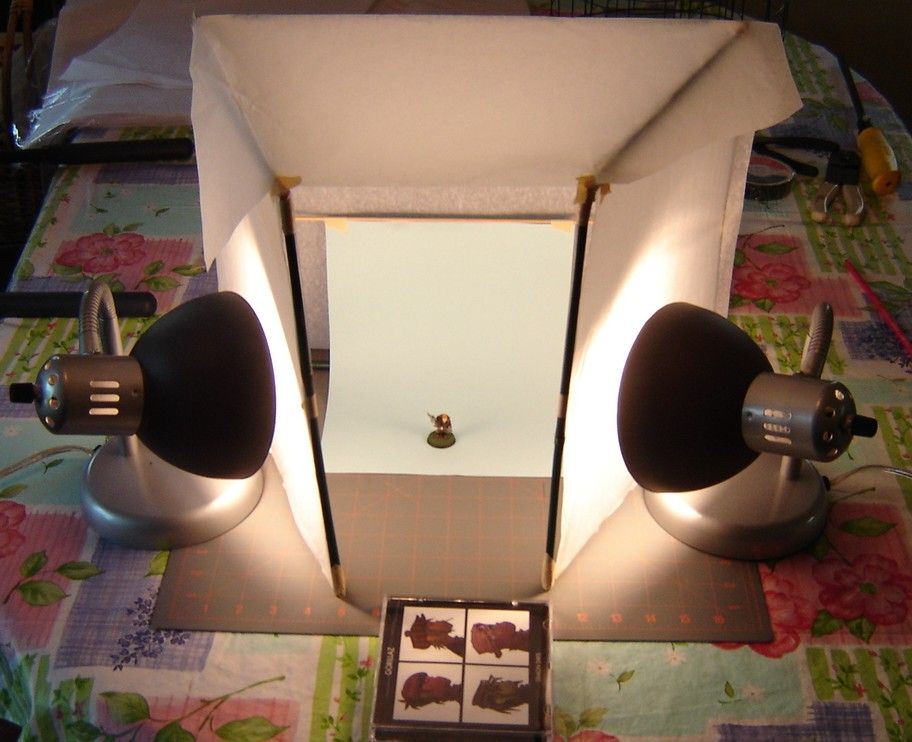
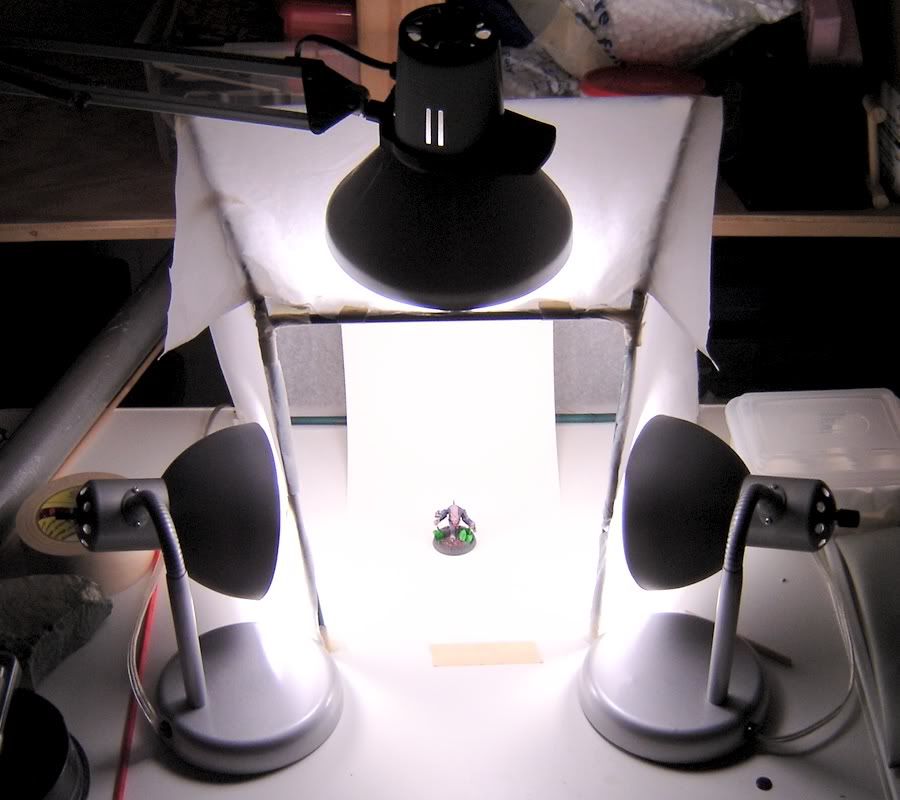
 Mine was really cheap and really easy to make. Not having any lengths regular wood to work with that wouldn't involve heavy cutting and making this a project that couldn't be finished in the space of one night, I went out to the garage and took a bag of thin, tall (3') bamboo stakes to which you can tie vines/tomato plants. I also had a thick roll of narrow (3/4" wide) masking tape and a pair of shears, too. And a hacksaw. Oh, and some large sheets of white translucent tissue paper for gift wrapping. All the materials together? Good to go!


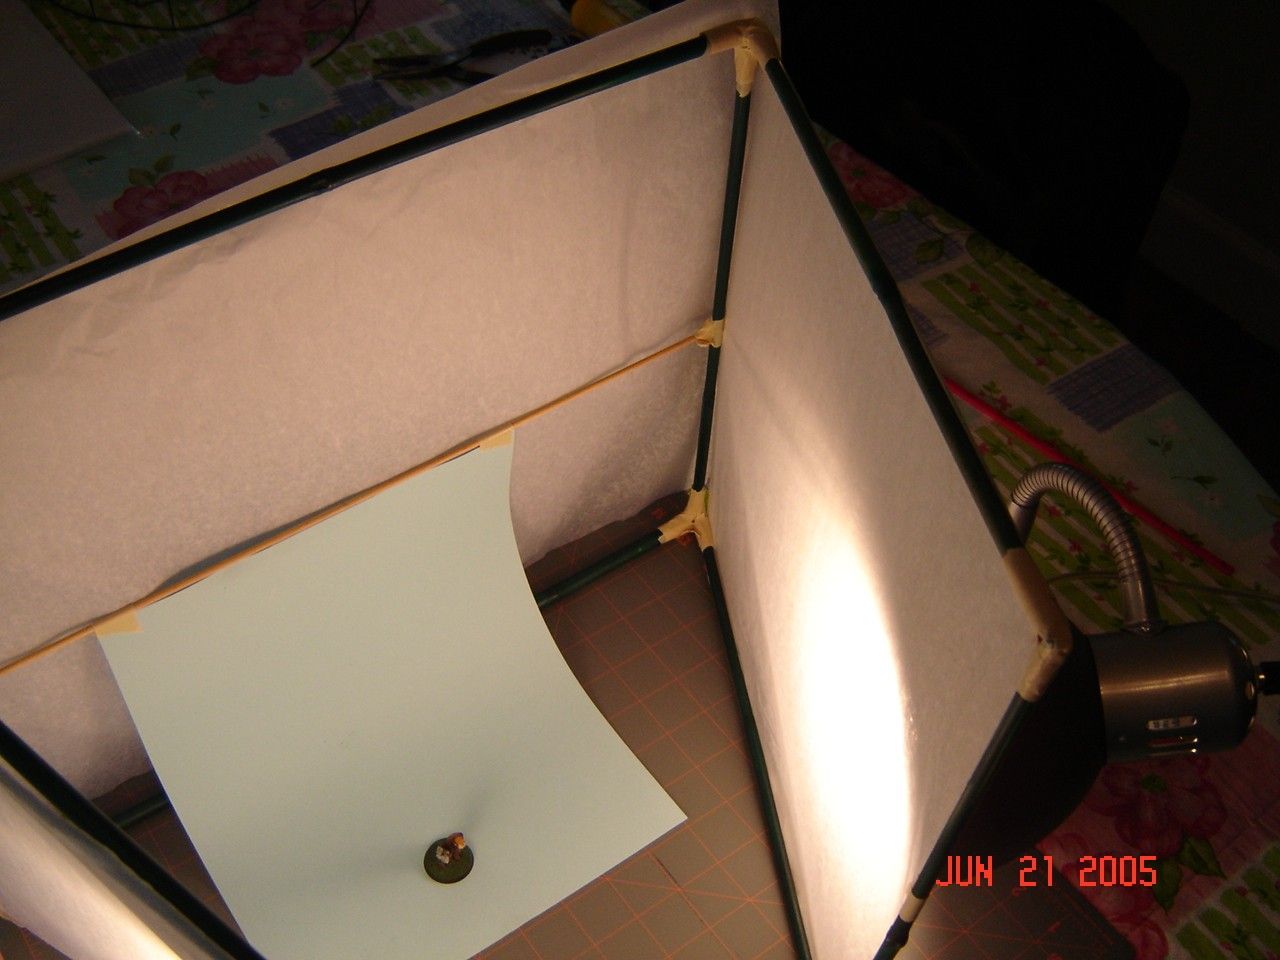
 To start, I decided on four uprights and 6 crossbeams. Choosing the straightest bamboo stakes out of the bag, I got enough straight pieces to cover the length of materials I needed. I cut them all down to size and then wrapped all the ends of the cut pieces with tape to keep the stakes from splitting.

 In order to join the lengths of bamboo together I put a piece of tape on each joint to hold the pieces at a right angle, then wrapped both lengths first diagonally across each 90 deg. corner and then with a band around each bamboo length just to each side of joint to flatten out the diagonally-wrapped tape. I made 3 rectangles of the same height - two to serve as side panels and one to serve as a backing.

 Compared to wrapping bamboo lengths with tape to fasten 'em together, taping the tissue wrapping paper sheets to the frame was much easier. I simply cut them to size and fastened them to each panel of the frame at regular intervals. I used a length of wooden dowel fastened across the backing frame because couldn't be bothered cutting another piece of bamboo stake down to size - this serves as something to hang photo backdrops from.


 From a technical standpoint, the paper-covered frame serves as a barrier between external light sources and the photographic subject, i.e., the miniature. The tissue paper, while translucent, is not sheer enough to allow all the light through thus acting as a diffusing filter. This light diffusion box allows light to pass through onto the subject but refracts the light, so rather than direct illumination of the miniature inside causing glare or reflections that would show up in the final photograph, instead you end up with muted, comfortable, and non-directional ambient lighting of the figure inside.
 
 Currently I'm using 3 lamps with 100-watt GE Reveal "daylight" bulbs for taking pictures (I stocked up on them before incandescent bulbs stopped being produced): one is a cheap swing-arm overhead lamp clamped to the table that the light diffusion box sits, and the other two are figure-level $6 desk lamps angled inwards. These three equally bright lamps diffusing from both the front sides as well as angled down toward the miniature from the top make for very even "ambient" lighting to get good photographs. The current setup allows me to swap out backdrops as needed, and the only real problem I've run into is with figures or displays too large to fit inside my light diffusion box - everything has been fixed with additional tape or replacements of new white tissue sheets cut to shape. My light diffusion box has been going strong for roughly 10 years as of this writeup.
 
 Lastly, here's a picture I took recently using the above lamp setup, the above light diffusion box, a neutral greyish randomly-patterned backdrop I printed from the Internet and a white sheet of paper in the opening of the box to further bounce light back toward the figure:


2/01/2015

How Do You Handle Painting Disaster?

 I've been working on a figure in the background here, both for myself and ideally for entry into a competition. I've kinda promised myself not to paint for competitions, or deadlines, or for other people since that's what lead to me getting anxious and burnt out and depressed about miniatures for a good while there - but since I was going to be working on some figures anyway and they fit the theme of the competition, I figgered 'what the heck?'

The long and the short of it is that I was making halfway decent progress, had a color scheme going that I liked, and had a reasonably decent face on the figure done... until I was tired and tried doing some touch-ups to bump up the highlights on the face, and that's when things got sloppy and it all went to crap. This isn't the first time something like this has cropped up and I lose motivation and get frustrated about painting.

 Since I have this medium to post to, I thought I'd see if I could solicit some opinions on how other people handle things when something goes wrong with painting a figure they're invested in. So, what do you do?

1/26/2015

A Tale of Malifaux Bloggers 2

For anyone who might be interested, there's a Malifaux blogging/painting motivational thing getting off the ground along the lines of the "Tale of X Painters" events from various sites.

I'm not personally going to be involved for a number of reasons (available time and non-compliance with the rules being two), but I figgered I'd put this out for anyone who's interested in Malifaux, has a blog of their own, and might want to get involved.

The organizing site/post is here: A Tale of Malifaux Bloggers 2
And on the Wyrd Forums here: http://wyrd-games.net/community/topic/105889-tale-of-malifaux-bloggers-2/

1/24/2015

First Two Daydreams - Final Pictures!

 Much like with the Malifaux Ice Golem, I got creative with Secret Weapon Miniatures' Crushed Glass Bundle with these Daydreams from The Dreamer's crew. I used a technique similar to building up the snow exploding out from underneath the Ice Golem's fist in order to build up what I'm intending to ideally look like a "barrier between worlds" - as if these guys are partly in the 19th Century real world and partly in Malifaux. I glued clear chunks of dried crushed glass/clear resin cut to shape as small upright pillars, and then filled in gaps and built up the shapes with additional coats of crushed glass/resin mixture. I went back with acetone over the "barrier" to melt it all back to translucency and applied a mixture of Yellow and Green Games Workshop Inks. To tone the saturation of the inks back a bit, I used a trick I read about elsewhere and brushed on household bleach along the top edges of the barrier to cut back the color a bit.
 
 The Daydreams themselves are the Black Friday sale release in translucent pink plastic, but at suggestion from my wife I went and washed them with SW Amethyst Wash and then a mixture of that wash and Vallejo Model Air Intermediate Blue directly painted into shade areas. I used leaf litter from Secret Weapon as well as Gale Force 9 static grass to round out a new "dirt" color recipe I tried.
 
 With these figures, I'm trying to tie most everything together color-wise: the wood planking is a new recipe, but it mixes in some of the steps from the dirt colors and is shaded with the same Amethyst as the figures themselves; the leaf litter, grass, and dirt are all washed with a GW brown wash color, same as one step in painting the wood planking. The only thing that doesn't tie in elsewhere is the green-yellow barrier, so as to stand out more.
 
 
Feedback and suggestions appreciated, as always!

1/20/2015

#hobbytiptuesday - Agitators!

 Thought I'd share this (again) because it's a practice I still follow, and I think it's been key in maintaining my paints over the years: using agitators in my paint bottles. Every paint bottle I own has an agitator in it, and here's why - over time paints separate, just like any other solid medium in a liquid suspension. The pigment and binder come out of solution from the carrier liquid - with metallics, this is even more pronounced as the aluminum (maybe mica) precipitating to the bottom due to weight.

 Every once in a while, it's a good idea to give your paints and inks a good shaking - not just prior to use. I have a 6mm glass bead in all my paint bottles, and adding this is still a ritual whenever I get a new color, same as "labeling" the bottle with some of the shaken paint afterwards. I've been a few times now to retail craft stores, usually with weekly coupon in hand, to pick up glass bead necklaces for a few dollars.

 Why an agitator, you may ask? Well, because it helps to more thoroughly mix the paint in the bottle, for one, without the need of toothpicks or brush ends or anything else that will take away from your supply of paint while mixing. For another, it acts as a force multiplier - you may be shaking the outside of the bottle and sloshing the paint around inside, which may be good enough; on the inside, you have a weighted object that's churning the paint back together at an even faster rate.

 What to use? Something with some weight to it, something that's inert, a and something that won't catch inside your paint bottle. This is why I use 6mm glass beads- they're small enough to fit down the necks of dropper paint bottles like those by Vallejo and Reaper, they've got some heft, they're made from inert material so as to not react with your paint itself (I've tried metal sprue and zinc-plated BB's and both of those turn ugly after a few years), and even better, you can get them in large numbers for cheap (did I mention craft store coupons for lengths of bead necklace?).

Oh, and a blog post from many years back, which still holds true:
Shaking Violently Being the Next Best Thing to Strangling

1/19/2015

Ice Golem - Final Pictures!

 The snow effect used on the base was achieved with Secret Weapon Miniatures crushed glass, presumably designed just for snow and ice effects - it's the Crushed Glass Bundle, which comes with "Realistic Water" resin to apply the loose crushed glass and seal it in place. I can actually sculpt it and layer it the same way I use my other basing materials. Great stuff!

I motivated myself toward getting final pictures of the finished Ice Golem:


 One thing I really liked when laying down the snow effect was that it was translucent - a first layer I mixed with white paint to represent solid snow; the second layer I left as-is for fresher snow. The best thing about it, I think, is the seepage of the Realistic Water around the edges, which makes it look like meltwater esp. on the edges on the base and the low mound on the paving. I used a less "wet" mixture for the outward-exploding snow (mostly cemented clumps of the previous white paint mixture), and just gave it a light coat of paint-free mixture to even things out.

 He's by no means showcase quality - I could've spent lots of hours on the ice crystal effect, say, and straight painted him entirely instead of using washes, but I was aiming ideally for speed. The most involved part was the highlighting and general tidying up. I really like how the eyes show up on the side-view pictures, since I used light flesh tone instead of white.

Comments and criticisms appreciated!

LinkWithin

Related Posts with Thumbnails

Followers: