
What do all these have in common?
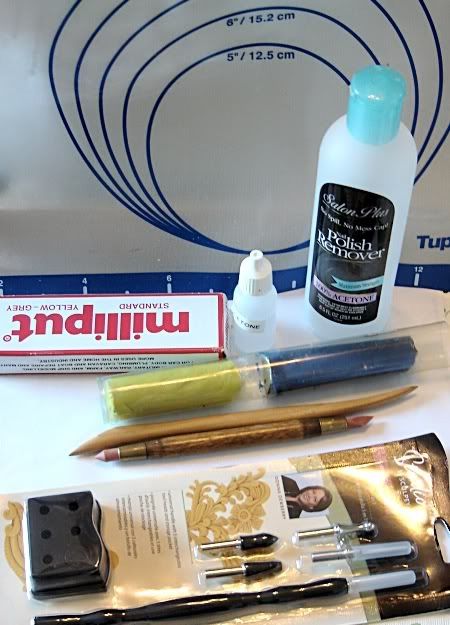
Well, they all have to do with my sculpting of Green Stuff - I'm not the most veteran of sculptors, and have never sculpted a full figure from scratch, but I've used it in smaller amounts on quite a few occasions from simple gap-filling all the way up to re-sculpts of joints and fill-ins of missing (or mutated) body parts. It's been suggested that when blogging, pictures say a lot more than simple text alone (Thanks, Ron!). The long and the short of it is that Green Stuff is the nickname for yellow-and-blue Kneadatite epoxy putty. The blue part is the hardener and the yellow part is the filler: more blue in the two-part mixture will make the putty cure faster and harder, whereas using more yellow will result in a softer mixture that takes details better but sets more slowly.
A wide range of tools can be used for sculpting and shaping Green Stuff: wax carving tools, dental tools, pins, hobby knives, and even custom-made molds. Personally, I alternate between using a wooden clay sculpting tool with a sharpened wedge-shaped end and an opposite rounded flat end - you can see it in the picture above. The excellent thing about wood is that it's great for burnishing, since it naturally has some "give" to it compared to a comparable metal sculpting tool, and if it comes right down to it you can reshape the tool itself if you need different angles or something (as I've done, myself, in increasing the sharpness of the point on the wedge-shaped end); the downside is that it doesn't sculpt as crisp an edge as a tool made from something more solid and is less suited for doing hard angles compared to the fairly popular dental tools that a number of sculptors would swear by.
Next to the wooden clay sculpting tool is possibly the next best thing to sliced bread, in my opinion, in terms of shaping Green Stuff: a roughly pencil-length "clay shaper." One tip is somewhat scalpel- or chisel-shaped and the other is round and comes to a point with a slope similar to a 45° angle sharpened pencil - the great thing about clay shapers, and they come in all different tip varieties, is that the rubber ends don't stick to Green Stuff like pretty much everything else does. The unopened package at the bottom of the picture is a 5-in-1 clay tool set produced by Studio by Sculpey that I picked up for cheap at JoAnn Etc. fairly recently, and it hopefully will live up to my expectations - it has similar rounded point and chisel-like tips in the set along the lines of my current clay shaper, but also has interchangeable blade, ball, and needle ends that can all be stored in the container when not in use.
In working with a roughly 50-50 mixture, you have to let it sit about 20-30 minutes to firm up a bit so it's not as sticky or soft. It's always going to have some tackiness to it, but this is a good thing as it allows you to actually put the stuff somewhere (if you're adding detail to an existing figure, say) and have it stay where you want it. Outside of the rubberized tips of clay shapers, Green Stuff sticks to mostly everything else - the way around this is to use moistened tools, whether that be from saliva, water, or more exotic substances. I generally use a thin layer of Vaseline on my wooden sculpting tool (or whatever else I might be using) in order to position the GS and give it a rough initial shape with gentle nudges. After another brief period of firming time, say, 20 more minutes or so, that's when I find I can go back and start to work on fine details as the GS has turned a bit more rubbery and actually holds molded shape without too much deformation elsewhere. In other words, I'd suggest starting with broad shapes and then work down to fine details over several breaks. An alternate method would simply be to block out rough areas with a certain amount of the stuff and once that's fully set, then use a thinner layer for surface details. My understanding of what many professional epoxy putty sculptors do when they're sculpting figures as a whole, for example, is to establish underlying muscle groups over an armature of some sort, apply the clothes in a second pass, apply smaller details in a 3rd pass, and so on.
Other tips:
- It speeds things up when working using multiple layers if you let Green Stuff set under a low-wattage lamp (say, a 40-watt bulb) rather than letting it air-cure, but the down side is that unless well-supported, the GS tends to sag with heat. The maximum working time for GS is roughly an hour to an hour and a half, depending on the temperature of the working environment. Experimenting with various ratios of yellow to blue is also useful, depending on how quickly you want it to set by itself or how malleable you want your sculpting material to be overall.
- Some people use plain ol' water as a lubricant for sculpting GS - it works great and prevents tools from sticking to the stuff, but unfortunately evaporates fairly quickly. Some use Vaseline to help with sculpting (myself included) - it prevents sticking, takes a long time to rub away to the point where you need to add more, and it easily allows for smooth, finger-burnished finishes on your GS sculpture without much work; the downside is that it leaves behind an oily residue which must be removed completely once the GS has cured otherwise you'll have difficulty in sculpting/painting/priming/etc. over the top of it. Nothing a little bit of dish soap, running water, and a little gentle scrubbing can't take care of, though - at worst, an overnight soak in Simple Green will take care of any leftover petroleum jelly on your sculpting when followed by a gentle scrub with a toothbrush. I'd imagine about halfway between the various properties of water and Vaseline would be saliva. A lot of folks use nothing but saliva to keep their sculpting equipment moistened so as not to stick - personal preference, really. Probably the oddest thing I've heard of to use in working with GS would be the use of a water-based "personal lubricant" like KY, Astroglide, or something similar - it's water based so there's no leftover residue (unlike Vaseline), it doesn't evaporate quickly (unlike water), and it's available in ready supply (unlike saliva, I guess)... I just can't see myself hitting up the condom 'n' lotion aisle of the grocery store for the sake of buying something to use in miniature sculpting, much less explaining it to my family - but to each their own.
- The cheapest and easiest way to sculpt with Green Stuff is to not use Green Stuff at all - no slight to Games Workshop (since they're the reason I'm back in this hobby), but their Green Stuff as sold in blister packs and consisting of two ribbons of yellow and blue stuck together is fairly expensive when compared to other options (and wasteful, considering the seam where the two colors meet is already set when you buy it off the shelf). Both Games Workshop and Reaper Miniatures both sell essentially repackaged and higher-priced versions of Kneadatite, as manufactured by Polymeric Systems, Inc. I bought the tube of Kneadatite Blue/Yellow Sculptors Epoxy Putty in the picture above for roughly $11 - holding about 2-3 times the amount of repackaged Green Stuff. (I'm to understand there's eBay stores selling Kneadatite for as little as $6 US or so, even, but I've had my tube for several years now and haven't needed to buy more.) One other good alternative to GS, as shown in my picture, is Milliput - it comes in several different grades of fineness (with White-White being the finest but most expensive) and has a longer set time compared to Green Stuff (roughly 4 hours), but is also able to be drilled, sanded, filed and sets fairly hard. A good workable plan when custom sculpting might be to use a different underlying material, like Milliput, Apoxie Sculpt, sprue, styrene, or even aluminum foil to bulk out a rough shape, and then go back and do detail work with Green Stuff after the fact.
- One of the best investments you could get if you're planning on sculpting with Green Stuff frequently is a non-stick flexible baking sheet (containing Teflon). I have one made by Tupperware that I use as a work surface when sculpting with Green Stuff - not only does GS not stick to it whatsoever, but it has metric and English measurements along the edges, can turn any relatively flat surface into a good place to sculpt, and conveniently rolls up compactly for easy storage. (I wouldn't recommend using it for baking after you start rolling around epoxy putty on it, though - I'm sure that can't be at all healthy. The one in the background of my pic above was co-opted upon discovery from our kitchen - with my wife's blessing, of course.)
- A small amount of kneaded Green Stuff mixed with decent amounts of pure acetone makes a slurry of paste-like consistency (hence the nail polish remover in the pic at the beginning of this blog entry). This concoction is perfect for spackling into gaps, brushing over unwanted crevices, or when thinned sufficiently can be "painted" over an existing surface to smooth it out. Once set, GS and acetone don't interact at all, but while still firming up they can be mixed together and used for all sorts of things that firmer molding-required GS can't be as easily - like radiation burns, the beginnings of corruption by Chaos, or minor mutation. A word of warning, though - acetone will begin to melt any plastic GW figures into a shapeless mass if spilled (hence the labeled Vallejo dropper bottle I use) and begin to deform surface details even in the amounts you'd use to make a GS paste.
- A few sheets of plasticard/sheet styrene coated with a fine layer of Vaseline make an excellent press for a blob of Green Stuff between them, if you have something hard to flatten them together against and you take pains to make sure that you're squashing the GS evenly flat. You can always carve squared-off sections of this flattened piece away for use as shoulder pad- or decorative armor trim - the set GS still remains somewhat flexible (depending on your mixing ratio) and can easily be set into position on your figures with CA glue.
Great post!
ReplyDeleteYou can also use ProCreate, which is availible through many fine distributors and retailers to the miniature industry.
ReplyDelete@ Tim - I do have an unopened package of ProCreate on my workbench, actually - I figured I'd use up my Kneadatite before I started with any fresh packages of anything. I bought it at one of our LGS' prior to them going under, and that's the only place I've ever seen it locally.
ReplyDeleteThe reason I omitted it wasn't out of any bias or anything, it's more a case of my wanting to point out that even if you use Green Stuff, you can get it in original packaging (as Kneadatite) from the actual manufacturer cheaper by bulk than buying it repackaged as GS. Likewise, there's stuff you can use that's cheaper in order to "build up a figure" and save the fine detail stuff like Green Stuff, ProCreate, etc. for the outwardmost sculpting. One thing I forgot to mention is that Green Stuff (and ProCreate) have the added benefit of minimally shrinking through the curing process as compared to most other brands of epoxy modeling compound (Milliput, ApoxieSculpt, etc.) and definitely moreso than Fimo, Sculpey, etc.
Very true, though, that ProCreate IS a cheaper alternative, is reputed to be easier to shape and model with, per quite a few reviews I've read about it, and can be found through the manufacturer if not elsewhere: http://www.kraftmark.biz
Maybe I wasn't clear enough on any of this, but that's what the Comments section for you guys (and me) is for, and the Edit Post button is for on my end. 8^)